 New Business Direction LLC
Accurate, thorough item records inform your customers and help you track inventory levels correctly.
Whether you’re selling one-of-a-kind items or stocking dozens of the same kinds of products, you need to create records for each. When it comes time to create invoices or sales receipts, your careful work defining each type of item will:
- Ensure that your customers receive correct descriptions and pricing,
- Provide the information you must know about your inventory levels, and,
- Help you make smart decisions about reordering.
You’ll start this process by making sure that your QuickBooks file is set up to track inventory. Open the Edit menu and select Preferences, then Items & Inventory. Click the Company Preferences tab and click in the box in front of Inventory and purchase orders are activated if there isn’t a check in the box already. Here, too, you can ask that QuickBooks warn you when there isn’t enough inventory to sell. Click OK when you’re finished.

Figure 1: You need to be sure that QuickBooks knows you’ll be tracking inventory before you start making sales.
To create your first item, open the Lists menu and select Item List. Click the down arrow next to Item in the lower left corner of the window that opens and select New. The New Item window opens.
Warning: You must be very precise when you’re creating item records in order to avoid confusing your customers and creating problems with your accounting down the road. Please call us if you want us to walk you through the first few items.
QuickBooks should display the list of options below TYPE. Since you’re going to be tracking inventory that you buy and sell, select Inventory Part. Enter a name and/or item number in the next field. This is not the text that will appear on transactions; it’s simply for you to be able to recognize each item in your own bookkeeping.
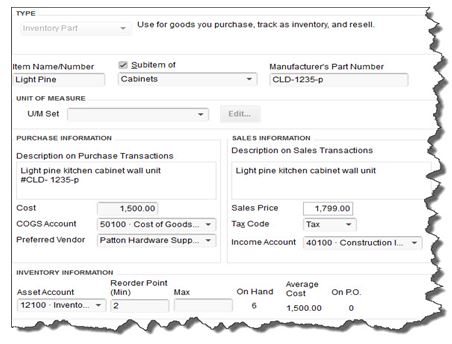
Figure 2: Let us work with you if you have any doubts about the data that needs to be entered in the New Item window. It must be 100 percent accurate.
In the example above, the box next to Subitem of has a check mark in it because “Light Pine” is only one of the cabinet types you sell (you can check this box and select <Add New> if you want to create a new “parent” item on the fly). Leave the next field blank if your item doesn’t have a Part Number, and disregard UNIT OF MEASURE unless you’re using QuickBooks Premier or above.
Fill in the PURCHASE INFORMATION and SALES INFORMATION fields (or select from the lists of options). Keep in mind that the descriptive text you enter here will appear on transaction forms, though customers will never see what you’ve actually paid for items, of course (your Cost, as opposed to the Sales Price).
QuickBooks should have automatically selected the COGS Account (Cost of Goods Sold), but you’ll need to specify an Income Account. Please ask us if you’re not sure, as this is a critical designation. The Preferred Vendor and Tax Code fields will display lists if you’ve already set these up.
QuickBooks should have pre-selected your Asset Account. If you want to be alerted when your inventory level for this item has fallen to a specific number (Min) so you can reorder up to the point you specify in the Max field, enter those numbers there (the Inventory to Reorder option must be turned on in Edit | Preferences | Reminders).
If you already have this item in stock, enter the number under On Hand. QuickBooks will automatically calculate Average Cost and On P.O. (Purchase Order).
Click OK when you’ve completed all of the fields. This item will now appear in your Item List, and will be available to use in transactions. When you want to create, edit, delete, etc. any of your items, simply open the same menu you opened in the first step here (Lists | Item List | Item).

Figure 3: The Item menu, found in the lower left corner of the Item List.
Precisely created Inventory Part records are critical to accurate sales and purchase transactions. So use exceptional care in building them.
Our last two newsletters focused on what was new in QuickBooks Pro and Premier for 2015; first for Accountants and then for Clients. If you missed them, they are posted on our blog.
In the next two issues, we will cover what’s new in Intuit’s more robust software – Enterprise – in the recently released 2015 version.
![]() In my opinion, the most significant changes to Enterprise are in the Preferences that control what users can and cannot do within their company files.
In my opinion, the most significant changes to Enterprise are in the Preferences that control what users can and cannot do within their company files.
Disallow Negative Inventory
In the past, QuickBooks© has allowed you to sell products that you do not  have in stock – at least not according to QuickBooks. There was a preference that if set, would warn you that you were selling something that was not in stock, but it would not prevent you from doing so.
This caused all sorts of problems – having negative quantities on hand threw off the Cost of Goods calculations, caused errors in reporting and in some cases lead to recurring data damage.
In the 2015 release, we now have an option in the Items and Inventory Preference that says “Don’t Allow Negative Quantity”. Selecting this option will prevent you from processing a transaction that causes negative inventory.
It only works to block transactions from going negative if they have a balance of zero or greater. If the quantity is already negative, it does not prevent it from becoming further negative.
This only works with Quantity on Hand. If you select the Preference to Disallow Negative Inventory, you will no longer be warned that a Sales Order or Inventory Assembly creates a negative Quantity Available.
If you decide to use this Preference, take the time to review the new report called Negative Item Listing under Reports – Inventory and correct ALL negative inventory quantities before enabling this Preference.
Disallow Sales to Overdue Customers

You will want to make sure that your Customer Terms as they relate to Due Dates and exactly what constitutes Overdue, are set up properly before selecting this option. There is no Admin user override and this is not a User or Role specific preference so it could become quite restrictive if not set up properly.
Hide Opening Balance Fields
The leading cause of postings to the Opening Balance Equity account is entering the Opening Value when setting up Customers, Vendors, Assets or Inventory accounts and items.
In 2015, we have the option to hide opening balance fields in Names and Items. It’s under the Accounting Preference tab. The field will be visible, but grayed out.
I only wish that Intuit had made the default preference to Hide this field; it would save us countless hours of reversing duplicate transactions.
These are only a few of the changes to Enterprise for 2015. Stay tuned for our next article and we will cover more of what you can expect to see for improvements.
Part 1 of our What’s New in Enterprise for 2015 focused on the changes to the Preferences. This issue will cover some of the other changes that were made to enhance this more powerful and robust version of QuickBooks.
Total Columns on Forms
In addition to being able to total the dollar amounts on transaction forms, we can now total Quantity and Custom Fields such as weights and counts specific to our industry.
This is available on Invoices, Sales Receipts, Sales Orders, Purchase Orders, Checks, Bills and Credit Card Charges. The Custom Field must be a numeric field and not text.
A section has been added to the Subtotal Item to allow you to edit and select which columns to total on forms.
This feature does not work well with Units of Measure. There is no way for the program to understand 2 each or 2 dozen and make the proper calculation. It’s also a little tricky for Group Items but it can be configured to work for this type of item.
Sort on Columns in Transactions
We now have the ability to sort columns on our transaction forms. This is available in Estimates, Sales Orders, Invoices, Assemblies, Checks, Credit Card Charges, Bills, Item Receipts, Credit Memos, Sales Receipts, Weekly Timesheets and Purchase Orders.
It behaves property with Subtotal Items by sorting those items above the Subtotal separately from the items below the subtotal. It does not do as well with Group Items.
Other than making the forms look neater, I don’t really understand it’s purpose here.
Search Within Transactions
This feature I like for when I am trying to find that needle in a haystack, like on lengthy purchase orders when I can’t remember if I added something to my order and I want to go back and look for it.
 It’s located on a separate tab in the transaction menu ribbon. Just type in the box and it will search the displayed transaction for matches to your inquiry. It looks at the Item Code and the Description only – not custom fields.
Shaded Lines on Forms and Reports
For me, this makes my forms and reports easier to read by alternating shaded lines. This option is available in the print window and is stored in the local printer preferences; it is saved per form and per user.
The option is available on Estimates, Sales Orders, Pick Ticket lists, Packing Slips, Invoices, Purchase Orders, Bills, Item Receipts, Sales Receipts, building Assemblies, the physical inventory worksheet and item price lists.
Show Cost on Sales Forms
This field is available for Sales/Work Orders, Invoices and Sales Receipts. It is only a screen option and will not print on the forms themselves. It allows you to see your cost as your making a sale and with the new Subtotal feature, you can compare your total cost to your total sale.
Keep in mind that this is Cost, not Average Cost. I can imagine that this would be useful in calculating customer discounts or mark-downs at the time of a sale to make sure that you’re not selling below cost.
Print Footer on Last Page Only
I’ve been waiting for this one, unfortunately it’s only in Enterprise 2015 and not Pro and Premier 2015. The option is located in the additional customization settings of the form template on the last tab – Print – Only Show Total on the Last Page.
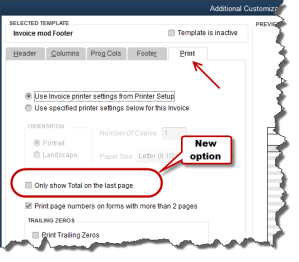 This avoids having that blank Total Box show on the first page of an invoice with multiple pages. It suppresses the entire footer with the exception of custom text boxes and page numbers.
It affects Invoices, Sales Orders, Estimates and Purchase Orders. For some unknown reason it is not currently available on Credit Memos or Sales Receipts. Maybe they will add that later.
There are quite a few more changes in Enterprise 2015 – too lengthy to cover in this article – and I am sure that there will be more to follow. At the time of this writing, rumor has it that there will be a big announcement regarding the Enterprise platform at the QB Connect conference in San Jose next week – I’ll let you know what I find out.


QuickBooks 2015 Desktop has just been released and there are several new features and improvements to old ones that you will want to take a look at to see if it has something worth upgrading for.
Insights Dashboard – Insights is similar to the old Company Snapshot, which is still available. It’s a dashboard view of your financial position with a more up-to-date user interface. You can find it as a tab on the Home Page and configure the view using the gear icon in the upper right-hand corner of the screen. It’s customizable – you can add your logo, decide what you want to see and print the details of the entire screen. You can also click on the graphs to see a report with the supporting details.
Time and Expense on the Income Tracker – You can now view Unbilled Hours for Work in Progress by Dollars and sort the on-screen information in the Income Tracker. If you’re not familiar with the Income Tracker, that was a new feature in QuickBooks 2014.

 Improved Reporting – This is great for those of us who are now having a difficult time with seeing our monitors without magnifiers. The on-screen reports have a more modern design with background shading, vertical and horizontal lines, increased line spacing, row alignment and indentation.
Field Search Boxes – Finally! When customizing reports we can now search for the columns we want to add to our reports from the filter list that is now in alphabetical order and searchable, instead of scrolling up and down looking for a needle in a haystack.
Comments on Reports – In QuickBooks 2015, you will be able to add comments to reports, snapshot save them as Commented Reports and email them with the comments attached. The comments are numbered sequentially and will print as a separate page. Please keep in mind that emailing sensitive information is not secure.

Multiple Reports in Single Email – instead of sending one email per report or creating PDF’s of multiple reports, storing them in a folder and then emailing them, you can now process and email multiple memorized or commented reports from the multiple reports menu. Again, emailing is not the preferred method of sending sensitive financial information as it is not secure. We recommend using a secure portal for transmitting data.
Manufacturer’s Part Numbers – in QuickBooks 2015, we can add the Manufacturer’s Part Number to our forms without using up a valuable custom field. This is available on Invoices, Sales Receipts and Sales Orders, but not Credit Memos. Be careful, this is an editable field and can be copied back to your Item List.
Pin Notes – the Notes section of Customers and Vendors has been re-designed and we can now pin important notes to the top of the view screen so that it always shows and is the default note on reports.

Reminders Dashboard – The Reminders now show up as a dashboard with To Do Notes. It’s easier to understand and work with than previous versions.
Terminate QB on Workstation – This new feature is dangerous at best. In a multi-user QuickBooks file, the Administrator can now switch to single-user mode without the permission of the other users who may be logged in. It closes even if the other users have unsaved data. I am recommending that all Admins forget that I told you about this feature.
Invoice for Selected Items on Sales Orders – We can now select which items we want to Invoice from a Sales Order.
Unless you see something in these changes that has been an issue for you, there is no real reason to upgrade. If Intuit stays true to form, the 2012 version of QuickBooks will be sunsetted in May of 2015 at which time those users will be required to update if they wish to continue using online banking, payroll and email features from within the program.
New Business Directions offers QuickBooks consulting, outsourced accounting, business and CFO services to small and mid-sized organizations. If we can help you in anyway, please contact us.
Getting QuickBooks ready to process payroll is a complex, time- consuming process. Here’s what you can expect.
Payday. You look forward to it when you’re young and working at your first part-time job.
But as a grown-up who needs to start processing payroll for your employees, you probably anticipate it in a different way, perhaps even with a sense of dread. QuickBooks handles the real grunt work once you’ve done the initial setup, but those early hours you spend preparing to print your first paycheck can be challenging.
Fortunately, QuickBooks’ payroll setup tool can guide you through the process. Once you’ve signed up for payroll, open the Employees menu and select Payroll Setup.

Figure 1: The QuickBooks Payroll Setup tool tells you’ll what information you need to supply in order to start paying employees.
Easy Operations
The first screen you’ll see in this step-by-step, wizard-like setup guide contains a link to QuickBooks’ payroll setup checklist. You don’t have to assemble all of the information you’ll need about your company, your employees, and your payroll taxes, but we recommend that you gather as much as you can before you start.
You’ll advance through setup by completing the information requested and then clicking the Continue button in the lower right (or, sometimes, Next; there’s also a Previous button available often). If you don’t have a particular detail immediately at hand, you can continue on and come back later. You’ll be able to edit your work then.
To back out of the whole process and return at another time, click the Finish Later button in the lower left.
Building a Framework
QuickBooks first wants to know about the various types of compensation and employee benefits your company offers. To start adding your Compensation options, click Add New. Click in the box in front of any pay types you support (Salary, Hourly wage and overtime, Commission, etc.) to create a check mark. When you click Next, this window opens:

Figure 2: It’s easy to indicate the types of compensation your company offers.
Keep clicking Next after you’ve completed each screen until you come to a page that lists all of the compensation types you’ve defined. To make any changes, highlight the type and click Edit to modify or Delete to remove. Then click Continue when you’re finished.
The next section is probably the most difficult: Employee Benefits. Here, using similar interface conventions to enter information and navigate, you’ll provide information about your company’s:
- Insurance benefits
- Retirement benefits
- Paid time off, and
- Miscellaneous items (cash advance, wage garnishment, mileage reimbursement, etc.).
It’s absolutely critical that you set these up accurately, or you’ll have unhappy benefits providers – and employees. If you’re not absolutely confident of an answer, it’s better to leave an item unfinished and come back later. You may want to ask us to work with you as you complete this section.
People and Taxes
QuickBooks will then ask you about your employees. Have your W-4 forms handy for this section, as you’ll need to know Social Security numbers, birth dates, etc.

Figure 3: On this screen, you’ll tell QuickBooks what type(s) of compensation and their dollar amounts apply to the employee.
All of those details you entered earlier about company benefits comes into play here. Once you’ve defined an employee’s compensation types and amounts, the next screen will display the additions and deductions that your company supports. You will have set up defaults for some of these, but you can modify them for individual employees.
There are numerous other details that you’ll have to supply for your staff, like how vacation and sick hours accrue, what state will want to collect taxes from them, and what their filing status is.
Unless you’ve worked with payroll before, you’re going to want our help in completing the payroll tax section. Once it’s done correctly, QuickBooks will calculate taxes due and help you pay them.
Finally, QuickBooks helps you determine whether you’ll need to enter any previous payroll data from the current year before you start to process your payroll in the software.
Whether you’re switching from manual payroll or a payroll service, or simply getting ready to pay your first employee, QuickBooks payroll-processing tools can help you save time and foster accuracy – as long as you get the details from the start.
The Income Tracker is one of QuickBooks’ more innovative features. If you’re not using it, you should be.
One of the reasons that QuickBooks appeals to millions of small businesses is because it offers multiple ways to complete the same tasks, which accommodates different work styles. Say, for example, you wanted to look up a specific invoice. You could:
- Go to the Customer Center and select the customer, and then scan through the list of transactions,
- Use the Find feature (Edit | Find), or
- Create a report.
There’s also another way you can get there if you have a recent version of QuickBooks: the Income Tracker. (Note: Only the Administrator or a staff member with the correct permissions can access this feature. Talk to us about whether to allow other employees to use it, and how to set that up.)
 |
| Figure 1: QuickBooks’ Income Tracker provides a visual overview of your company’s income. |
That’s the first thing you can do with QuickBooks’ Income Tracker. To get there, either click the link in the vertical navigation bar or go to Customers | Income Tracker.
Four colored bars across the top of the screen represent unbilled estimates, open invoices, overdue invoices, and invoices paid within the last 30 days. Each bar contains two numerical values: the number of transactions of that type and the dollar amount involved.
QuickBooks defaults to displaying all types of transactions, but when you click on a bar, the screen changes to show only that type of transaction.
You can also filter the table of transactions using the drop-down lists below the colored bars. Your choices here include Customer:Job, Type, Status (Open, Paid, etc.) and Date (range). Click the arrow to the right of each filter’s label to display your options.
The column labels below these lists will change depending on the transaction type that’s active.
|
More Functionality |
||
|
The Income Tracker is great for simply viewing groups of transactions; double-clicking on one will open the original form. You can also open them by selecting an action to take. For example, open your estimates list and click on a transaction to highlight it. Then click the arrow next to Select in the Action column at the far right end of the row.
If you choose the first option here, QuickBooks opens a small window that asks you whether you’d like to create an invoice for 100 percent of the estimate, a percentage of it, specific items, or percentages of each item. When you make your selection and click OK, a completed invoice form opens, which you can then check over and save.
As you can see above, you can also mark the estimate as inactive, print it, or email it.
Each transaction type supports a different set of actions. In the open invoice action column, as you’d expect, you can click the option to Receive Payment, which opens the Customer Payment window with the customer and amount due already filled in. This can be edited to reflect a different amount, or you can just accept it as is, then save it. |

|
Flexible Forms
|
||
|
You can even create a new transaction within the Income Tracker. Click on the arrow next to Manage Transactions in the lower left corner of the screen and select the form you want.
The Income Tracker also provides one of the fastest ways to print multiple forms. Just select the transactions you want to print by clicking in the box in front of them, and then click the arrow next to Batch Actions in the lower left corner.
Finally, you can edit transactions from here, too. Either double-click on one or select it and click Edit Highlighted Row in the Manage Transactions menu.
QuickBooks’ Income Tracker doesn’t do anything that can’t be done another way in the program. But it provides an excellent one-glance view of the current state of your receivables movement.
If you’re consistently seeing patterns that you don’t like, call us. We can evaluate your receivables process and suggest ways to accelerate it. Even if your sales aren’t increasing, getting that “PAID” stamp on invoices quickly will improve your cash flow and strengthen your confidence as a business manager. |

Increasing your income is good. But even if you can’t, you can still take steps to collect the money you’re already owed faster. Here are five ways. 
If you asked five small business owners to name the top three roadblocks they face in their quest for ongoing profitability, it’s likely that all five would point to slow payments.
It’s everyone’s problem. Accounts receivable requires constant monitoring. As satisfying as it can be to dispatch a group of invoices, you know that it’s going to take some work to bring in payment for at least some of them.
By using QuickBooks’ tools and complying with accounting best practices, you’ll be more confident during the invoicing stage that what you’re owed will actually be in your bank account in a reasonable amount of time. Here are five things that we suggest.
Let Customers Pay Invoices Electronically

A few years ago, this was a good idea. In 2014, when people have stopped carrying checkbooks and are accustomed to using their mobile devices to pay for merchandise, it’s become almost required. Whether or not you know it, you’re probably losing some business if you don’t have a merchant account that supports credit and debit card payments, and possibly e-checks.
If you have an online storefront, you’ve undoubtedly been accepting plastic for a long time now. Not many shoppers want to place an order on a website and hunt for envelopes and stamps and blank checks to complete it. If you invoice customers, it’s just as critical that you allow them to remit payment as soon as possible.
Not set up with a merchant account yet? We can help you get started with the Intuit Payment Network.
Keep a Close Watch on your A/R Reports
Part of being proactive with your accounts receivable is being vigilant and informed. Create and customize A/R reports regularly. When you customize your A/R Aging Detail report, for example, in addition to the other columns that you include, be sure that Terms, Due Date, Bill Date, Aging and Open Balance are turned on (click Customize Report | Display and click in front of each column label).
You should also be looking at Open Invoices and Collections Report frequently, or assigning someone else to monitor them closely. We can help here by creating more complex financial reports periodically, like Statement of Cash Flows.
Send Statements

Invoices are generally the preferred way to bill your customers, but you should consider sending statements when customers have outstanding balances past a certain date. QuickBooks sometimes calls these reminder statements. You’re not providing the recipients with any new information; you’re simply sending a kind of report that lists all invoices sent, credit memos and payment received.
To generate statements, click Customers | Create Statements. You’ll see the window pictured above. You can send statements to everyone, a defined group or one customer, and you can define the past-due status that you want to target in addition to other options.
Send Accurate Invoices the First Time
Few things will slow down your accounts receivable more than incorrect invoices. The customer can wait until payment is almost due to dispute the charges, which means that they’ll probably get another 15 or 30 days (or whatever their terms are) to pay the amended bill.
So whoever is responsible for creating invoices needs to be checking and re-checking them. If it’s logistically possible, and depending on your workflow, have them verified by a second employee.
Offer Discounts for Early Payment and Assess Finance Charges
Offering discounts is a balancing act. You’ll be getting less money for your sale – even 5 percent multiplied by many customers can add up – but it may make sense financially for you to take a small hit in return for being able to deposit the payment sooner. We can help you do the math here.
To offer this, you’ll have to set up your discount scenario as a Term option (Lists | Customer & Vendor Profile Lists | Terms List), as seen here:

To make a customer eligible for the discount, open the Customer Center and double-click on a customer, then on Payment Settings| Payment Terms.
You might also want to be assessing finance charges. The revenue you bring in from finance charges will probably be negligible. But sometimes, just knowing that a late payment will be more costly may prompt your customers to settle up in a timely fashion.
Whatever approaches you choose to accelerate your receivables, be consistent. If any of your customers should compare notes, you want to be regarded as being firm but fair.
You may not have even completed your 2013 taxes yet. But now is an ideal time to start getting ready for your 2014 returns.
We know that you’re in some stage of preparation for your 2013 income taxes. It may seem odd to start thinking about 2014 taxes just now, but actually, this is the ideal time to start planning and making business decisions with their tax implications always in the back of your mind.
As you look at the data that will be entered in your 2013 tax forms, you’re likely to come across some expenses that you might have handled differently, or some income that should have been deferred. If you begin your planning process for 2014 while 2013 is still in the works, you can start making smarter, more tax-advantageous business decisions now, instead of late in the year when everyone is rushing to take actions necessary to lower their tax obligation.
Here’s how QuickBooks can help you with this new approach.
Overhaul your Chart of Accounts
The mechanics of doing this in QuickBooks are fairly uncomplicated, but changing this critical list – the backbone of your company file – requires solid knowledge of which accounts should be added, deleted or changed. You also need to know which accounts and subaccounts will have impact on your income taxes. They must be structured accordingly.

Figure 1: QuickBooks’ default Chart of Accounts can be easily modified to meet your company’s unique needs. But let us help you with this task.
For these reasons, we ask that you consult with us if you think your Chart of Accounts could use an overhaul. Our early involvement will be much more economical for you than if we have to come in down the road when your accounts have become dangerously tangled.
Devise an Effective System for Estimated Taxes
As you well know, there’s no magical formula for estimating how much income tax you’ll owe when all of your income and expenses have been tallied. We can make this an ongoing task by creating monthly or quarterly financial reports for your business and working from those.
If you’re self-employed, you might want to open a low-fee checking account that will serve solely as your tax fund. Because you have no employer to pay a portion of your Social Security and Medicare obligations, it’s critical that you’re putting enough away. Consider putting one-third of your taxable income into that account and see how it goes. You may get a pleasant surprise at tax prep time, or you may have to dip into other savings to be compliant.

Figure 2: You may want to set up a separate bank account to park estimated tax funds, so you know they’re committed. Ask us about numbering new accounts.
You can submit federal payments online on the Electronic Federal Tax Payment System site. Check with us to see if your state has an electronic system. Of course, the IRS will accept a check.
Run Reports on Everything. And Keep Running Them.
We already mentioned that we’re happy to create and analyze your most critical financial reports on a regular basis. You may have tried to understand the Trial Balance, Statement of Cash Flows, etc. in QuickBooks and been puzzled. Don’t feel incompetent because of that: It often takes an accountant-level individual to understand what they mean for your business.
You can define and build your own reports using QuickBooks’ customization tools. If you have employees who travel, consider bringing in an automated expense report application (we can help you find one and implement it). Stress the importance of adhering to IRS rules about travel. Same goes for your local salesforce, off-site technicians and other service providers, etc.

For employees who come into the office every day or are telecommuting, you can give them some ownership of their contribution to expenses by bringing them into the budget process and/or requesting that they submit their own monthly mini-reports on any company funds they spend. The more employees are aware of and accountable for expenses, the easier it will be for you to work toward minimizing your tax obligation. And having some information about the considerable sum you pay in taxes may help staff understand your tightening of the purse strings.
Consider Retraining Bookkeeping Staff if Necessary
You may be paying a portion of your taxes unnecessarily, simply because your company’s bookkeeping is less-than-precise. Nip that in the bud.
The more you manage your reporting, stay aware of the consequences of every expenditure and bring employees into the process, the more prepared you’ll be for 2014 taxes.
QuickBooks can be used as is, or you can customize many elements to improve your workflow, your form output and your business insight.
While many of the things you purchase and use in your daily work and professional lives don’t come with options, many do. Think about the last time you bought a car, for example. Did you request additional features for safety or convenience or aesthetic value?
You can’t buy “extras” with your copy of QuickBooks. You can select from the different versions (Pro, Premier, etc.) and extend the software’s functionality by installing integrated add-ons from the Intuit App Center. But if you install QuickBooks on two machines from the same DVD or download, they’ll look and work the same.

Figure 1: Need more functionality in areas like CRM or receivables? Talk to us about adding an integrated app.
That is, until you start customizing the product, which you should do. The customization options in QuickBooks let you:
- Change the appearance of your desktop
- Modify forms to include only needed content and to make them look professional and uniform, and
- Drill down deeply on your company data to isolate only the information that you want.
The benefits of customization are obvious. You’ll accelerate your workflow, polish your image and get insight that helps you make critical business decisions.
Your Desktop View
QuickBooks has always made your most commonly-used tools available on the home page. Intuit revamped this screen very skillfully starting with the 2013 versions, so it’s much cleaner and less cramped. But if you don’t use all of the functions represented by icons, you don’t have to even see them.

Figure 2: You can remove icons from the home page, but not if related features are enabled.
You can remove icons like Estimates and Time Tracking if you’re not planning to use those functions, but some icons must remain if specific features are active. For example, if sales orders and estimates are enabled, invoices are automatically turned on. Likewise, if you’ve enabled Inventory, Enter Bills and Pay Bills are locked in, too.
There’s an option to either limit the QuickBooks display to one window or let multiple windows open simultaneously. When you open QuickBooks, you can choose to have a specific set of windows open, the window or windows that were open when you shut down, or no windows.
Your Forms
QuickBooks comes with pre-defined forms for transactions like purchase orders, invoices and sales receipts. If you don’t like the look of one of these default templates, you can download one from the dozens of alternatives that QuickBooks supplies. You can alter these to better meet your needs – even creating multiple versions of the same type of form to use in different situations.
Columns and fields can be added, deleted, renamed and repositioned so that your forms contain only the information that your business requires. You can add your logo and change fonts and colors. Once you’ve settled on a design, you can apply it to multiple forms to present a unified image to your customers and vendors.
 Figure 3: You can specify which fields will appear – both onscreen and in print — in your templates’ headers, footers and columns. QuickBooks provides the tools to do all of this, but let us help you if you plan to do much modification. It can be challenging, especially if you have to use the Layout Designer.
Your Reports
You already know that you can do simple modification of your reports, like changing the date range. You may even have clicked on Customize Report and altered the column structure of a report and its sort order.
But do you regularly click on the Filters tab in the Modify Report dialog box? If you’re often frustrated because your reports cover too much ground or an inadequate, unfocused level of detail, you should be exploring the options offered here regularly. Filters restrict the data in a given report to a smaller, more targeted group of records or transactions, based on your needs.
For example, you might want to find out which customers in your New Construction class have outstanding balances (based on invoices) of more than $500 that are more than 60 days old. You’d set up Filters to create this screen:
 Figure 4: You’ll learn far more about your company’s financial status if you use Filters in reports. We can help you set up the most effective ones for your business.
Why not resolve to make your copy of QuickBooks your copy of QuickBooks in 2014? Some customization processes will require some upfront time, but once you get going, you’ll wish you’d done this sooner.
Depending on the situation, there’s more than one way to record a customer payment in QuickBooks. Here are your options.
There are undoubtedly some QuickBooks tasks that are more enjoyable than others. It’s no fun paying bills, for example, and making collection calls on unpaid invoices can be downright unpleasant.
But you probably don’t mind recording customer payments, sending invoices or statements, and generating reports to make sure you’re on top of it all.
QuickBooks offers more than one way to document customer remittances, and it’s important that you use the right one for the right situation.
Defining the Destination

Figure 1: Uncheck the box on the farthest right if you think you may want to direct payments to other accounts sometimes.
Before you begin receiving payments, you need to make sure they’ll end up in the correct account. The default is an account called Undeposited Funds. To make sure that this setting is correct, open the Edit menu and select Preferences, click Payments and select the Company Preferences tab. Use Undeposited Funds as a default deposit to account should have a check mark in the box next to it.
If you think you’ll sometimes want to deposit to a different account, leave the box unchecked. Then every time you record a payment, there’ll be a Deposit to field on the form. Talk to us if you’re planning to use any account other than Undeposited Funds, as you can run into serious problems down the road if payments are earmarked for the wrong account.
The Right Tools for the Right Job
Probably the most common type of payment that you’ll process will come in to pay all or part of an invoice or statement that you sent previously.

To do this, open the Customers menu and select Receive Payments. In the window that opens, click on the arrow in the field next to RECEIVED FROM to display the drop-down list, and choose the correct customer. You’ll see the outstanding balance. Enter the amount of the payment you received in the AMOUNT field and change the date if necessary. Click the arrow in the field next to PMT METHOD, and then select the type of payment.
If you established a credit card as the default payment method in the customer record, the card number and expiration date will be filled in. If not, or if a check was submitted, enter the information requested.
Any outstanding invoices will appear in a table. Make sure that there’s a check mark in front of the correct one(s). If the customer only made a partial payment, you’ll have to indicate how you want to handle the underpayment. Here are your options:

Figure 3: You can select how to handle partially-paid invoices here.
When you’re done, save the payment.
Instant Income
There may be times when you receive payment immediately, at the time your products or services change hands. In these cases, you’ll want to use a sales receipt. Open the Customers menu again and click Enter Sales Receipts.
Select a customer from the drop-down list or add a new one, then fill out the rest of the form like you would an invoice, selecting the items and quantities sold, and indicating the type of payment made (cash, check, credit).

Other Scenarios
These are the most common methods of receiving payments from customers, and you may never have to do anything other than simple payment-recording and sales receipts.
But unusual situations may arise that leave you stumped. For example, a customer may want to make a partial, advance payment before you’ve created an invoice or at the same time you’re entering it. In a case like this, you’ll have to create a payment item so that the money you’ve just received is reflected on the invoice. Or you may get a down payment on a product or service, or even an overpayment.
Let us help you when such situations occur. It’s much easier -and more economical for you – to spend some time with us before you record a puzzling payment than to have us track it down later on. We’ll help ensure that your money makes it to the right destination.
This article of QuickBooks Tips and Tricks was based on the 2013 version of QuickBooks.
