 New Business Direction LLC
 The balance sheet is one of the main financial reports for any business. Among other things, it shows what a company owns, what they owe, and how much they and others have invested in the business. One of the characteristics of a balance sheet is how it separates what you own and what you owe into two categories based on timeframe. The balance sheet is one of the main financial reports for any business. Among other things, it shows what a company owns, what they owe, and how much they and others have invested in the business. One of the characteristics of a balance sheet is how it separates what you own and what you owe into two categories based on timeframe.
Current and Long-Term You may have seen the Assets section of your balance sheet divided into two sections: Current Assets and a list of long-term assets that might include Property, Plant, and Equipment, Intangibles, Long-Term Investments, and Other Assets. Current Assets
Long-Term Assets The remaining assets are long-term, or assets that cannot easily be converted to cash within a year. Property, Plant, and Equipment, also termed Fixed Assets, includes buildings, automobiles, and machinery that the business owns. You might also see an account called Accumulated Depreciation; it reflects the fact that fixed assets lose their value over time and adjusts the balance accordingly. Int Current Liabilities Similarly, liabilities are broken out into the two categories, current and long-term. Current liabilities is made up of credit card balances, unpaid invoices due to vendors (also called accounts payable), and any unpaid wages and payroll taxes. If you have borrowed money from a bank or mortgage broker, the loan will show up in two places. The amount due within one year will show up in current liabilities and the amount due after one year will show up in long-term liabilities. Long-Term Liabilities The most common types of long-term liabilities are notes payable that are due after one year, lease obligations, mortgages, bonds payable, and pension obligations. Why All the Fuss Over Current vs. Long Term?
Next time you receive a balance sheet from your accountant, check out your current and long-term sections so that you’ll gain a better understanding of this report. |
 Current Assets include all of the items the business owns that are liquid and can easily be converted to cash within one operating cycle, typically a year’s time. The most common types of current assets include the balances in the checking and savings accounts, receivables due from clients who haven’t paid their invoices, and inventory for resale.
 angible assets are assets that have value but no physical presence. The most common intangible assets are trademarks, patents, and Goodwill. Goodwill arises out of a company purchase. Investments that are not easily liquidated will also be listed under Long-Term Assets.
 Bankers and investors want to know how liquid a company is. Comparing current assets to current liabilities is a good indicator of that. Some small businesses have loan covenants requiring that they maintain a certain current ratio or their loan will be called. The current ratio of your business is equal to current assets divided by current liabilities. Bankers like this amount to meet or exceed 1.2 : 1 (that’s 120%: 100%, although this can vary by industry).
As Accountants we default to the tried and true – the journal entry – we use the traditional system of accounting to record, adjust and correct all things. A debit here, a credit there and voila, we are done.
Not so in QuickBooks® – Journal entries do not use “Items” and items are the backbone of all the subsidiary reports in QuickBooks®. When you run job profitability reports, the costs recorded by journal entries do not show up on the Profit & Loss by Job reports. This holds true for any item-based reports in QuickBooks®.
QuickBooks® likes to have all transactions start with the source document – a Sales Receipt, an Invoice, a Credit Memo, a Payment Receipt, a Deposit, a Bill, a Credit, a Bill Payment, a Check, a Credit Card Charge, a Statement Charge, an Inventory Adjustment, a Sales Tax Adjustment, a Sales Tax Payment, a Payroll Check or a Payroll Liability Payment.
There are very few reasons to create journal entries in QuickBooks® and they should be limited to non-transactional entries with the exception of outsourced payroll.
If you use a third-party payroll service like Paychex® or ADP, the payroll company sends you reports. To record the numbers from those reports into your company file where you need them, you can use journal entries.
You may also need to enter year-end adjustments for Depreciation, Amortization, Prepaid Expenses, Deferred Revenues, Accrued Payroll and Taxes or to allocate Net Income to Partner Equity accounts. These may be done in the form of journal entries and/or reversing entries.
Otherwise, it’s best to use the source documents. Using the forms allows you to maintain the integrity of the management reports like Sales by Customer or Sales by Item.
You should never make journal entries with Accounts Receivable and/or Accounts Payable accounts. While it may clear out the account to zero, you will notice on your Aging Reports that the fixes live forever in the clients’ QuickBooks® file.
Sources and Targets in Journal Entries
All of that being said; I am convinced that some of you are still going to insist on using journal entries for adjusting Accounts Receivable and/or Accounts Payable in QuickBooks®.
With that in mind, a final word of caution – do not use these particular Balance Sheet accounts that require a Customer or Vendor name to be associated with them as the first line in any journal entry.
The first line in a journal entry is the Source of the transaction. All subsequent lines are Targets of the transaction. When you enter a Source Name, QuickBooks® copies that name into any Target Name that you leave blank.
When you make a journal entry in QuickBooks® with Accounts Receivable/Accounts Payable as the first line item and assign a Customer/Vendor Name to that line, each subsequent line uses that Name even if you leave it blank.
For example, let’s say this is the journal entry that you give to your client to enter into their QuickBooks® file to tie out to the year-end trial balance:

This is what QuickBooks does with the transaction behind the scenes:

All lines of the journal entry are associated with the Customer Name “Bill Smith”.
Copying the Source Name creates issues when you filter a report for the Customer: Job Name and the report includes transaction lines that you do not intend; it distorts the report.
To avoid having Customer/Vendor Names incorrectly copied down to the blank lines of an adjustment –
- Enter the accounts with names on the lower lines of the journal entry after the accounts without names, or
- Create a dummy name on the Other Names list e.g. “No Name” and enter it on each of the Target lines.
The Mount Washington Valley Economic Council will be hosting a three-part QuickBooks® Boot Camp series, led by Rhonda Rosand, CPA:
Session #1: Introduction to QuickBooks® Products – What’s Right for Me?
Tuesday, February 24, 2015 – 8:30 AM – 11:00 AM
Whether you are keeping the books for your own business or for others, you need to be using the right tools. We will cover a multitude of options under the Intuit umbrella.
- Desktop Pro and Premier
- Enterprise Solutions and Point of Sale
- Desktop Hosted and Online Solutions
- Payroll – Full Service, Basic, Enhanced, and Assisted
- Third Party Applications
Session #2: QuickBooks® Navigation Workflow and Basic Set Up
Tuesday, March 17, 2015 – 8:30 AM – 11:00 AM
Learn how to navigate your way around the Quickbooks Desktop and online versions, how to begin setting up your own company file and avoid some of the common pitfalls.
- Navigation and Workflow
- Common Pitfalls
- Basic Set Up
Session #3: QuickBooks® Reports and Customizing Forms and Templates
Tuesday, April 7, 2015 – 8:30 AM – 11:00 AM
Learn how to customize forms and templates and create Quickbooks reports that are useful management tools for your business. Understand the difference between profits and cash.
- Customize forms and templates
- Revenue Planning
- Quickbooks Reports
- Cash Flow Management
Courses are $35.00 and are held from 8:30am-11am at:

Many Retail stores sell inventory on consignment. It’s important to keep track and to know how much inventory you have in stock, who it belongs to and where it’s all located.
Let’s start our discussion of Accounting for Consignments in QuickBooks with a few basic definitions.
- Consignment – the act of consigning, which is placing any materials in the hands of another.
- Consigned Inventory – the goods shipped by the Consignor to the Consignee.
- Consignor – the owner of the inventory – the person who hands over the goods to be sold.
- Consignee – the seller of someone else’s goods – the person who receives the goods to sell.
There are two sides to the consignment equation – Consignor and Consignee. In this article, we will discuss the situation from the viewpoint of the Consignor. Note: We will also assume that you are using QuickBooks Premier and not Pro or Enterprise.
As the Consignor, you own the inventory – it’s your asset and your responsibility and if the product is damaged, it’s your loss. You are the party at risk and have an insurable asset. You’ve consigned it, or handed it over, to someone else who has agreed to sell it on your behalf in exchange for a pre-determined fee or percentage as well as reimbursable out-of-pocket expenses.
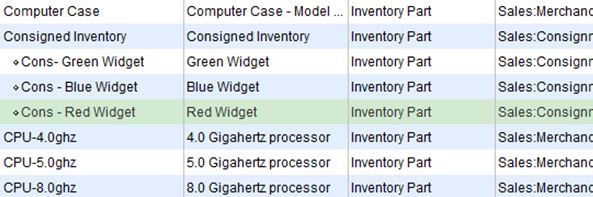
In QuickBooks, it’s as simple as creating a separate section in your Item List for Consigned Inventory and listing each Item as a Sub-Item with an identifier (Cons) that categorizes it as consigned. These are still Inventory Parts and are mapped to the same Cost of Goods Sold, Income and Inventory accounts as your other Inventory Items. Note: You may wish to create a separate Inventory Asset account for your Consigned Inventory, however this is optional.
To transfer the Items from your Regular Inventory to Consigned Inventory, it’s an Inventory Adjustment for Quantity only – the value of your inventory does not change, only the location of the Items for sale. Adjust Inventory/Quantity On Hand is located under the Vendor Menu.

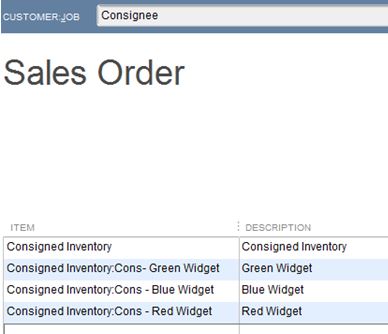
In addition to creating an Inventory Adjustment, you will need to create a Sales Order to the Consignee for the Consigned Inventory. Create Sales Order is located under the Customer Menu. This is a non-posting entry in QuickBooks and will show the Inventory as committed to the Consignee and not available for sale to others on an Inventory Stock Status Report.
As you receive reports of Sales of your Consigned Inventory from the Consignee, or better yet, as you conduct a physical inventory of your Consigned goods at the Retail location, you will create an Invoice in QuickBooks from the Sales Order to the Consignee to bill for your pre-determined percentage of the sale, less reimbursable expenses.

These are the steps to account for Consignments from the perspective of the Consignor.
There are many more steps involved in accounting for Consignments from the angle of the Consignee. We’ll cover these in a later edition of our newsletter – stay tuned.
As always, if you have any questions on any of the procedures for recording Consignments in QuickBooks, please contact us. We’re happy to help.
Accurate, thorough item records inform your customers and help you track inventory levels correctly.
Whether you’re selling one-of-a-kind items or stocking dozens of the same kinds of products, you need to create records for each. When it comes time to create invoices or sales receipts, your careful work defining each type of item will:
- Ensure that your customers receive correct descriptions and pricing,
- Provide the information you must know about your inventory levels, and,
- Help you make smart decisions about reordering.
You’ll start this process by making sure that your QuickBooks file is set up to track inventory. Open the Edit menu and select Preferences, then Items & Inventory. Click the Company Preferences tab and click in the box in front of Inventory and purchase orders are activated if there isn’t a check in the box already. Here, too, you can ask that QuickBooks warn you when there isn’t enough inventory to sell. Click OK when you’re finished.

Figure 1: You need to be sure that QuickBooks knows you’ll be tracking inventory before you start making sales.
To create your first item, open the Lists menu and select Item List. Click the down arrow next to Item in the lower left corner of the window that opens and select New. The New Item window opens.
Warning: You must be very precise when you’re creating item records in order to avoid confusing your customers and creating problems with your accounting down the road. Please call us if you want us to walk you through the first few items.
QuickBooks should display the list of options below TYPE. Since you’re going to be tracking inventory that you buy and sell, select Inventory Part. Enter a name and/or item number in the next field. This is not the text that will appear on transactions; it’s simply for you to be able to recognize each item in your own bookkeeping.
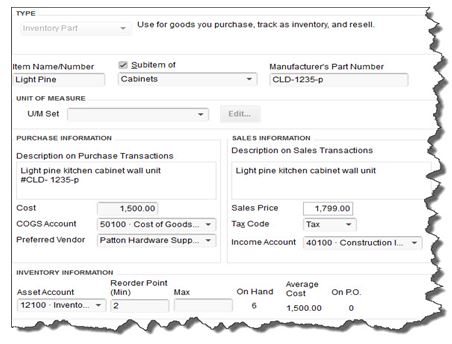
Figure 2: Let us work with you if you have any doubts about the data that needs to be entered in the New Item window. It must be 100 percent accurate.
In the example above, the box next to Subitem of has a check mark in it because “Light Pine” is only one of the cabinet types you sell (you can check this box and select <Add New> if you want to create a new “parent” item on the fly). Leave the next field blank if your item doesn’t have a Part Number, and disregard UNIT OF MEASURE unless you’re using QuickBooks Premier or above.
Fill in the PURCHASE INFORMATION and SALES INFORMATION fields (or select from the lists of options). Keep in mind that the descriptive text you enter here will appear on transaction forms, though customers will never see what you’ve actually paid for items, of course (your Cost, as opposed to the Sales Price).
QuickBooks should have automatically selected the COGS Account (Cost of Goods Sold), but you’ll need to specify an Income Account. Please ask us if you’re not sure, as this is a critical designation. The Preferred Vendor and Tax Code fields will display lists if you’ve already set these up.
QuickBooks should have pre-selected your Asset Account. If you want to be alerted when your inventory level for this item has fallen to a specific number (Min) so you can reorder up to the point you specify in the Max field, enter those numbers there (the Inventory to Reorder option must be turned on in Edit | Preferences | Reminders).
If you already have this item in stock, enter the number under On Hand. QuickBooks will automatically calculate Average Cost and On P.O. (Purchase Order).
Click OK when you’ve completed all of the fields. This item will now appear in your Item List, and will be available to use in transactions. When you want to create, edit, delete, etc. any of your items, simply open the same menu you opened in the first step here (Lists | Item List | Item).

Figure 3: The Item menu, found in the lower left corner of the Item List.
Precisely created Inventory Part records are critical to accurate sales and purchase transactions. So use exceptional care in building them.
