How to Back Up Your QuickBooks File   Learn how to back up your QuickBooks file with Rhonda Rosand, CPA of New Business Directions, LLC.

Learn How to Navigate the Homepage of QuickBooks with Rhonda Rosand of New Business Directions, LLC.

Abandoned Property – What Is It? How Do We Account For It?

            How many times have you written a check to someone, who either loses it or forgets to cash the check? After a certain amount of time, that check is considered stale and can no longer be presented to be cashed. It sits in your QuickBooks file uncleared on the bank statement reconciliation, now what?

            You call the person, ask them to cash it. You may even re-issue the check so they have another chance to get paid, but then you find out they moved away and you don’t have their address, now what?

Uncashed checks to vendors, payroll checks to employees, contractors, dividends, and distributions to stockholders all are potential unclaimed or abandoned property. Every state has their own escheatment laws that require businesses and organizations to hand over to the state, the abandoned property that has been in their possession for a certain period of time. If a check goes uncashed, that does not mean the property no longer belongs to that individual and the obligation that the employer has to compensate the employee does not go away.

            In the state of New Hampshire, you are required to notify the owner of the abandoned property. No more than 120 days prior to filing, all holders must send a written notice to the owner of the property having a value of $50.00 or more. In this notice you must verify the nature of the property and how to retrieve it and avoid abandonment to the state. If this attempt at notifying the owner is unsuccessful, you will then move forward to reporting the abandoned property to the state.

How to Report Abandoned Property in New Hampshire

            To begin the process of reporting abandoned property, you must fill out the State of New Hampshire form for abandoned property which is Form T-1. Below is a link for your convenience to click on and review this form and/or print it.

https://www.nh.gov/treasury/documents/abandonded-propert-t1-form.pdf

            For detailed instructions on how to fill out this form, we have also provided you the necessary link that will walk you through, step-by-step for filling out NH Form T-1.

https://www.nh.gov/treasury/documents/abandonded-property-t1-instructions.pdf

            The first column on the form asks for the correct code for the property type. Here is a link that will show you which code is appropriate for your abandoned property.

https://www.nh.gov/treasury/documents/property-type-codes-t1-a.pdf


How to handle Abandoned Property in QuickBooks

            It is important to remember that abandoned property does not belong to the company. That property is either owed to the state or owner. Uncashed checks should never be voided. Making sure your bank accounts are reconciled on a monthly basis will help you monitor uncashed checks. Once that property amount is sent to the state or given to the property owner, it can then be cleared from your bank reconciliation.

What Sales Orders Are and When to Use Them

They’re not as commonly used as invoices. But if you need them, they’re there.

When you want to document sales that you can’t (or won’t) fulfill immediately, but you plan to do so in the future, you can’t create an invoice just yet. This is where sales orders come in.

You may never need to create a sales order for a customer. Perhaps you have a service-based business, or you never run out of inventory. Or you simply don’t enter an order unless you know you have the item(s) in stock.

But if you plan to use sales orders, you must first make sure QuickBooks is set up to accommodate them. Open the Edit menu and select Preferences, then Sales & Customers. Click the Company Preferences tab to open that window.

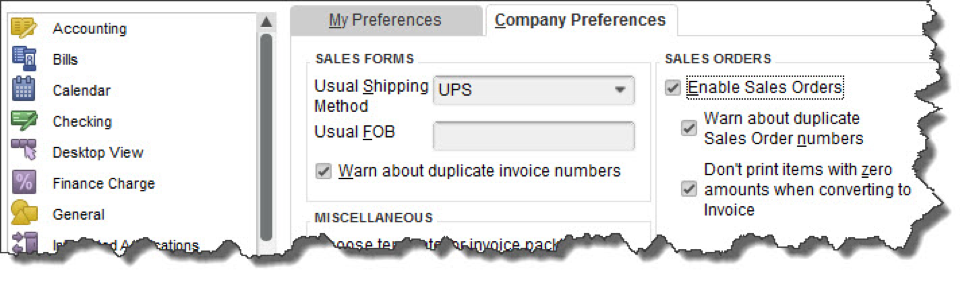
Before you can use sales orders, you’ll need to make sure that QuickBooks is set up for them.

Sales Orders Are Required for Some Tasks

There are a few situations where you must use a sales order:

  • If you have a customer who orders very frequently, you may not want to create an invoice for absolutely every item. You could use a sales order to keep track of these multiple orders, and then send an invoice at the end of the month.
  • If you’re missing one or more items that a customer wanted, you can create a sales order that includes everything, but only note the in-stock items on an invoice. The sales order will keep track of the portion of the order that wasn’t fulfilled. Both forms will include the back-ordered quantity.

Warning: Working with back orders can be challenging. In fact, working with inventory-tracking itself may be problematic for you. If your business stocks enough of multiple types of items that you want to use those QuickBooks features, let us help you get started to ensure that you understand these rather complex concepts.

Creating a Sales Order

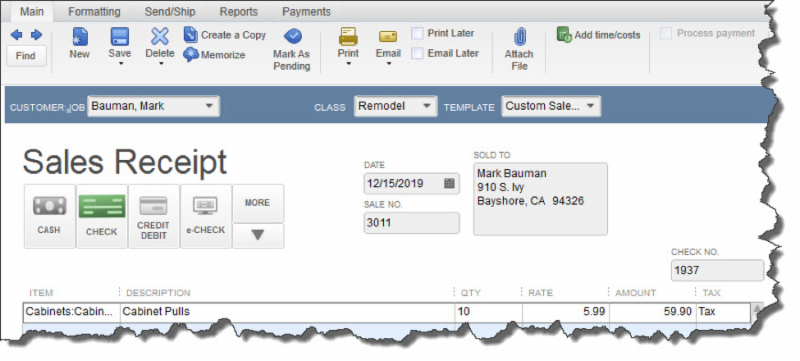
Creating sales orders in QuickBooks is actually quite simple and similar to filling out an invoice. Click the Sales Orders icon on the home page, or open the Customers menu and select Create Sales Orders.


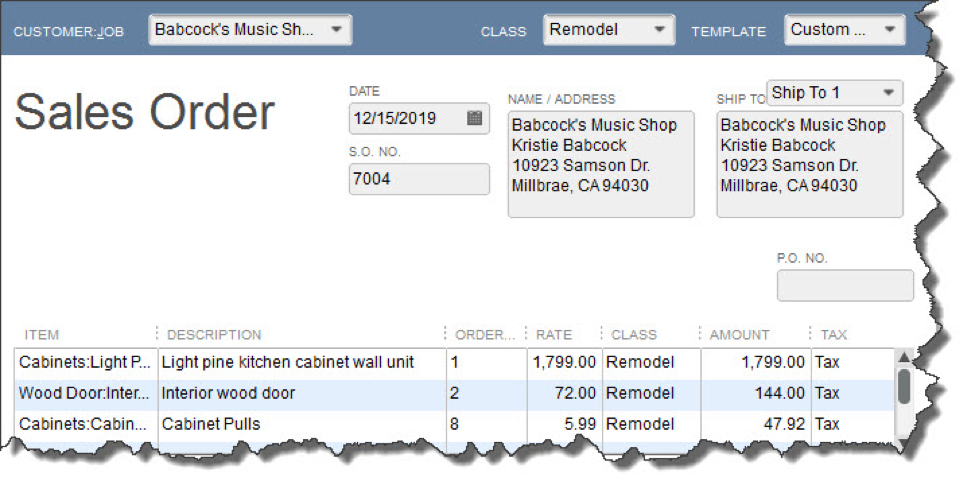
A sales order in QuickBooks looks much like an invoice.

Click the down arrow in the field next to Customer: Job and choose the correct one. If you use Classes, select the correct one from the list that drops down, and change the Template if you’ve created another you’d like to use.

Tip: Templates and Classes are totally optional in QuickBooks. Templates provide alternate views of forms containing different fields and perhaps a different layout. Classes are like categories. You create your own that work for your business; they can be very helpful in reports. Talk to us if you don’t understand these concepts.

If the shipping address is different from the customer’s main address, click the down arrow in the field next to Ship To, and either select an alternate you’ve created or click <Add New>. Make sure the Date is correct, and enter a purchase order number (P.O. No.) if appropriate.

The rest of the sales order is easy. Click in the fields in the table to make your selections from drop-down lists, and enter data when needed. Pay special attention to the Tax status. Let us know if you haven’t set up sales tax and need to.

When everything is correct, save the sales order. When you’re ready to convert it to an invoice, open it and click the Create Invoice icon in the toolbar. QuickBooks will ask whether you want to create an invoice for all the items or just the ones you select. You’ll be able to specify quantities, too, in the window that opens.

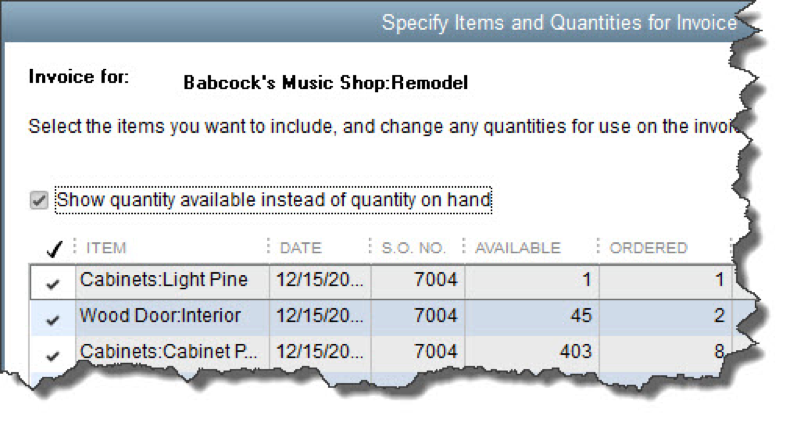
When you create an invoice from a sales order, you can select all the items ordered or a subset.

As we’ve said, sales orders are easy to fill out in QuickBooks. But they involve some complex tracking, and you may want to schedule a session with us before you attempt them. Better to understand them ahead of time than to try to troubleshoot problems later.

It’s one of your more pleasant tasks as a QuickBooks user: receiving payments from customers. 
Here’s how it works. 
QuickBooks was designed to make your daily accounting tasks easier, faster, and more accurate. If you’ve been using the software for a while, you’ve probably found that to be true. Some chores, of course, aren’t so enjoyable. Like paying bills. Reconciling your bank account. Or anything else that has the potential to reduce the balance in your checking accounts.
The process of receiving customer payments is one of your more enjoyable responsibilities. You supplied a product or service that someone liked and purchased, and you’re getting the
money due you.
Depending on the situation, you’ll use one of multiple methods to record customer payments. Here’s a look at some of your options.
A Familiar Screen
 
If you’re like many businesses, you send invoices to customers to let them know what they owe and when their payment is due. So one of the most commonly used ways to record payments is by using the Receive Payments window. To open it, click the Receive Payments icon on the home page or click
Customers | Receive Payments.
 

You’ll use QuickBooks’ Receive Payments screen when you record a payment made in response to an invoice.
 
The first thing you’ll do, of course, is choose the correct customer by clicking the down arrow in the field to the right of RECEIVED FROM. The outstanding balance from that customer will appear in the upper right corner, and invoice information will be displayed in the table below. Enter the PAYMENT AMOUNT and make sure the DATE is correct. (The next field, REFERENCE #, changes to CHECK # only if the CHECK option is selected.)
Next, you’ll need to ensure that the payment is applied to the right invoices. If it covers the whole amount due, there will be a checkmark in every row in the first column of the table. If not, QuickBooks will use the money received to pay off the oldest invoices first. To change this, click Un-Apply Payment in the icon bar and click in front of the correct rows to create checkmarks.
Several Options
 
You’ll then want to tell QuickBooks what payment method the customer is using. Four options are displayed. The possibilities that are visible here are:
  • CASH
  • CHECK
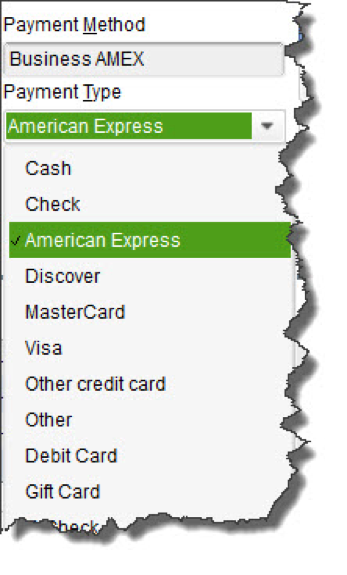
  • CREDIT DEBIT (A specific card type may be shown here if you’ve indicated the customer’s preferred payment method in his or her record.)
  • e-CHECK
If the desired payment method isn’t included in those four, click the down arrow under MORE. If it’s still not there, click Add New Payment Method. This window will open:
The New Payment Method window
 
Click OK. When you choose your new payment method from the list, a window opens containing fields for the card number and expiration date. Click Done after you’ve entered it, and you’ll be returned to the Receive Payments screen. If you’re satisfied with your work there, click Save & Close or Save & New.
Haven’t gotten set up to accept credit and debit cards yet? We can get you going with a merchant account to make this possible. You’re likely to find that some customers pay faster with this option. Your customers will be able to click a link in an emailed invoice and make their payments.
Instant Sales
Depending on the type of business you have and its physical location, there may be times when customers will come in and buy something on the spot. You’ll need to give them a Sales Receipt. Click Create Sales Receipts on the home page or open the Customers menu and select Enter Sales Receipts to
open this window:
The Enter Sales Receipts window
 
You’ll complete this form much like you entered data in the fields of the Receive Payments window. As you can see, you can print the mail for the customer and/or email it.
After all the hard work you’ve done to make your sales, the last thing you want to do is record a payment incorrectly so it isn’t processed and you don’t get paid. Though QuickBooks makes the mechanics of receiving payments simple enough, you still should understand the entire process involved in getting income into the correct accounts.  We’re available to help with this and any other areas of QuickBooks
You know that QuickBooks saves a lot of time. But have you explored how it does so by memorizing transactions?
 
Your accounting work involves a lot of repetition. You send invoices. Pay bills. Create purchase orders. Generate payroll checks and submit payroll taxes.
Some of the time, you only fill out those transaction forms once. You might be doing a one-time purchase, like paying for some new office furniture. Other times, though, you’re paying or charging the same companies or individuals on a regular basis.
QuickBooks Desktop contains a shortcut to those recurring tasks, called Memorized Transactions. You can save the details that remain the same every time, and use that template every time the bill or invoice is due, which can save a lot of time and improve accuracy. Here’s how it works.
 
Making Copies
To memorize a transaction, you first need to create a model for it. Let’s say you have a monthly bill for $450 that’s paid to Bruce’s Office Machines. You’d click Enter Bills on the home page or open the Vendors menu and select Enter Bills. Fill in the blanks and select from drop-down lists to create the bill. Then click Memorize in the horizontal toolbar at the top of the form.  This window will open.
Before you can Memorize a transaction, you first have to create a model (template) for it.
The vendor’s name will already be filled in on the Memorize Transaction screen. Look directly below that. There are three ways that QuickBooks can handle these Memorized Transactions when one of their due dates is approaching:
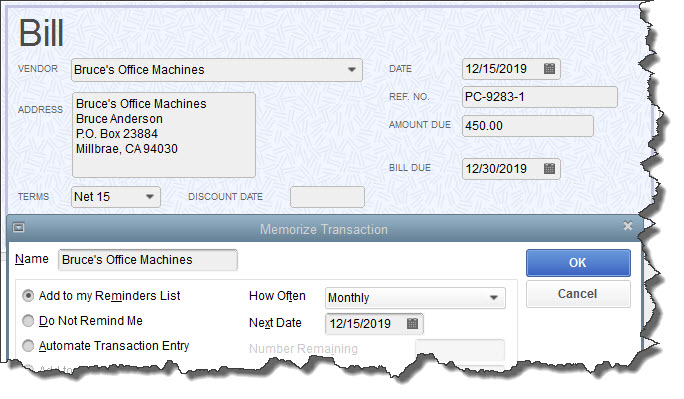
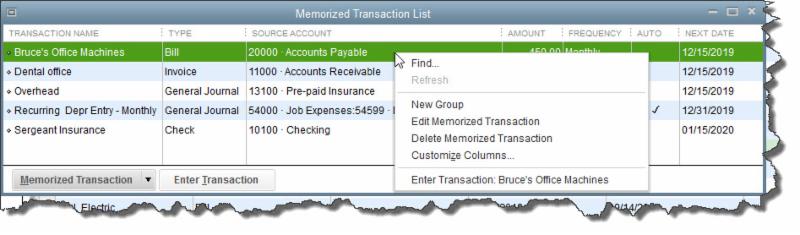
  • Add to my Reminders List. If you click the button in front of this option, the current transaction will appear on your Reminders List every time it’s due. You might request this for transactions that will change some every time they’re processed, like a utility bill that’s always expected on the same day, but which has a different amount every month.
  • Do Not Remind Me. Obviously, QuickBooks will not post a reminder if you click this button. This is best used for transactions that don’t recur on a regular basis. Maybe you have a snow-shoveling service that you pay only when there’s a storm. So the date is always different, but everything else is the same.
  • Automate Transaction Entry. Be very careful with this one. It’s reserved for transactions that are identical except for the issue date. They don’t need your approval – they’re just created and dispatched.
Click the down arrow in the field to the right of How Often and select the correct interval. Then click the calendar icon to pick a date for the next occurrence. If you have selected Automate Transaction Entry, the grayed-out lines below Next Date contain fields for Number Remaining and
Days in Advance to Enter.
How Does QuickBooks Know?
Obviously, you’ll want advance warning of transactions that will require processing. QuickBooks lets you specify how many days’ notice you want for each type. Open the Edit menu and select Preferences. Click Reminders in the left vertical pane, then the Company Preferences tab. You can tell QuickBooks whether you want to see a summary in each category or a list or no Reminder. Then you can enter the number of days’ warning you want.
 
QuickBooks lets you specify the content and timing 
of your Reminders.
Working with Memorized Transactions
Once you’ve created some Memorized Transactions, you will undoubtedly need to review them at some point. Open the Lists menu and select Memorized Transaction List to see all the templates for recurring bills, invoices, etc., that you’ve defined. Right-click on one you want to work with, and this menu appears:
The Memorized Transaction List with the right-click 
window open
 
You have several options here. If your list is so long that it fills multiple screens, you can Find the transaction you’re looking for. If you’ve created multiple related transactions, you can save them as a New Group. You can also Edit, Delete, and Enter Memorized Transactions.
Anytime you’re letting QuickBooks do something on its own, it’s critical that you thoroughly understand the mechanics of setting the process up. We’d be happy to go over the whole topic of Memorized Transactions with you, or any other aspect of QuickBooks operations.
If you plan to have multiple employees using QuickBooks, you can limit their access to specific areas.
 
Controlling access to your QuickBooks company file is easy when you’re a one-person accounting department. You simply use one password to protect your data.
But when you add new employees to the mix, do you want them to have access to absolutely everything in QuickBooks? Probably not. You have confidence in your employees or you wouldn’t have hired them. But this isn’t solely a matter of trust. It’s just good business practice to restrict individuals to specific areas and responsibilities, no matter what the application.
That’s why QuickBooks has built-in tools to help you limit activity. Here’s how it works.
Identifying Users
 
Only the Amin user can add users.  To get started, open the
Company menu and scroll down the list to highlight
Set Up User Names and Passwords. On the slide-out menu, select  Set Up Users. You will need to enter your Admin password here.  The  User List window will open, and you should see your own entry as  Admin. Click  Add User.
To give an employee access to QuickBooks, enter a User Name for him or her here, then a password.
The Setup user password and access window will open.
Fill in those fields.
 
Click Next. In the window that opens, you’ll define the access level for your new user. Your options here are:
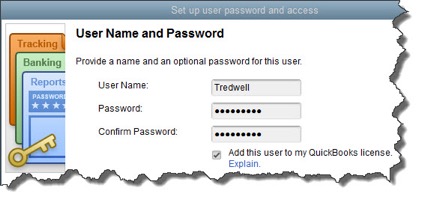
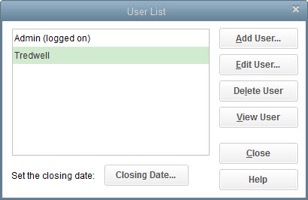
  • All areas of QuickBooks,
  • Selected areas of QuickBooks, or,
  • External accountant (you can grant us access to all areas of the software except for those that contain sensitive customer data, like credit card numbers).
Click the button in front of the second option, then Next.
You can specify the access rights for individual employees in numerous areas.
The image above shows the first screen of 10 that display the levels of access available in many individual areas of QuickBooks. Be sure to read the whole page carefully before assigning rights. Here, for example, you’re not just allowing the employee to enter sales and A/R transactions. You’re also deciding whether to grant him or her permission to view the Customer Center and A/R reports. As you can see, your options are No AccessFull Access, and Selective Access (three levels there). Check the box below this list if you want the employee to be able to View complete customer credit card numbers.
When you’re finished there, click Next to specify your similar preferences for Purchases and Accounts ReceivableChecking and Credit CardsInventoryTime Tracking, and Payroll and Employees. The next two screens contain more complex concepts, but you’ll follow the same process to express your wishes. They are:
  • Sensitive Accounting Activities, like funds transfers, general journal entries, and online banking tasks
  • Sensitive Financial Reporting, which allows access to all QuickBooks reports. The option you choose here overrides all other reporting restrictions that you’ve specified for the employee.
Finally, you’ll tell QuickBooks whether this person can change or delete transactions in designated areas and whether he or she can do so to transactions that were recorded before the closing date (if this applies). The last screen displays a summary of the access and activity rights you’ve given the employee. Check them carefully, and if they’re correct, click Finish.
Housekeeping Options
 

The User List window
QuickBooks then takes you back to the User List window, where you’ll see the employee’s name displayed. If you want to Add, Edit, Delete, or View a user, make sure the correct name is highlighted and click the button for the desired action.
Caution: Do not delete users.  There is an audit trail to teach which user performed certain tasks in the QuickBooks file and you will want to keep the name to preserve the integrity of 
the audit trail.
If you’re just now looking to add your first employee to QuickBooks or if you’re starting to outgrow the user limit, give us a call. There are more issues to consider when you take on multi-user access. We’d be happy to discuss them with you.
Preferences in QuickBooks
 
Before you start entering data, make sure QuickBooks is set up appropriately for your company.
 
QuickBooks was designed to serve the needs of millions of small businesses. To do that, it had to include the tools and processes suitable for a wide variety of companies. Intuit recognized that every organization is unique, so your copy of QuickBooks can be customized in ways that make it work best for  you
and  your company.
You could just dive in and start adding records and transactions, but we recommend you do some setup first. If you don’t, you may run into some issues later, such as finding that some features you need haven’t been turned on or that QuickBooks is simply not doing some things the way you do. The good news is that you can change many of these.
 
Getting There
QuickBooks refers to these options as Preferences. You’ll find them by opening the Edit menu
and selecting Preferences.
  
To start customizing QuickBooks so it works best for you, open the
Edit menu and choose Preferences.
 
As you can see, the left vertical pane contains a list of Preferencetypes. Click on any of these to change the option screens to the right. Click both the tabs labeled My Preferences and Company Preferences to make sure you see everything that’s displayed for each type (sometimes one will have no choices).
Critical Areas
We recommend that you look through all of QuickBooks’ Preferences and change any that don’t fit your company. Some simply have to do with the way QuickBooks displays information and how it functions, but others have direct impact on your accounting work. As always, we’re available if you have questions here and when in doubt, check wth your tax preparer to be sure.
There are many that you will probably want to visit. They may have numerous options, but here’s some of what you can establish in each:
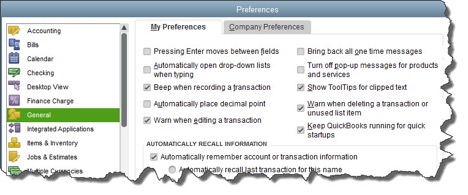
  • Accounting. Do you want to use account numbers & classes?
  • Checking. Which accounts should QuickBooks automatically use for tasks like Open the Pay Bills, Open the Make Deposits, and Open the Create Paychecks?
  • Finance Charge. Will you be assessing finance charges on late payments from customers? What’s the interest rate, minimum finance charge, and grace period?
  • Items & Inventory. Do you want inventory and purchase orders to be active?
  • Multiple Currencies. Does your company do business using other currencies?  This preference is NOT reversible, it cannot be turned off once it is turn on – be sure that you  know this!
  • Payments. Can customers pay you online? What methods can they use?
  • Payroll & Employees. Will you be processing payroll   using QuickBooks?
  • Sales & Customers. Do you want to use sales orders? How should QuickBooks handle invoices when there are time and costs that need to be added?
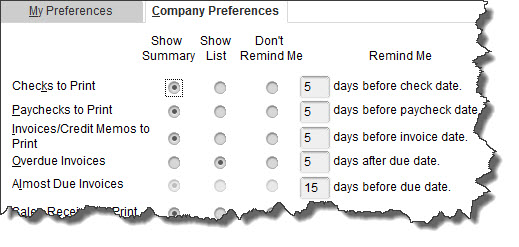
  • Reminders.  Ask QuickBooks to track critical dates and tasks and remind you of them.
You can see why it’s important to study QuickBooks’ Preferencesearly on. It’ll help you avoid unnecessary roadblocks and ensure that your company’s needs are reflected well in the software.
What you need to know about Windows 10 and QuickBooks® 

I know that many of you are wondering if you should upgrade to the new Windows 10 operating system. It has been hard to ignore the constant reminders of this FREE upgrade. Every time we turn on our computers, there it is, asking us to Upgrade Now. Some of us have even had a surprise automatic installation of the newest operating system while we were sleeping!

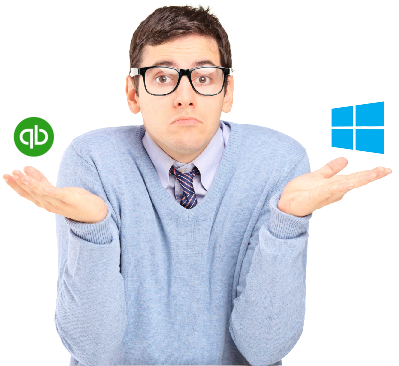
Microsoft is offering this software for free until the end of July 2016, after which they are going to charge a fee – currently starting at $149 per system for the Home Edition – they have not yet released any pricing for the Professional versions of the software. If you are currently running Windows 8/8.1, then you may wish to consider the update to Windows 10, but please read further.

At New Business Directions, LLC, we have decided to stay with the Windows 7 platform and not to upgrade to Windows 10. Microsoft will still be issuing updates for Windows 7 until 2021 but will not offer any phone or online support for the product.

There have been many issues with the installation of Windows 10 especially in a networked environment and the software needs a lot of tweaking to network correctly and play with other devices – such as printers. We see no real advantage to updating to Windows 10 and we have found it to actually hinder some programs from running properly, specifically QuickBooks and Point of Sale.

If you do decide to upgrade to Windows 10, we will gladly assist in the installation to smooth the transition. Ultimately, the decision is yours.
TSheets Pros
The New Business Directions Team is bringing the #1 employee-rated and requested Time Tracking Software to you. Sondra Love, Wayne Kukuruza, and Rhonda Rosand, CPA have recently joined the 6000+ TSheets PRO community by participating in an exclusive TSheets PRO certification course accredited by CPAacademy.org.So what exactly is TSheets? TSheets is a time tracking and scheduling software designed for businesses that track, manage, and report time. TSheets provides the alternative to paper timesheets and/or punch cards to simplify human resource and data processing roles for companies of all sizes.

But here’s the best part, TSheets fully integrates with QuickBooks by syncing accurate timesheets to your QuickBooks file and eliminating manual, duplicate time entries. Tracked and approved time can now be easily exported to either QuickBooks® Online or Desktop with just one click. Management can then use their favorite tools within QuickBooks to process payroll, calculate job costing, and create invoices in a more simplified work flow.

TSheets is also a scheduling software making it faster and easier to build and share schedules with employees, assign jobs, and alert shifts while increasing profitability and improving communication. In other words, we want to keep your workforce running like a well-oiled machine.

Oh, and have I mentioned their amazing customer service department? The TSheets team who’s behind the product is just as amazing as the software itself. Customer service team is passionate about their customers and provides exceptional support in times of need. They make your entire TSheets experience FUN and might even give you a smile or two.

Are you ready to sign up? To find out more about TSheets, email sondra@newbusinessdirections.com or give us a call at (603) 356-2914.
Note: As of February 2021, TSheets is now QuickBooks Time. To learn more about this update, visit https://quickbooks.intuit.com/time-tracking/