 New Business Direction LLC
A couple of years ago, QuickBooks® gave Accounting Professionals a tool just for us – it’s only in the QuickBooks® Accountant and QuickBooks® Enterprise Accountant versions. It’s called Period Copy and it allows us to extract transactions between a set of dates for a specified period of time and condense transactions outside of the range.
This preserves transactions in the condensed file only for a particular period with entries prior to that period summarized and entries after that period removed.
This is useful for clients with file size and list limit issues as well as for third-party requests of information – not only for audit requests, but also in the event of a business sale, a divorce or legal dispute when you do not need to provide the entire QuickBooks® file.
First thing – BACKUP your data file. You are creating a new file to be issued to a third-party and you do not want to overwrite your working file.
Then under the FILE menu, UTILITIES, CONDENSE DATA –
Accept the prompt that it is ok to lose Budget data.
When it prompts you for what transactions you want to remove, select “Transactions outside of a date range” to prepare a period copy of the company file. Set your before and after dates to include the period you want to keep.

Then when it prompts you how transactions should be summarized, choose “Create one summary journal entry“.

Remove the recommended transactions.
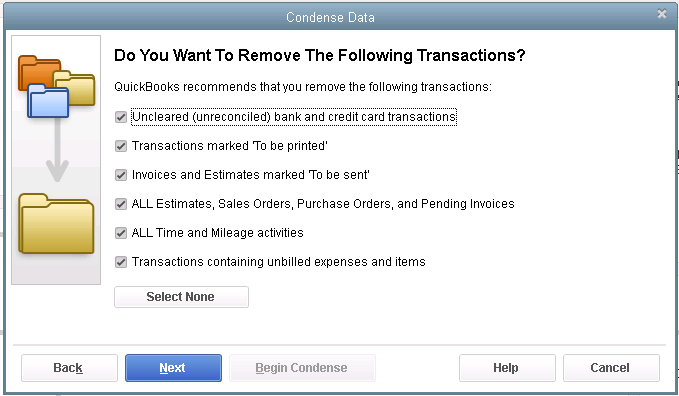

Begin Condense.
Once complete, you will have a QuickBooks® data file with only the relevant transactions for a specific period of time and you won’t be disclosing more information than need be.
The Mount Washington Valley Economic Council will be hosting a three-part QuickBooks® Boot Camp series, led by Rhonda Rosand, CPA:
Session #1: Introduction to QuickBooks® Products – What’s Right for Me?
Tuesday, February 24, 2015 – 8:30 AM – 11:00 AM
Whether you are keeping the books for your own business or for others, you need to be using the right tools. We will cover a multitude of options under the Intuit umbrella.
- Desktop Pro and Premier
- Enterprise Solutions and Point of Sale
- Desktop Hosted and Online Solutions
- Payroll – Full Service, Basic, Enhanced, and Assisted
- Third Party Applications
Session #2: QuickBooks® Navigation Workflow and Basic Set Up
Tuesday, March 17, 2015 – 8:30 AM – 11:00 AM
Learn how to navigate your way around the Quickbooks Desktop and online versions, how to begin setting up your own company file and avoid some of the common pitfalls.
- Navigation and Workflow
- Common Pitfalls
- Basic Set Up
Session #3: QuickBooks® Reports and Customizing Forms and Templates
Tuesday, April 7, 2015 – 8:30 AM – 11:00 AM
Learn how to customize forms and templates and create Quickbooks reports that are useful management tools for your business. Understand the difference between profits and cash.
- Customize forms and templates
- Revenue Planning
- Quickbooks Reports
- Cash Flow Management
Courses are $35.00 and are held from 8:30am-11am at:

Many Retail stores sell inventory on consignment. It’s important to keep track and to know how much inventory you have in stock, who it belongs to and where it’s all located.
Let’s start our discussion of Accounting for Consignments in QuickBooks with a few basic definitions.
- Consignment – the act of consigning, which is placing any materials in the hands of another.
- Consigned Inventory – the goods shipped by the Consignor to the Consignee.
- Consignor – the owner of the inventory – the person who hands over the goods to be sold.
- Consignee – the seller of someone else’s goods – the person who receives the goods to sell.
There are two sides to the consignment equation – Consignor and Consignee. In this article, we will discuss the situation from the viewpoint of the Consignor. Note: We will also assume that you are using QuickBooks Premier and not Pro or Enterprise.
As the Consignor, you own the inventory – it’s your asset and your responsibility and if the product is damaged, it’s your loss. You are the party at risk and have an insurable asset. You’ve consigned it, or handed it over, to someone else who has agreed to sell it on your behalf in exchange for a pre-determined fee or percentage as well as reimbursable out-of-pocket expenses.
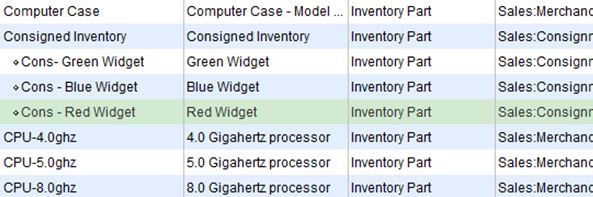
In QuickBooks, it’s as simple as creating a separate section in your Item List for Consigned Inventory and listing each Item as a Sub-Item with an identifier (Cons) that categorizes it as consigned. These are still Inventory Parts and are mapped to the same Cost of Goods Sold, Income and Inventory accounts as your other Inventory Items. Note: You may wish to create a separate Inventory Asset account for your Consigned Inventory, however this is optional.
To transfer the Items from your Regular Inventory to Consigned Inventory, it’s an Inventory Adjustment for Quantity only – the value of your inventory does not change, only the location of the Items for sale. Adjust Inventory/Quantity On Hand is located under the Vendor Menu.

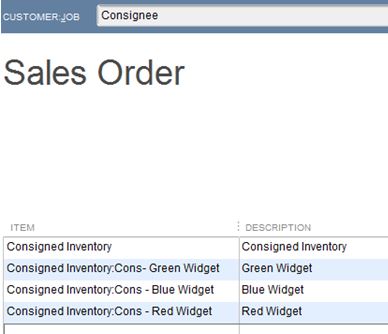
In addition to creating an Inventory Adjustment, you will need to create a Sales Order to the Consignee for the Consigned Inventory. Create Sales Order is located under the Customer Menu. This is a non-posting entry in QuickBooks and will show the Inventory as committed to the Consignee and not available for sale to others on an Inventory Stock Status Report.
As you receive reports of Sales of your Consigned Inventory from the Consignee, or better yet, as you conduct a physical inventory of your Consigned goods at the Retail location, you will create an Invoice in QuickBooks from the Sales Order to the Consignee to bill for your pre-determined percentage of the sale, less reimbursable expenses.

These are the steps to account for Consignments from the perspective of the Consignor.
There are many more steps involved in accounting for Consignments from the angle of the Consignee. We’ll cover these in a later edition of our newsletter – stay tuned.
As always, if you have any questions on any of the procedures for recording Consignments in QuickBooks, please contact us. We’re happy to help.
Accurate, thorough item records inform your customers and help you track inventory levels correctly.
Whether you’re selling one-of-a-kind items or stocking dozens of the same kinds of products, you need to create records for each. When it comes time to create invoices or sales receipts, your careful work defining each type of item will:
- Ensure that your customers receive correct descriptions and pricing,
- Provide the information you must know about your inventory levels, and,
- Help you make smart decisions about reordering.
You’ll start this process by making sure that your QuickBooks file is set up to track inventory. Open the Edit menu and select Preferences, then Items & Inventory. Click the Company Preferences tab and click in the box in front of Inventory and purchase orders are activated if there isn’t a check in the box already. Here, too, you can ask that QuickBooks warn you when there isn’t enough inventory to sell. Click OK when you’re finished.

Figure 1: You need to be sure that QuickBooks knows you’ll be tracking inventory before you start making sales.
To create your first item, open the Lists menu and select Item List. Click the down arrow next to Item in the lower left corner of the window that opens and select New. The New Item window opens.
Warning: You must be very precise when you’re creating item records in order to avoid confusing your customers and creating problems with your accounting down the road. Please call us if you want us to walk you through the first few items.
QuickBooks should display the list of options below TYPE. Since you’re going to be tracking inventory that you buy and sell, select Inventory Part. Enter a name and/or item number in the next field. This is not the text that will appear on transactions; it’s simply for you to be able to recognize each item in your own bookkeeping.
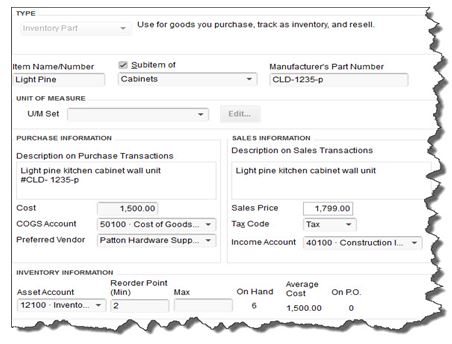
Figure 2: Let us work with you if you have any doubts about the data that needs to be entered in the New Item window. It must be 100 percent accurate.
In the example above, the box next to Subitem of has a check mark in it because “Light Pine” is only one of the cabinet types you sell (you can check this box and select <Add New> if you want to create a new “parent” item on the fly). Leave the next field blank if your item doesn’t have a Part Number, and disregard UNIT OF MEASURE unless you’re using QuickBooks Premier or above.
Fill in the PURCHASE INFORMATION and SALES INFORMATION fields (or select from the lists of options). Keep in mind that the descriptive text you enter here will appear on transaction forms, though customers will never see what you’ve actually paid for items, of course (your Cost, as opposed to the Sales Price).
QuickBooks should have automatically selected the COGS Account (Cost of Goods Sold), but you’ll need to specify an Income Account. Please ask us if you’re not sure, as this is a critical designation. The Preferred Vendor and Tax Code fields will display lists if you’ve already set these up.
QuickBooks should have pre-selected your Asset Account. If you want to be alerted when your inventory level for this item has fallen to a specific number (Min) so you can reorder up to the point you specify in the Max field, enter those numbers there (the Inventory to Reorder option must be turned on in Edit | Preferences | Reminders).
If you already have this item in stock, enter the number under On Hand. QuickBooks will automatically calculate Average Cost and On P.O. (Purchase Order).
Click OK when you’ve completed all of the fields. This item will now appear in your Item List, and will be available to use in transactions. When you want to create, edit, delete, etc. any of your items, simply open the same menu you opened in the first step here (Lists | Item List | Item).

Figure 3: The Item menu, found in the lower left corner of the Item List.
Precisely created Inventory Part records are critical to accurate sales and purchase transactions. So use exceptional care in building them.
Part 1 of our What’s New in Enterprise for 2015 focused on the changes to the Preferences. This issue will cover some of the other changes that were made to enhance this more powerful and robust version of QuickBooks.
Total Columns on Forms
In addition to being able to total the dollar amounts on transaction forms, we can now total Quantity and Custom Fields such as weights and counts specific to our industry.
This is available on Invoices, Sales Receipts, Sales Orders, Purchase Orders, Checks, Bills and Credit Card Charges. The Custom Field must be a numeric field and not text.
A section has been added to the Subtotal Item to allow you to edit and select which columns to total on forms.
This feature does not work well with Units of Measure. There is no way for the program to understand 2 each or 2 dozen and make the proper calculation. It’s also a little tricky for Group Items but it can be configured to work for this type of item.
Sort on Columns in Transactions
We now have the ability to sort columns on our transaction forms. This is available in Estimates, Sales Orders, Invoices, Assemblies, Checks, Credit Card Charges, Bills, Item Receipts, Credit Memos, Sales Receipts, Weekly Timesheets and Purchase Orders.
It behaves property with Subtotal Items by sorting those items above the Subtotal separately from the items below the subtotal. It does not do as well with Group Items.
Other than making the forms look neater, I don’t really understand it’s purpose here.
Search Within Transactions
This feature I like for when I am trying to find that needle in a haystack, like on lengthy purchase orders when I can’t remember if I added something to my order and I want to go back and look for it.
 It’s located on a separate tab in the transaction menu ribbon. Just type in the box and it will search the displayed transaction for matches to your inquiry. It looks at the Item Code and the Description only – not custom fields.
Shaded Lines on Forms and Reports
For me, this makes my forms and reports easier to read by alternating shaded lines. This option is available in the print window and is stored in the local printer preferences; it is saved per form and per user.
The option is available on Estimates, Sales Orders, Pick Ticket lists, Packing Slips, Invoices, Purchase Orders, Bills, Item Receipts, Sales Receipts, building Assemblies, the physical inventory worksheet and item price lists.
Show Cost on Sales Forms
This field is available for Sales/Work Orders, Invoices and Sales Receipts. It is only a screen option and will not print on the forms themselves. It allows you to see your cost as your making a sale and with the new Subtotal feature, you can compare your total cost to your total sale.
Keep in mind that this is Cost, not Average Cost. I can imagine that this would be useful in calculating customer discounts or mark-downs at the time of a sale to make sure that you’re not selling below cost.
Print Footer on Last Page Only
I’ve been waiting for this one, unfortunately it’s only in Enterprise 2015 and not Pro and Premier 2015. The option is located in the additional customization settings of the form template on the last tab – Print – Only Show Total on the Last Page.
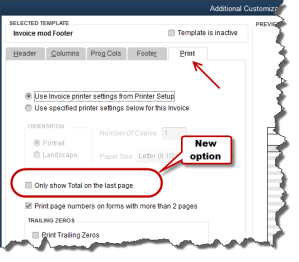 This avoids having that blank Total Box show on the first page of an invoice with multiple pages. It suppresses the entire footer with the exception of custom text boxes and page numbers.
It affects Invoices, Sales Orders, Estimates and Purchase Orders. For some unknown reason it is not currently available on Credit Memos or Sales Receipts. Maybe they will add that later.
There are quite a few more changes in Enterprise 2015 – too lengthy to cover in this article – and I am sure that there will be more to follow. At the time of this writing, rumor has it that there will be a big announcement regarding the Enterprise platform at the QB Connect conference in San Jose next week – I’ll let you know what I find out.
Getting QuickBooks ready to process payroll is a complex, time- consuming process. Here’s what you can expect.
Payday. You look forward to it when you’re young and working at your first part-time job.
But as a grown-up who needs to start processing payroll for your employees, you probably anticipate it in a different way, perhaps even with a sense of dread. QuickBooks handles the real grunt work once you’ve done the initial setup, but those early hours you spend preparing to print your first paycheck can be challenging.
Fortunately, QuickBooks’ payroll setup tool can guide you through the process. Once you’ve signed up for payroll, open the Employees menu and select Payroll Setup.

Figure 1: The QuickBooks Payroll Setup tool tells you’ll what information you need to supply in order to start paying employees.
Easy Operations
The first screen you’ll see in this step-by-step, wizard-like setup guide contains a link to QuickBooks’ payroll setup checklist. You don’t have to assemble all of the information you’ll need about your company, your employees, and your payroll taxes, but we recommend that you gather as much as you can before you start.
You’ll advance through setup by completing the information requested and then clicking the Continue button in the lower right (or, sometimes, Next; there’s also a Previous button available often). If you don’t have a particular detail immediately at hand, you can continue on and come back later. You’ll be able to edit your work then.
To back out of the whole process and return at another time, click the Finish Later button in the lower left.
Building a Framework
QuickBooks first wants to know about the various types of compensation and employee benefits your company offers. To start adding your Compensation options, click Add New. Click in the box in front of any pay types you support (Salary, Hourly wage and overtime, Commission, etc.) to create a check mark. When you click Next, this window opens:

Figure 2: It’s easy to indicate the types of compensation your company offers.
Keep clicking Next after you’ve completed each screen until you come to a page that lists all of the compensation types you’ve defined. To make any changes, highlight the type and click Edit to modify or Delete to remove. Then click Continue when you’re finished.
The next section is probably the most difficult: Employee Benefits. Here, using similar interface conventions to enter information and navigate, you’ll provide information about your company’s:
- Insurance benefits
- Retirement benefits
- Paid time off, and
- Miscellaneous items (cash advance, wage garnishment, mileage reimbursement, etc.).
It’s absolutely critical that you set these up accurately, or you’ll have unhappy benefits providers – and employees. If you’re not absolutely confident of an answer, it’s better to leave an item unfinished and come back later. You may want to ask us to work with you as you complete this section.
People and Taxes
QuickBooks will then ask you about your employees. Have your W-4 forms handy for this section, as you’ll need to know Social Security numbers, birth dates, etc.

Figure 3: On this screen, you’ll tell QuickBooks what type(s) of compensation and their dollar amounts apply to the employee.
All of those details you entered earlier about company benefits comes into play here. Once you’ve defined an employee’s compensation types and amounts, the next screen will display the additions and deductions that your company supports. You will have set up defaults for some of these, but you can modify them for individual employees.
There are numerous other details that you’ll have to supply for your staff, like how vacation and sick hours accrue, what state will want to collect taxes from them, and what their filing status is.
Unless you’ve worked with payroll before, you’re going to want our help in completing the payroll tax section. Once it’s done correctly, QuickBooks will calculate taxes due and help you pay them.
Finally, QuickBooks helps you determine whether you’ll need to enter any previous payroll data from the current year before you start to process your payroll in the software.
Whether you’re switching from manual payroll or a payroll service, or simply getting ready to pay your first employee, QuickBooks payroll-processing tools can help you save time and foster accuracy – as long as you get the details from the start.
The Income Tracker is one of QuickBooks’ more innovative features. If you’re not using it, you should be.

One of the reasons that QuickBooks appeals to millions of small businesses is because it offers multiple ways to complete the same tasks, which accommodates different work styles. Say, for example, you wanted to look up a specific invoice. You could:
- Go to the Customer Center and select the customer, and then scan through the list of transactions,
- Use the Find feature (Edit | Find), or
- Create a report.
There’s also another way you can get there if you have a recent version of QuickBooks: the Income Tracker. (Note: Only the Administrator or a staff member with the correct permissions can access this feature. Talk to us about whether to allow other employees to use it, and how to set that up.)
 |
| Figure 1: QuickBooks’ Income Tracker provides a visual overview of your company’s income. |
That’s the first thing you can do with QuickBooks’ Income Tracker. To get there, either click the link in the vertical navigation bar or go to Customers | Income Tracker.
Four colored bars across the top of the screen represent unbilled estimates, open invoices, overdue invoices, and invoices paid within the last 30 days. Each bar contains two numerical values: the number of transactions of that type and the dollar amount involved.
QuickBooks defaults to displaying all types of transactions, but when you click on a bar, the screen changes to show only that type of transaction.
You can also filter the table of transactions using the drop-down lists below the colored bars. Your choices here include Customer:Job, Type, Status (Open, Paid, etc.) and Date (range). Click the arrow to the right of each filter’s label to display your options.
The column labels below these lists will change depending on the transaction type that’s active.
|
More Functionality |
||
|
The Income Tracker is great for simply viewing groups of transactions; double-clicking on one will open the original form. You can also open them by selecting an action to take. For example, open your estimates list and click on a transaction to highlight it. Then click the arrow next to Select in the Action column at the far right end of the row.
If you choose the first option here, QuickBooks opens a small window that asks you whether you’d like to create an invoice for 100 percent of the estimate, a percentage of it, specific items, or percentages of each item. When you make your selection and click OK, a completed invoice form opens, which you can then check over and save.
As you can see above, you can also mark the estimate as inactive, print it, or email it.
Each transaction type supports a different set of actions. In the open invoice action column, as you’d expect, you can click the option to Receive Payment, which opens the Customer Payment window with the customer and amount due already filled in. This can be edited to reflect a different amount, or you can just accept it as is, then save it. |

|
Flexible Forms
|
||
|
You can even create a new transaction within the Income Tracker. Click on the arrow next to Manage Transactions in the lower left corner of the screen and select the form you want.
The Income Tracker also provides one of the fastest ways to print multiple forms. Just select the transactions you want to print by clicking in the box in front of them, and then click the arrow next to Batch Actions in the lower left corner.
Finally, you can edit transactions from here, too. Either double-click on one or select it and click Edit Highlighted Row in the Manage Transactions menu.
QuickBooks’ Income Tracker doesn’t do anything that can’t be done another way in the program. But it provides an excellent one-glance view of the current state of your receivables movement.
If you’re consistently seeing patterns that you don’t like, call us. We can evaluate your receivables process and suggest ways to accelerate it. Even if your sales aren’t increasing, getting that “PAID” stamp on invoices quickly will improve your cash flow and strengthen your confidence as a business manager. |

|
QuickBooks provides dozens of customizable report templates. You know when you need some of them, but which are musts?
You send invoices because you sold products and/or services. Purchase orders go out when you’re running low on inventory, and there are always bills to pay, it seems like. All of this activity is, of course, important in itself, but all of your conscientious bookkeeping culminates in what’s probably the most critical element of QuickBooks: your reports.
Reports can tell you how many navy blue sweatshirts you sold in March, what you paid for health insurance premiums in the first quarter, and how much you bought from your favorite vendor last month. They’re very good at drilling down to get the precise set of numbers you need.
But reports – carefully customized and properly analyzed – can do more than tell you how many golf clubs to order and when it’s time to switch phone services. They can help you make the business decisions that will help you take your growing company to the next level. There are several that you should be looking at regularly, some of which you can interpret easily and use in your daily workflow. We’ll help you with the interpretation of the more complex financial reports. |

|
Who Owes Money? |
|
That’s probably a question you ask yourself every day. You don’t necessarily have to run the A/R Aging Detail report every day, but you’ll want to run it frequently. It tells you who owes you money and whether they’ve missed the due date (and by how many days).
Figure 1: By running the A/R Aging Detail report, you can see whether you need to follow up with customers who have past due invoices.
As with any report, you can modify it to include the columns, data set and date range you want by clicking the Customize button. When you create a report in a format that you think you might want to run again, click the Memorize button. Enter a name that you’ll remember, and assign it to a Memorized Report Group.
|

|
Getting There
|
|
There are two ways to find the reports you want to see. You can open the Reports menu and move your cursor down to the category you want, like Customers & Receivables, which will open a slide-out menu of options there.
Or you can open the Report Center, which lets you explore reports in more depth. Each is represented by a small graphic with four icons under it. You can:
Figure 2: If you access QuickBooks reports through the Report Center, you’ll have several related options.
Other accounts receivable reports that you should consult periodically include Open Invoices and Average Days to Pay. |

|
Tracking What You Owe
|
|
Reports can also keep you up-to-date on money that you owe to other people and companies. An important one is Unpaid Bills Detail, accessible through the Vendors & Payables menu item. Though you can modify its columns, this report basically tells you who is expecting money from you, the date the bill was issued and its due date, any number assigned to it, the balance due, and relevant aging information.
Vendor Balance Detail is critical, too. This report displays every transaction (invoices, payments, etc.) that contribute to the balance you have with each vendor.
|
|
Standard Financial Reports
|
||
QuickBooks report categories include one labeled Company & Financial. These are reports that you can run yourself, but they’re critical for understanding your company’s financial status. We can customize and analyze these for you on a regular basis so you’ll know where you stand. They include:
Reports can only generate information about what you’ve entered in QuickBooks and exactly where it’s been entered. So it’s crucial that you follow standard accounting practice as you proceed through your daily workflow. We’re always available to answer questions you have about QuickBooks’ structure and your activity there. Your reports – and your critical business decisions – depend on it. |

There are a lot of clues that indicate trouble with your QuickBooks company file. Is it time for a check-up and tune-up?
After this ridiculously long winter, you’ll probably hear few complaints about things like puddles in the street, summer heat and spring cleaning. Most people are eager to throw open the doors and windows, and attack the dirt that the season left behind, both inside and outside of the house.
It’s not hard to see when your home is dirty. QuickBooks company file errors are harder to detect, but they’re there, including:
- Performance problems
- Inability to execute specific processes, like upgrading
- Occasional program crashes
- Missing data (accounts, names, etc.)
- Refusal to complete transactions, and
- Mistakes in reports.
 Figure 1: If some transactions won’t go through when you click one of the Save buttons – or worse, QuickBooks shuts down — you may have a corrupted company file.
Call for Help
The best thing you can do if you notice problems like this cropping up in QuickBooks – especially if you’re experiencing multiple ones – is to contact us. We understand the file structure of QuickBooks company data, and we have access to tools that you don’t. We can analyze your file and take steps to correct the problem(s).
One of the reasons QuickBooks files get corrupt is simply because they grow too big. That’s either a sign of your company’s success or of a lack of periodic maintenance that you can do yourself. QuickBooks contains some built-in tools that you can run occasionally to minimize your file size.
One thing you can do on your own is to rid QuickBooks of old, unneeded data. The software contains a Condense Data utility that can do this automatically. But just because QuickBooks offers a tool doesn’t mean that you should use it on your own.

A Risky Utility
The program’s documentation for this utility contains a list of warnings and preparation steps a mile long.
We recommend that you do not use this tool. Same goes for Verify Data and Rebuild Data in the Utilities menu. If you lose a significant amount of company data, you can also lose your company file. It’s happened to numerous businesses.
Be Proactive
Instead, start practicing good preventive medicine to keep your QuickBooks company file healthy. Once a month or so, perhaps at the same time you reconcile your bank accounts, do a manual check of your major Lists.
Run the Account Listing report (Lists | Chart of Accounts | Reports | Account Listing). Are all of your bank accounts still active? Do you see accounts that you no longer used or which duplicate each other? Don’t try to “fix” the Chart of Accounts on your own. Let us help.

Figure 3: You might run this report periodically to see if it can be abbreviated.
Be very careful here, but if there are Customers and Vendors that have been off your radar for a long time, consider removing them – once you’re sure your interaction with them is history. Same goes for Items and Jobs. Go through the other lists in this menu with a critical but conservative eye. If there’s any doubt, leave them there.
A Few Alternatives
There are other options. Your copy of QuickBooks may be misbehaving because it’s unable to handle the depth and complexity of your company. It may be time to upgrade. If you’re using QuickBooks Pro, consider a move up to Premier. And if Premier isn’t cutting it anymore, consider QuickBooks Enterprise Solutions.
There’s cost involved, of course, but you may already be losing money by losing time because of your version’s limitations. All editions of QuickBooks look and work similarly, so your learning curve will be minimal.
Also, try to minimize the number of open windows that are active in QuickBooks. That will improve your performance. And what about your hardware? Is it getting a little long in the tooth? At least consider adding memory, but PCs are cheap these days. If you’re having problems with many of your applications, it may be time for an upgrade.
A Stitch in Time…
We’ve suggested many times here that you contact us for help with your spring cleanup. While that may seem self-serving, remember that it takes us a lot less time and money to take preventive steps with your QuickBooks company file than to troubleshoot a broken one.
You may not have even completed your 2013 taxes yet. But now is an ideal time to start getting ready for your 2014 returns.
We know that you’re in some stage of preparation for your 2013 income taxes. It may seem odd to start thinking about 2014 taxes just now, but actually, this is the ideal time to start planning and making business decisions with their tax implications always in the back of your mind.
As you look at the data that will be entered in your 2013 tax forms, you’re likely to come across some expenses that you might have handled differently, or some income that should have been deferred. If you begin your planning process for 2014 while 2013 is still in the works, you can start making smarter, more tax-advantageous business decisions now, instead of late in the year when everyone is rushing to take actions necessary to lower their tax obligation.
Here’s how QuickBooks can help you with this new approach.
Overhaul your Chart of Accounts
The mechanics of doing this in QuickBooks are fairly uncomplicated, but changing this critical list – the backbone of your company file – requires solid knowledge of which accounts should be added, deleted or changed. You also need to know which accounts and subaccounts will have impact on your income taxes. They must be structured accordingly.

Figure 1: QuickBooks’ default Chart of Accounts can be easily modified to meet your company’s unique needs. But let us help you with this task.
For these reasons, we ask that you consult with us if you think your Chart of Accounts could use an overhaul. Our early involvement will be much more economical for you than if we have to come in down the road when your accounts have become dangerously tangled.
Devise an Effective System for Estimated Taxes
As you well know, there’s no magical formula for estimating how much income tax you’ll owe when all of your income and expenses have been tallied. We can make this an ongoing task by creating monthly or quarterly financial reports for your business and working from those.
If you’re self-employed, you might want to open a low-fee checking account that will serve solely as your tax fund. Because you have no employer to pay a portion of your Social Security and Medicare obligations, it’s critical that you’re putting enough away. Consider putting one-third of your taxable income into that account and see how it goes. You may get a pleasant surprise at tax prep time, or you may have to dip into other savings to be compliant.

Figure 2: You may want to set up a separate bank account to park estimated tax funds, so you know they’re committed. Ask us about numbering new accounts.
You can submit federal payments online on the Electronic Federal Tax Payment System site. Check with us to see if your state has an electronic system. Of course, the IRS will accept a check.
Run Reports on Everything. And Keep Running Them.
We already mentioned that we’re happy to create and analyze your most critical financial reports on a regular basis. You may have tried to understand the Trial Balance, Statement of Cash Flows, etc. in QuickBooks and been puzzled. Don’t feel incompetent because of that: It often takes an accountant-level individual to understand what they mean for your business.
You can define and build your own reports using QuickBooks’ customization tools. If you have employees who travel, consider bringing in an automated expense report application (we can help you find one and implement it). Stress the importance of adhering to IRS rules about travel. Same goes for your local salesforce, off-site technicians and other service providers, etc.

For employees who come into the office every day or are telecommuting, you can give them some ownership of their contribution to expenses by bringing them into the budget process and/or requesting that they submit their own monthly mini-reports on any company funds they spend. The more employees are aware of and accountable for expenses, the easier it will be for you to work toward minimizing your tax obligation. And having some information about the considerable sum you pay in taxes may help staff understand your tightening of the purse strings.
Consider Retraining Bookkeeping Staff if Necessary
You may be paying a portion of your taxes unnecessarily, simply because your company’s bookkeeping is less-than-precise. Nip that in the bud.
The more you manage your reporting, stay aware of the consequences of every expenditure and bring employees into the process, the more prepared you’ll be for 2014 taxes.
