Your “Chart of Accounts” is the list of accounts in your accounting software and forms the basis for all reports. It is the foundation of your accounting system. The accounts are listed in your reports, and the totals allow you to determine how much you’ve spent, made, own, or owe depending on the type of account.
It’s essential to create a list of accounts that you need in order to make better business decisions. Your chart of accounts needs to be designed intentionally. It needs to be short, sweet, and to the point. You don’t need a million accounts. If it hasn’t been, it’s never too late.
Two Types of Accounts
There are two major types of accounts:
- Balance sheet accounts that tell what you own and owe. These are determined by your checking accounts, inventory, and credit cards.
- Income statement accounts that tell you about current period operating results. These, in turn, have two major categories, income and expenses. For companies with inventory, expenses are further broken out into cost of goods sold and other expenses.
Three Purposes
A chart of accounts should meet three needs:
- Make it really fast for you to do your taxes
- Give you all sorts of “Aha’s”
- Allow you to spend far more time on revenue analysis than expense analysis because that’s where success lies for small businesses
Taxes
Your accounts should be the same as (or be able to be grouped into) the lines on your tax return. You can find a copy of the tax form you fill out. For example, a sole proprietor will use a Schedule C of the 1040, and a corporation will complete an 1120.
There are a few special needs, such as meals and entertainment which are only partially deductible, that you need to pay special attention to. We can help you with that.
Aha
As small business owners, we work with a gut feel, but when you see what you’ve made or spent in black and white, it takes on a whole new level of meaning. Your income statement and other reports should do that for you. If they don’t you may not have your accounts set up right.
Revenue
Think about how you want to see your revenue:
- By product line
- By major supplier
- By category of solution to the customer
- By customer type
- By service type
- By location (you can also use Class for this)
- By job
- By distribution method
We can help you brainstorm based on your industry and type of business.
Actionable Intelligence
If you’ve been putting all your revenue into one revenue account, it will be exciting the first time you see your new Profit and Loss statement.
If you’ve been breaking out your revenue but it hasn’t led to any actionable change in your business, then there may be a better way to break it out.
If you’re happy with the way your revenue is broken out, then think about how you can take it to the next level.
Once you see your new chart of accounts, you will likely have even more questions. The chart of accounts can be an evolving entity, designed to serve your business needs.
Working with Checks in QuickBooks
Online banking may get all the headlines, but many small businesses still insist on paper checks. QuickBooks can accommodate them.
“I don’t write checks anymore,” you hear a lot of people say these days. Debit cards, smartphone payment apps, and online banking have replaced the old paper checkbook for a lot of consumers.
That’s fine if you’re at Starbucks or the grocery store, but many small businesses still prefer to issue paper checks to pay bills, cover expenses, and make product and service purchases. QuickBooks provides tools that help you create, print, and track checks.
But you don’t just head to the Write Checks window every time something needs to be paid. There are numerous times when you would record a payment in a different area of the program. For example, if you’ve already created a bill in Enter Bills, you’d go to the Pay Bills screen to dispatch a check.

Once you’ve recorded a bill in Enter Bills, you need to visit the Pay Bills screen to dispatch a check. The image above shows the bottom of that screen.
Other examples here include:
- Issuing paychecks (click the Pay Employees icon),
- Submitting payroll taxes and liabilities (Pay Liabilities icon), and
- Paying sales taxes (Manage sales tax icon).
Simple Steps
Let’s say you asked an employee to go to an office supply store to pick up some copy paper because you ran short before your normal shipment came in. If you knew the exact amount it would cost, you could write a check directly to the shop. But the employee agrees to pay for it and be reimbursed.
Click the Write Checks icon on the home page. If the BANK ACCOUNT that’s showing isn’t the correct one, click the arrow to the right of that field and select the right one. Unless you’ve written a check to that employee before, he won’t be in the Vendor list that opens when you click the arrow to the right of PAY TO THE ORDER OF. Enter his name in that field.
The Name Not Found window opens. If this was a new vendor that you would be working with again, you’d click Set Up and follow the instructions in the step-by-step wizard that opened. Since this isn’t the case, click Quick Add. In the window that opens, click the button next to Vendor.
Note: If you’re using a payroll application, you already have an employee record for that individual, which would have filled in automatically when you started typing the name. Since this is a Non-Payroll Transaction, it won’t get mixed up with his payroll records as long as you assign the correct account.

If you don’t want to create an entire record for the payee of a check, you can just click Quick Add.
QuickBooks will then return you to the check-writing screen, where you can verify the check number and date, and enter the amount. Fill in the MEMO field so you’ll remember the reason for the payment.
At the bottom of the screen, you’ll see a tabbed register. The Expenses tab should be highlighted and the amount of your check entered. Click the down arrow in the field under ACCOUNT to open the list, and select Office Supplies. The AMOUNT should fill in automatically. Not sure which account to select, and what the remaining three columns mean? Ask us.
Note: You would only enter the expense under the Items tab if you were buying inventory items or paying job-related costs.

Warning: If you’re planning to print the check, be sure to check the Print Later box in the horizontal toolbar at the top of the screen.
When you’re finished, save the transaction. Since you want to pay the employee right away, click the Print Checks icon and click in the field in front of the correct check to select it, then click OK.
Easy, But Tricky
QuickBooks makes the mechanics of writing checks easy. Simple as it is, though, a lot can go wrong if you, for example:
- Issue a check from the wrong screen,
- Classify a check incorrectly, or,
- Skip a step.
We encourage you to set up a learning session with us if you’re new to check-writing in QuickBooks or are confused about any of its attributes. We’ll be happy to help ensure that your accounts payable activities will result in accurate record keeping.
Abandoned Property – What Is It? How Do We Account For It?

How many times have you written a check to someone, who either loses it or forgets to cash the check? After a certain amount of time, that check is considered stale and can no longer be presented to be cashed. It sits in your QuickBooks file uncleared on the bank statement reconciliation, now what?
You call the person, ask them to cash it. You may even re-issue the check so they have another chance to get paid, but then you find out they moved away and you don’t have their address, now what?
Uncashed checks to vendors, payroll checks to employees, contractors, dividends, and distributions to stockholders all are potential unclaimed or abandoned property. Every state has their own escheatment laws that require businesses and organizations to hand over to the state, the abandoned property that has been in their possession for a certain period of time. If a check goes uncashed, that does not mean the property no longer belongs to that individual and the obligation that the employer has to compensate the employee does not go away.
In the state of New Hampshire, you are required to notify the owner of the abandoned property. No more than 120 days prior to filing, all holders must send a written notice to the owner of the property having a value of $50.00 or more. In this notice you must verify the nature of the property and how to retrieve it and avoid abandonment to the state. If this attempt at notifying the owner is unsuccessful, you will then move forward to reporting the abandoned property to the state.
How to Report Abandoned Property in New Hampshire

To begin the process of reporting abandoned property, you must fill out the State of New Hampshire form for abandoned property which is Form T-1. Below is a link for your convenience to click on and review this form and/or print it.
https://www.nh.gov/treasury/documents/abandonded-propert-t1-form.pdf
For detailed instructions on how to fill out this form, we have also provided you the necessary link that will walk you through, step-by-step for filling out NH Form T-1.
https://www.nh.gov/treasury/documents/abandonded-property-t1-instructions.pdf
The first column on the form asks for the correct code for the property type. Here is a link that will show you which code is appropriate for your abandoned property.
https://www.nh.gov/treasury/documents/property-type-codes-t1-a.pdf
How to handle Abandoned Property in QuickBooks
It is important to remember that abandoned property does not belong to the company. That property is either owed to the state or owner. Uncashed checks should never be voided. Making sure your bank accounts are reconciled on a monthly basis will help you monitor uncashed checks. Once that property amount is sent to the state or given to the property owner, it can then be cleared from your bank reconciliation.
What Sales Orders Are and When to Use Them
They’re not as commonly used as invoices. But if you need them, they’re there.
When you want to document sales that you can’t (or won’t) fulfill immediately, but you plan to do so in the future, you can’t create an invoice just yet. This is where sales orders come in.
You may never need to create a sales order for a customer. Perhaps you have a service-based business, or you never run out of inventory. Or you simply don’t enter an order unless you know you have the item(s) in stock.
But if you plan to use sales orders, you must first make sure QuickBooks is set up to accommodate them. Open the Edit menu and select Preferences, then Sales & Customers. Click the Company Preferences tab to open that window.

Before you can use sales orders, you’ll need to make sure that QuickBooks is set up for them.
Sales Orders Are Required for Some Tasks
There are a few situations where you must use a sales order:
- If you have a customer who orders very frequently, you may not want to create an invoice for absolutely every item. You could use a sales order to keep track of these multiple orders, and then send an invoice at the end of the month.
- If you’re missing one or more items that a customer wanted, you can create a sales order that includes everything, but only note the in-stock items on an invoice. The sales order will keep track of the portion of the order that wasn’t fulfilled. Both forms will include the back-ordered quantity.
Warning: Working with back orders can be challenging. In fact, working with inventory-tracking itself may be problematic for you. If your business stocks enough of multiple types of items that you want to use those QuickBooks features, let us help you get started to ensure that you understand these rather complex concepts.
Creating a Sales Order
Creating sales orders in QuickBooks is actually quite simple and similar to filling out an invoice. Click the Sales Orders icon on the home page, or open the Customers menu and select Create Sales Orders.

A sales order in QuickBooks looks much like an invoice.
Click the down arrow in the field next to Customer: Job and choose the correct one. If you use Classes, select the correct one from the list that drops down, and change the Template if you’ve created another you’d like to use.
Tip: Templates and Classes are totally optional in QuickBooks. Templates provide alternate views of forms containing different fields and perhaps a different layout. Classes are like categories. You create your own that work for your business; they can be very helpful in reports. Talk to us if you don’t understand these concepts.
If the shipping address is different from the customer’s main address, click the down arrow in the field next to Ship To, and either select an alternate you’ve created or click <Add New>. Make sure the Date is correct, and enter a purchase order number (P.O. No.) if appropriate.
The rest of the sales order is easy. Click in the fields in the table to make your selections from drop-down lists, and enter data when needed. Pay special attention to the Tax status. Let us know if you haven’t set up sales tax and need to.
When everything is correct, save the sales order. When you’re ready to convert it to an invoice, open it and click the Create Invoice icon in the toolbar. QuickBooks will ask whether you want to create an invoice for all the items or just the ones you select. You’ll be able to specify quantities, too, in the window that opens.

When you create an invoice from a sales order, you can select all the items ordered or a subset.
As we’ve said, sales orders are easy to fill out in QuickBooks. But they involve some complex tracking, and you may want to schedule a session with us before you attempt them. Better to understand them ahead of time than to try to troubleshoot problems later.
For business owners with employers, payroll is a necessary task that can slow your day and tie you down if you let it. If you’re looking for a way to make payroll less time-consuming, here are five ideas you can put to good use:
- Employee Onboarding
If you hire a lot, empower your new hires by letting them do their paperwork for you. A good payroll system allows employees to “onboard” themselves, completing the I-9, W-4, and direct deposit authorizations electronically, even before they show up for their first day. You’ll still need to ask for ID on their first working day, but at least you won’t have to do their paperwork for them.
- Integrate Employee Benefits
Rather than hire several separate companies to handle benefits, some payroll systems allow you to integrate benefits solutions right in their dashboard. That way, you won’t have to re-enter employee data in multiple systems, which often gets out of sync. Deductions and payments can also be integrated to save accounting time.
- Delegate Timesheet Entry
Require non-exempt employees to enter their own time; all you should have to do is approve it. The right timesheet application can take care of that, and a great timesheet application will allow employees to enter time from multiple options, including timecard, cell phone, and others.
- Eliminate the Annual Worker’s Compensation Audit
Tie your worker’s compensation vendor to your accounting system, and you’ll be able to avoid that time-consuming annual reconciliation report required by your worker’s compensation insurance company. You can also avoid the large annual payment because the insurance will be taken out each payroll cycle.
- Reduce the Frequency of Payroll
It’s not always possible, but if you can pay employees less frequently, you might be able to cut your payroll time in half. Pay weekly employees every two weeks or pay bi-weekly employees monthly. Reducing payroll frequency boosts cash flow as well.
Try one of these five ideas to streamline your payroll time and costs in your business. And as always, let us know if we can help.
- Discourage employees from excessive web browsing. This can be a hard rule to enforce, as some employees probably need internet access for research, timecard entry, and other work-related tasks. Create a firm policy legislating what workers can and can’t do on company-issued equipment (including tablets and smartphones) or any personal devices that use your wireless network.
- Ask employees to refrain from using public networks on work equipment. Enforce the rules vigorously, and make compliance an element of performance evaluations.
- Minimize app installations on business smartphones. Employees should ask for approval. Viruses and malware get in that way, as well as through some websites and email attachments.
- Use monitoring software. If you can’t afford to pay for “managed IT” (a la carte, third-party IT services), install an application that alerts you to problems.
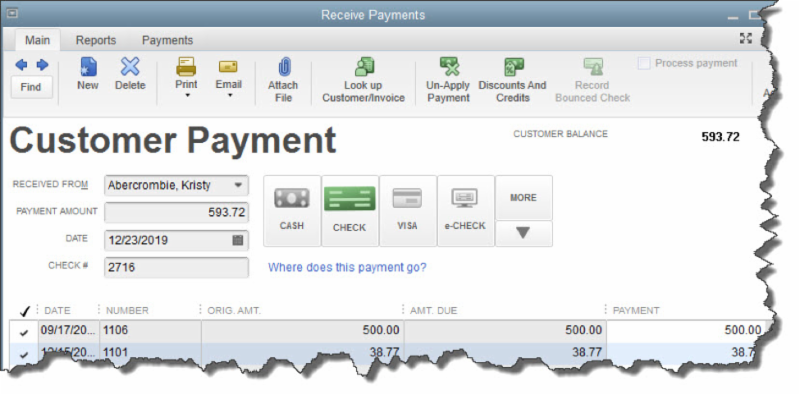
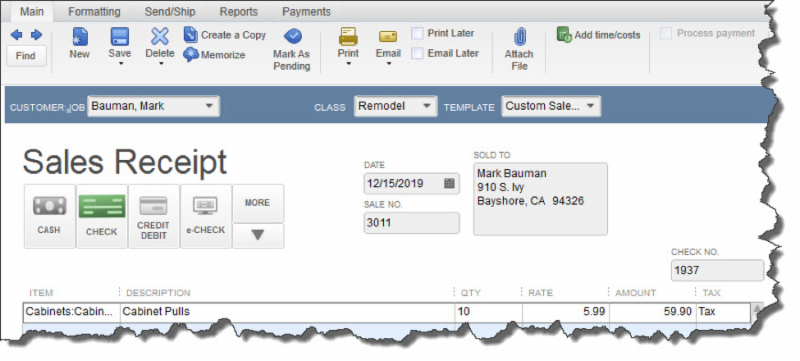
- CASH
- CHECK
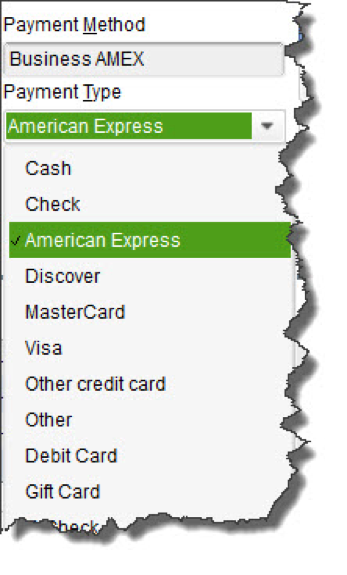
- CREDIT DEBIT (A specific card type may be shown here if you’ve indicated the customer’s preferred payment method in his or her record.)
- e-CHECK
Increasing your profits might sound like it’s an unattainable dream just out of your reach. But there are a finite number of ways that profits can be increased. Once you understand what they are, you’ll have clarity on how to best reach your goals.
There are two primary ways to increase profits:
- Raise revenue
- Lower expenses
That’s not particularly enlightening or instructional, is it? Let’s look at the four ways you can increase revenues and the four ways you can reduce expenses to get clearer on what actions we can take.
Four Ways to Increase Revenue
1. Raise prices
The easiest way to raise revenue is to simply raise prices. However, this is not foolproof and assumes you’ll be able to maintain the volume of sales you’ve achieved in the past.
This method is also limited by market demand, what your customers are willing to pay.
2. Add new customers
Adding new customers is what most entrepreneurs think about when raising revenue. Increasing your marketing or adding new marketing methods is typically the way to add new customers.
Another related option is to work hard to keep the customers you already have. You can also potentially contact the customers you lost and ask them to come back.
3. Introduce new products or services
For some companies, your products and services are changing every year. For others, not so much. To increase revenue, consider adding new products or services that will bring in an additional revenue stream that you didn’t have before.
Even if your products are changing every year, you can consider adding something completely different that your customer base would love. For example, a hair salon could add a nail desk, a clothing store could add handbags or shoes, a grocery store could add a coffee bar, a restaurant could add catering, a landscaper could add hardscaping, and so on.
4. Acquisition
The final way a business can increase revenue is to acquire another business in a merger or acquisition.
Four Ways to Reduce Expenses
1. Negotiate for a better deal with vendors
If you’ve been working with a vendor for a while, you may be able to re-negotiate your contract with them. This is especially common with telecom companies. Call your phone provider and ask them for the latest deal. They always favor new customers over long term customers, but they don’t want to lose customers either. Just calling them usually yields a better price than what you are paying now.
2. Change vendors
If a vendor has gotten too expensive, it might be time to look for a new vendor. Health care insurance seems to be in this category. Often, changing providers will lower your costs.
3. Cut headcount
If there is not enough work to support your employees or not enough cash flow to pay them, then it might be time for a layoff or restructuring. You might also consider outsourcing a function that you previously did in-house.
4. Cut the expense or reduce services
It might be your business no longer needs to spend money on an expense. Perhaps this expense has been automated. In this case, it’s an easy decision to cut the expense out entirely.
Those are the eight ways to increase profits. Which one makes the most sense in your business? Create a plan around these eight ideas to boost your profit in 2017, and let us know if we can help.
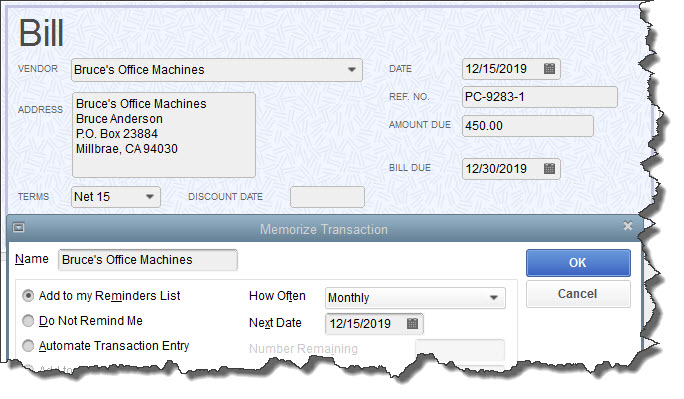
- Add to my Reminders List. If you click the button in front of this option, the current transaction will appear on your Reminders List every time it’s due. You might request this for transactions that will change some every time they’re processed, like a utility bill that’s always expected on the same day, but which has a different amount every month.
- Do Not Remind Me. Obviously, QuickBooks will not post a reminder if you click this button. This is best used for transactions that don’t recur on a regular basis. Maybe you have a snow-shoveling service that you pay only when there’s a storm. So the date is always different, but everything else is the same.
- Automate Transaction Entry. Be very careful with this one. It’s reserved for transactions that are identical except for the issue date. They don’t need your approval – they’re just created and dispatched.
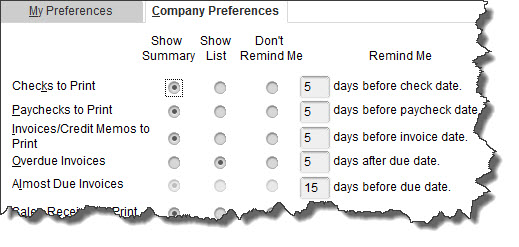

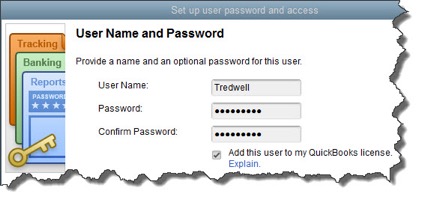
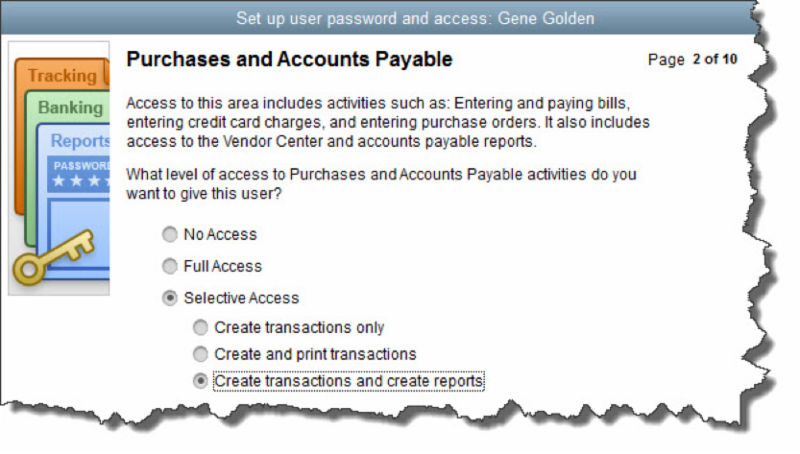
- All areas of QuickBooks,
- Selected areas of QuickBooks, or,
- External accountant (you can grant us access to all areas of the software except for those that contain sensitive customer data, like credit card numbers).
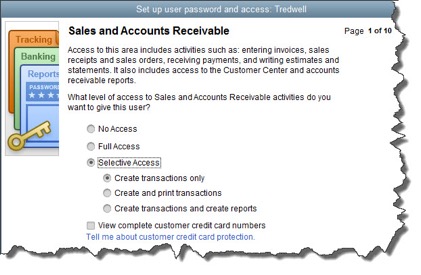
- Sensitive Accounting Activities, like funds transfers, general journal entries, and online banking tasks
- Sensitive Financial Reporting, which allows access to all QuickBooks reports. The option you choose here overrides all other reporting restrictions that you’ve specified for the employee.
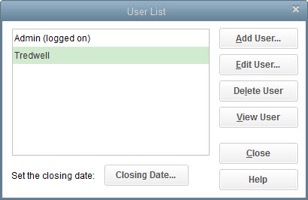
 New Business Direction LLC