Learn How to Navigate the Homepage of QuickBooks with Rhonda Rosand of New Business Directions, LLC.
What Sales Orders Are and When to Use Them
They’re not as commonly used as invoices. But if you need them, they’re there.
When you want to document sales that you can’t (or won’t) fulfill immediately, but you plan to do so in the future, you can’t create an invoice just yet. This is where sales orders come in.
You may never need to create a sales order for a customer. Perhaps you have a service-based business, or you never run out of inventory. Or you simply don’t enter an order unless you know you have the item(s) in stock.
But if you plan to use sales orders, you must first make sure QuickBooks is set up to accommodate them. Open the Edit menu and select Preferences, then Sales & Customers. Click the Company Preferences tab to open that window.

Before you can use sales orders, you’ll need to make sure that QuickBooks is set up for them.
Sales Orders Are Required for Some Tasks
There are a few situations where you must use a sales order:
- If you have a customer who orders very frequently, you may not want to create an invoice for absolutely every item. You could use a sales order to keep track of these multiple orders, and then send an invoice at the end of the month.
- If you’re missing one or more items that a customer wanted, you can create a sales order that includes everything, but only note the in-stock items on an invoice. The sales order will keep track of the portion of the order that wasn’t fulfilled. Both forms will include the back-ordered quantity.
Warning: Working with back orders can be challenging. In fact, working with inventory-tracking itself may be problematic for you. If your business stocks enough of multiple types of items that you want to use those QuickBooks features, let us help you get started to ensure that you understand these rather complex concepts.
Creating a Sales Order
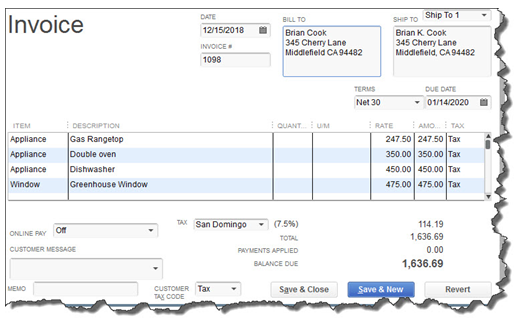
Creating sales orders in QuickBooks is actually quite simple and similar to filling out an invoice. Click the Sales Orders icon on the home page, or open the Customers menu and select Create Sales Orders.

A sales order in QuickBooks looks much like an invoice.
Click the down arrow in the field next to Customer: Job and choose the correct one. If you use Classes, select the correct one from the list that drops down, and change the Template if you’ve created another you’d like to use.
Tip: Templates and Classes are totally optional in QuickBooks. Templates provide alternate views of forms containing different fields and perhaps a different layout. Classes are like categories. You create your own that work for your business; they can be very helpful in reports. Talk to us if you don’t understand these concepts.
If the shipping address is different from the customer’s main address, click the down arrow in the field next to Ship To, and either select an alternate you’ve created or click <Add New>. Make sure the Date is correct, and enter a purchase order number (P.O. No.) if appropriate.
The rest of the sales order is easy. Click in the fields in the table to make your selections from drop-down lists, and enter data when needed. Pay special attention to the Tax status. Let us know if you haven’t set up sales tax and need to.
When everything is correct, save the sales order. When you’re ready to convert it to an invoice, open it and click the Create Invoice icon in the toolbar. QuickBooks will ask whether you want to create an invoice for all the items or just the ones you select. You’ll be able to specify quantities, too, in the window that opens.

When you create an invoice from a sales order, you can select all the items ordered or a subset.
As we’ve said, sales orders are easy to fill out in QuickBooks. But they involve some complex tracking, and you may want to schedule a session with us before you attempt them. Better to understand them ahead of time than to try to troubleshoot problems later.
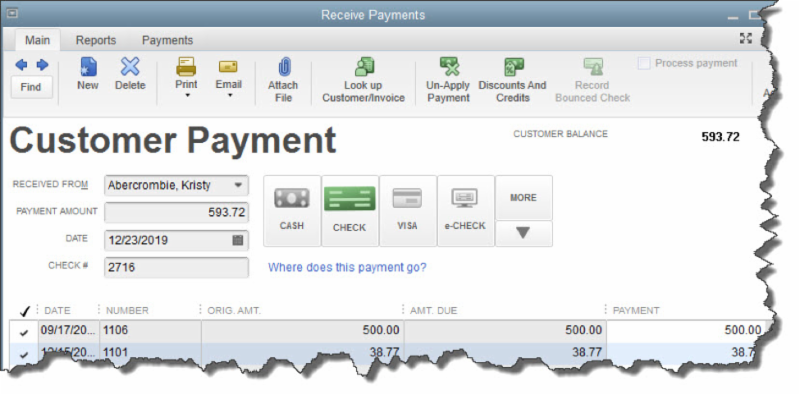
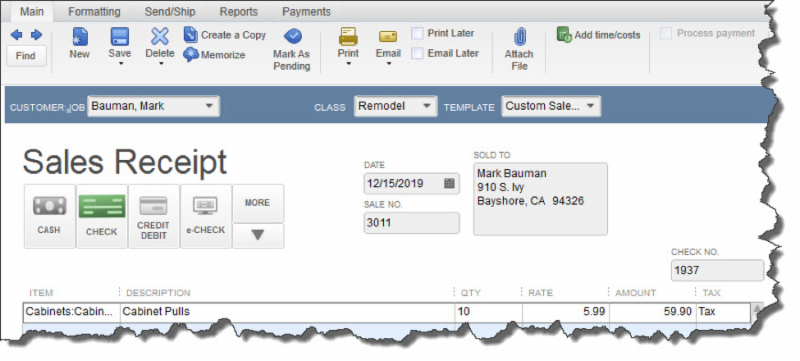
- CASH
- CHECK
- CREDIT DEBIT (A specific card type may be shown here if you’ve indicated the customer’s preferred payment method in his or her record.)
- e-CHECK
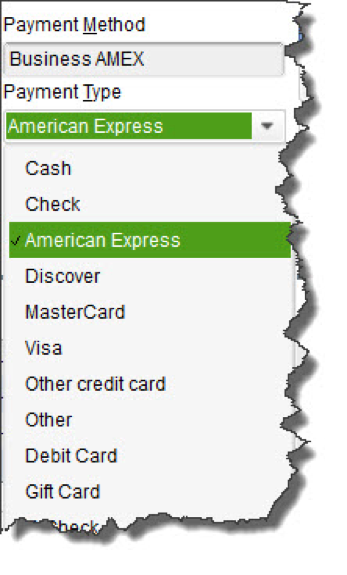
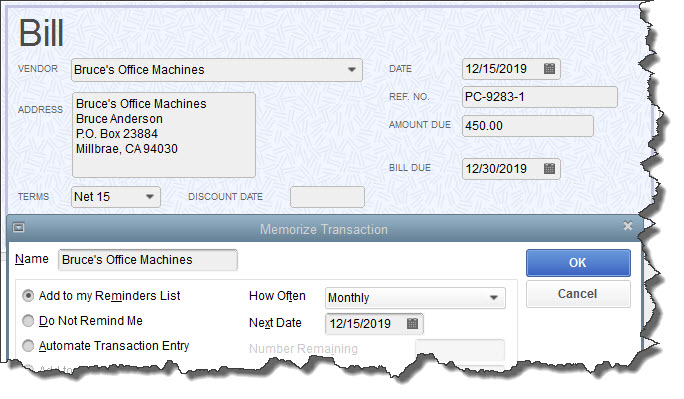
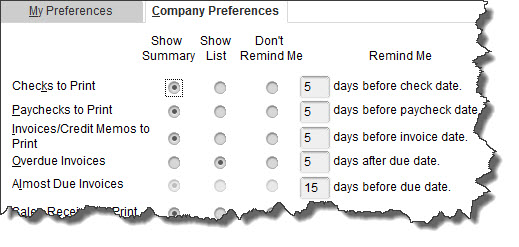
- Add to my Reminders List. If you click the button in front of this option, the current transaction will appear on your Reminders List every time it’s due. You might request this for transactions that will change some every time they’re processed, like a utility bill that’s always expected on the same day, but which has a different amount every month.
- Do Not Remind Me. Obviously, QuickBooks will not post a reminder if you click this button. This is best used for transactions that don’t recur on a regular basis. Maybe you have a snow-shoveling service that you pay only when there’s a storm. So the date is always different, but everything else is the same.
- Automate Transaction Entry. Be very careful with this one. It’s reserved for transactions that are identical except for the issue date. They don’t need your approval – they’re just created and dispatched.


New Business Directions, LLC is pleased to announce the recognition of Rhonda Rosand, CPA as an Insightful Accountant Top 100 ProAdvisor for 2016. This will be Rosand’s third consecutive year receiving the award out of tens of thousands of ProAdvisors in the country.
Leading Top 100 ProAdvisors leverage the ProAdvisor Program to better serve their clients, grow their own business, deliver great client service, and increase their knowledge and understanding of the Intuit ecosystem. This years award ceremony will take place at the Scaling New Heights 2016 conference at Atlantis Paradise Island Resort in the Bahamas.
Congratulations Rhonda!
It’s not hard to see when your home needs a good cleaning but QuickBooks company file errors are harder to recognize so here are a few errors to watch for:
- Performance problems
- Inability to execute specific processes
- Occasional program crashes
- Missing data (accounts, names, dates)
- Refusal to complete transactions
- Mistakes in reports
One thing you can do on your own is to start practicing good preventive medicine to keep your QuickBooks company file healthy. Once a month or so, perhaps at the same time you reconcile your bank accounts, do a manual check of your major Lists.
Run the Account Listing report (Lists, Chart of Accounts, and Reports). Ask yourself: Are all of your bank accounts still active? Do you see accounts that you no longer use or which duplicate each other? You may be able to make them inactive or merge duplicates. Be very careful here. If there’s any doubt, leave them there. Do not try to fix the Chart of Accounts on your own. Let us help or speak with your tax preparer. Do not make accounts with balances inactive.
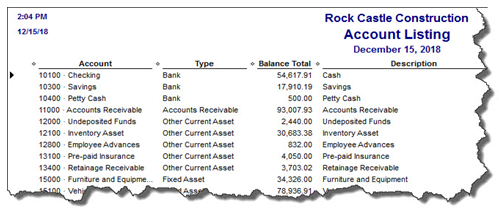
Figure 2: You might run this report periodically to see if it can be abbreviated.
A Risky Utility
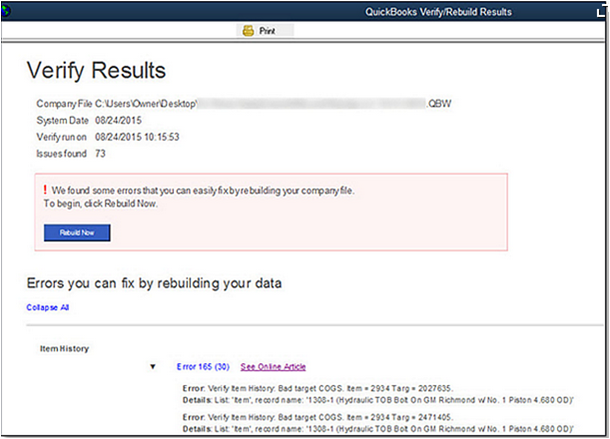
The program’s documentation for this utility contains a list of warnings and preparation steps a mile long. We recommend that you do not use this tool. Same goes for Verify Data and Rebuild Data in the Utilities menu. If you lose a significant amount of company data, you can also lose your company file. It’s happened to numerous businesses.
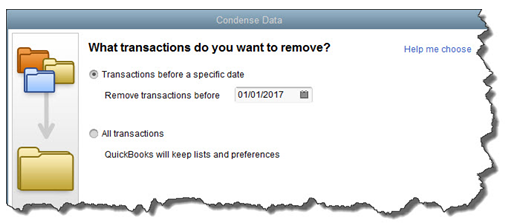
Figure 3: Yes, QuickBooks allows you to use this tool on your own. But if you really want to preserve the integrity of your data, let us help.
The best thing you can do if you notice problems like this cropping up in QuickBooks – especially if you’re experiencing multiple ones – is to contact us. We understand the file structure of QuickBooks company data, and we have access to tools that you don’t. We can analyze your file and take steps to correct the problem(s).
Your copy of QuickBooks may be misbehaving because it’s unable to handle the depth and complexity of your company. It may be time to upgrade. If you’re using QuickBooks Pro, consider a move up to Premier. And if Premier isn’t cutting it anymore, consider QuickBooks Enterprise Solutions.
There’s cost involved, of course, but you may already be losing money by losing time because of your version’s limitations. All editions of QuickBooks look and work similarly, so your learning curve will be minimal.
We Are Here for You
We’ve suggested many times that you should contact us for help with your spring cleanup. While that may seem self-serving, remember that it takes us a lot less time and money to take preventive steps with your QuickBooks company file than to troubleshoot a broken one.
The New Business Directions team is pleased to announce our newest QuickBooks® Online ProAdvisor!
Sondra Love has successfully completed the requirements to earn her QuickBooks® Online  2016 certification. This training will allow Sondra to provide assistance to businesses setting up, navigating and troubleshooting their QuickBooks® Online software.
New Business Directions, LLC specializes in QuickBooks® consulting and training services, coaching small business owners, and providing innovative business solutions.
To learn more about New Business Directions, LLC and QuickBooks®, please call (603) 356-2914 to schedule an appointment or visit our website.
 Rhonda Rosand, CPA has successfully completed the requirements to earn her designation for the twelfth consecutive year as a Certified QuickBooks® ProAdvisor.
Certified QuickBooks® ProAdvisors are CPA’s, accountants and other professionals who have completed comprehensive QuickBooks® training courses and met the annual testing requirements in order to become certified as experts in QuickBooks®. The courses are designed for accounting professionals and consultants who have a solid understanding of accounting principles.

An accounting professional since 1986 and a Certified Public Accountant since 1992, Rhonda is a one-of-a-kind, live-your-dreams business coach and trainer. She has real-world business experience, well-honed problem-solving skills and an enthusiastic, energetic, can-do attitude. She believes that a successful business stays that way not only by managing its finances well, but also through a proactive plan that includes marketing, strong customer service and long range planning. “Today it is not enough to have a good advisor who works with you once a year”, says Rosand. “The best approach is to actively manage all aspects of your business, all year long.”
Rhonda Rosand, CPA is the owner of New Business Directions, LLC.She specializes in QuickBooks® consulting and training services, coaching small business owners and providing innovative business solutions.
To learn more about New Business Directions, LLC and QuickBooks®, or to schedule an appointment, please call (603)356-2914, email rhonda@newbusinessdirections.com or visit the website at www.newbusinessdirections.com.
QuickBooks 2016 offers some new features that we are excited to share with our fellow accounting professionals. Batch Delete/Void Transactions and enhanced Statement Writer Support are two of the latest features available to Accountants only. Sorting on Item Custom Fields and Auto Copy Ship to Addresses are features only available in Premier (including Accountant) and Enterprise versions of the software.
Batch Delete/Void Transactions
We are cautiously excited about this new feature as it could prove to be quite dangerous in the wrong hands. Fortunately, Intuit realized that and only made the tool available in the Accountant and Enterprise versions of the software and in the Accountant Toolbox in the Pro and Premier versions.
It works for Invoices, Bill and Check transactions, but not for Credit Cards Charges or Deposits, at this time. It is also not available for Payroll or Sales Tax Transactions. The columns can be sorted by Entered Date, Modified Date or Transaction Date as well as by Payee, Type, Number, Account or Amount.
Any other transactions that are linked to the transaction to be voided/deleted are highlighted for you to be aware and to address them as well, if need be. For example, voiding a Bill-Check does not void the related Bill.
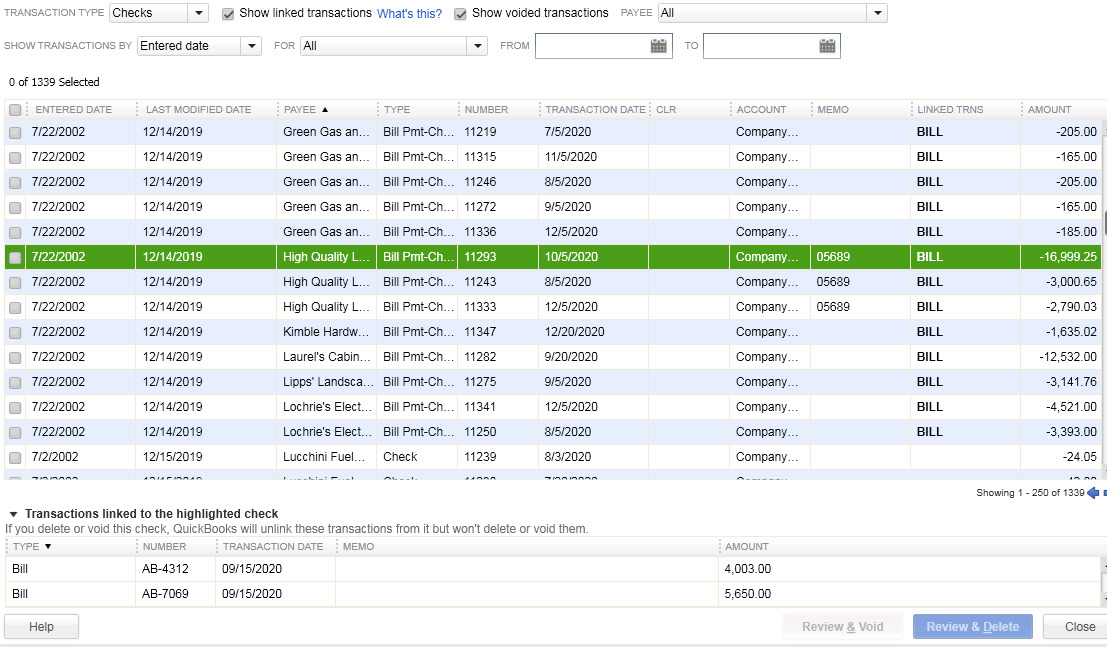
I am hopeful that Intuit will improve this feature and add the ability to work with Credit Card Charges, as I have seen many occasions where these were imported to the wrong account or even twice to the same account. As with any tool of this nature, we recommend a backup before and to Void instead of Delete.
Statement Writer Support for Microsoft Office
I do not prepare financial statements, but for those who do and for those who use the QuickBooks Statement Writer, it is essential to have the integration with Microsoft Word and Excel. With QuickBooks 2016, we have this integration with the Accountant and Enterprise versions of the software. However, we still do not have support for the cloud-based Microsoft Office 365.
Sorting on Item Custom Fields
In prior versions, we had the ability to sort on the Customer and Vendor Custom Fields, but not on the Items Custom Fields – those fields were mostly notational and not very reportable.
In QuickBooks 2016 Premier, Accountant, and Enterprise, Intuit introduced this feature which will allow sorting on Inventory Valuation and Inventory Stock Status reports as well as the Inventory Price List. This will save countless hours of exporting to Excel and creating Pivot Tables to gather the required information.

Auto Copy Ship to Addresses
For Contractors and Retailers who order materials or goods to be shipped directly to the job site or customer, QuickBooks 2016 – Premier, Accountant and Enterprise, has the ability to populate the Customer address in the Ship To Address directly from an Estimate or Sales Order, simply by selecting the Drop Ship to Customer checkbox when creating a Purchase Order.
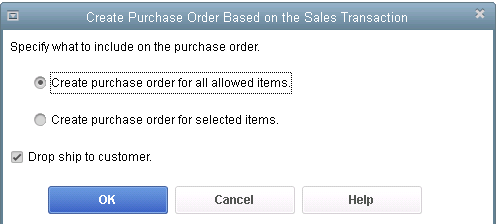
QuickBooks 2016 Desktop was recently released and there are a few new features that you will want to take a look at to see if it has something worth upgrading for.
Bill Tracker
The Bill Tracker is similar to the Income Tracker in the Customer Center that was released as a new feature in QuickBooks 2014 and improved with QuickBooks 2015. The Bill Tracker is located in the Vendor Center and allows a Snapshot View of Purchase Orders, Open Bills, Overdue Bills and Bills that have been paid in the last 30 days. Transactions can be managed from this area and batch actions can be taken to print or email and to close Purchase Orders and Pay Bills.

This Fiscal Year-to-Last Month
In the past, we had choices for date ranges on financial reports of This Fiscal Year or This Fiscal Year-to-Date as well as This Month or This Month-to-Date, none of which worked well for month-end reporting purposes. We now have This Fiscal Year-to-Last Month which allows us to print our financial reports as of the end of the Last Month, through which accounts are typically reconciled. This will allow us to Memorize Reports with the correct date instead of saving with a Custom Date that needs to be changed each time.
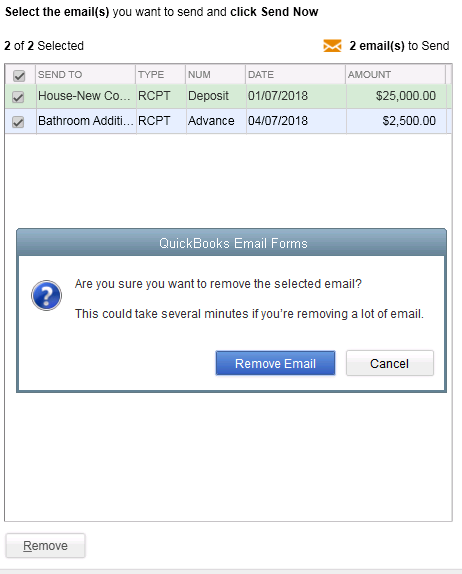 Bulk Clear “Send” Forms
Sales Receipts, Invoices, Estimates and Purchase Orders all have an Email Later check box and it’s a “sticky” feature, meaning that once selected, it remembers for future transactions. In the past, we would accumulate many documents in the queue to be sent later and if we wished to clear the queue, it would have to be done individually. With this release, under the File menu, Send Forms, we can now Select All and click Remove.
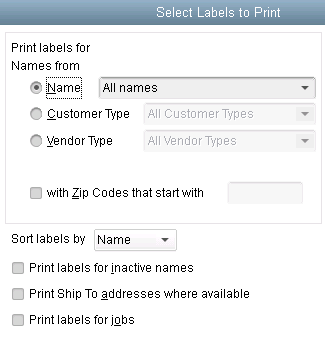
do a Backup!
 New Business Direction LLC