Learn How To Add & Edit Multiple List Entries in QuickBooks with Rhonda Rosand CPA and Advanced Certified QuickBooks ProAdvisor!

Learn How To Write Off A Bad Debt In QuickBooks with Rhonda Rosand, CPA, Advanced Certified QuickBooks Proadvisor of New Business Directions, LLC.

Chart of Accounts in QuickBooks Why the Chart of Accounts in QuickBooks is the Most Important List!

How to Back Up Your QuickBooks File Learn how to back up your QuickBooks file with Rhonda Rosand, CPA of New Business Directions, LLC.  

How to Use the Same Name on Different Lists in QuickBooks Learn How to Use the Same Name on Different Lists in QuickBooks with Rhonda Rosand, CPA of New Business Directions, LLC.

How to Back Up Your QuickBooks File   Learn how to back up your QuickBooks file with Rhonda Rosand, CPA of New Business Directions, LLC.

Learn How to Navigate the Homepage of QuickBooks with Rhonda Rosand of New Business Directions, LLC.

What Sales Orders Are and When to Use Them

They’re not as commonly used as invoices. But if you need them, they’re there.

When you want to document sales that you can’t (or won’t) fulfill immediately, but you plan to do so in the future, you can’t create an invoice just yet. This is where sales orders come in.

You may never need to create a sales order for a customer. Perhaps you have a service-based business, or you never run out of inventory. Or you simply don’t enter an order unless you know you have the item(s) in stock.

But if you plan to use sales orders, you must first make sure QuickBooks is set up to accommodate them. Open the Edit menu and select Preferences, then Sales & Customers. Click the Company Preferences tab to open that window.

Before you can use sales orders, you’ll need to make sure that QuickBooks is set up for them.

Sales Orders Are Required for Some Tasks

There are a few situations where you must use a sales order:

  • If you have a customer who orders very frequently, you may not want to create an invoice for absolutely every item. You could use a sales order to keep track of these multiple orders, and then send an invoice at the end of the month.
  • If you’re missing one or more items that a customer wanted, you can create a sales order that includes everything, but only note the in-stock items on an invoice. The sales order will keep track of the portion of the order that wasn’t fulfilled. Both forms will include the back-ordered quantity.

Warning: Working with back orders can be challenging. In fact, working with inventory-tracking itself may be problematic for you. If your business stocks enough of multiple types of items that you want to use those QuickBooks features, let us help you get started to ensure that you understand these rather complex concepts.

Creating a Sales Order

Creating sales orders in QuickBooks is actually quite simple and similar to filling out an invoice. Click the Sales Orders icon on the home page, or open the Customers menu and select Create Sales Orders.


A sales order in QuickBooks looks much like an invoice.

Click the down arrow in the field next to Customer: Job and choose the correct one. If you use Classes, select the correct one from the list that drops down, and change the Template if you’ve created another you’d like to use.

Tip: Templates and Classes are totally optional in QuickBooks. Templates provide alternate views of forms containing different fields and perhaps a different layout. Classes are like categories. You create your own that work for your business; they can be very helpful in reports. Talk to us if you don’t understand these concepts.

If the shipping address is different from the customer’s main address, click the down arrow in the field next to Ship To, and either select an alternate you’ve created or click <Add New>. Make sure the Date is correct, and enter a purchase order number (P.O. No.) if appropriate.

The rest of the sales order is easy. Click in the fields in the table to make your selections from drop-down lists, and enter data when needed. Pay special attention to the Tax status. Let us know if you haven’t set up sales tax and need to.

When everything is correct, save the sales order. When you’re ready to convert it to an invoice, open it and click the Create Invoice icon in the toolbar. QuickBooks will ask whether you want to create an invoice for all the items or just the ones you select. You’ll be able to specify quantities, too, in the window that opens.

When you create an invoice from a sales order, you can select all the items ordered or a subset.

As we’ve said, sales orders are easy to fill out in QuickBooks. But they involve some complex tracking, and you may want to schedule a session with us before you attempt them. Better to understand them ahead of time than to try to troubleshoot problems later.
It’s one of your more pleasant tasks as a QuickBooks user: receiving payments from customers. 
Here’s how it works. 
QuickBooks was designed to make your daily accounting tasks easier, faster, and more accurate. If you’ve been using the software for a while, you’ve probably found that to be true. Some chores, of course, aren’t so enjoyable. Like paying bills. Reconciling your bank account. Or anything else that has the potential to reduce the balance in your checking accounts.
The process of receiving customer payments is one of your more enjoyable responsibilities. You supplied a product or service that someone liked and purchased, and you’re getting the
money due you.
Depending on the situation, you’ll use one of multiple methods to record customer payments. Here’s a look at some of your options.
A Familiar Screen
 
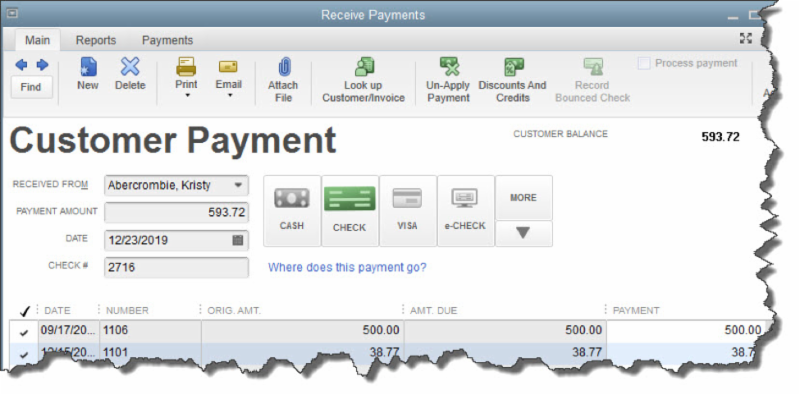
If you’re like many businesses, you send invoices to customers to let them know what they owe and when their payment is due. So one of the most commonly used ways to record payments is by using the Receive Payments window. To open it, click the Receive Payments icon on the home page or click
Customers | Receive Payments.
 

You’ll use QuickBooks’ Receive Payments screen when you record a payment made in response to an invoice.
 
The first thing you’ll do, of course, is choose the correct customer by clicking the down arrow in the field to the right of RECEIVED FROM. The outstanding balance from that customer will appear in the upper right corner, and invoice information will be displayed in the table below. Enter the PAYMENT AMOUNT and make sure the DATE is correct. (The next field, REFERENCE #, changes to CHECK # only if the CHECK option is selected.)
Next, you’ll need to ensure that the payment is applied to the right invoices. If it covers the whole amount due, there will be a checkmark in every row in the first column of the table. If not, QuickBooks will use the money received to pay off the oldest invoices first. To change this, click Un-Apply Payment in the icon bar and click in front of the correct rows to create checkmarks.
Several Options
 
You’ll then want to tell QuickBooks what payment method the customer is using. Four options are displayed. The possibilities that are visible here are:
  • CASH
  • CHECK
  • CREDIT DEBIT (A specific card type may be shown here if you’ve indicated the customer’s preferred payment method in his or her record.)
  • e-CHECK
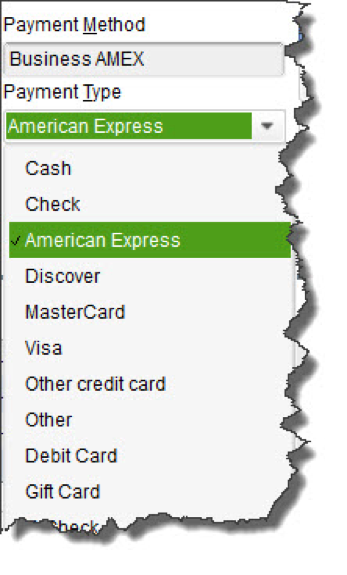
If the desired payment method isn’t included in those four, click the down arrow under MORE. If it’s still not there, click Add New Payment Method. This window will open:
The New Payment Method window
 
Click OK. When you choose your new payment method from the list, a window opens containing fields for the card number and expiration date. Click Done after you’ve entered it, and you’ll be returned to the Receive Payments screen. If you’re satisfied with your work there, click Save & Close or Save & New.
Haven’t gotten set up to accept credit and debit cards yet? We can get you going with a merchant account to make this possible. You’re likely to find that some customers pay faster with this option. Your customers will be able to click a link in an emailed invoice and make their payments.
Instant Sales
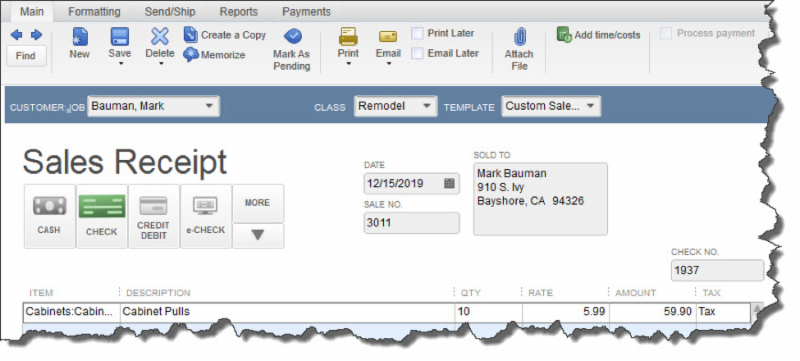
Depending on the type of business you have and its physical location, there may be times when customers will come in and buy something on the spot. You’ll need to give them a Sales Receipt. Click Create Sales Receipts on the home page or open the Customers menu and select Enter Sales Receipts to
open this window:
The Enter Sales Receipts window
 
You’ll complete this form much like you entered data in the fields of the Receive Payments window. As you can see, you can print the mail for the customer and/or email it.
After all the hard work you’ve done to make your sales, the last thing you want to do is record a payment incorrectly so it isn’t processed and you don’t get paid. Though QuickBooks makes the mechanics of receiving payments simple enough, you still should understand the entire process involved in getting income into the correct accounts.  We’re available to help with this and any other areas of QuickBooks
You know that QuickBooks saves a lot of time. But have you explored how it does so by memorizing transactions?
 
Your accounting work involves a lot of repetition. You send invoices. Pay bills. Create purchase orders. Generate payroll checks and submit payroll taxes.
Some of the time, you only fill out those transaction forms once. You might be doing a one-time purchase, like paying for some new office furniture. Other times, though, you’re paying or charging the same companies or individuals on a regular basis.
QuickBooks Desktop contains a shortcut to those recurring tasks, called Memorized Transactions. You can save the details that remain the same every time, and use that template every time the bill or invoice is due, which can save a lot of time and improve accuracy. Here’s how it works.
 
Making Copies
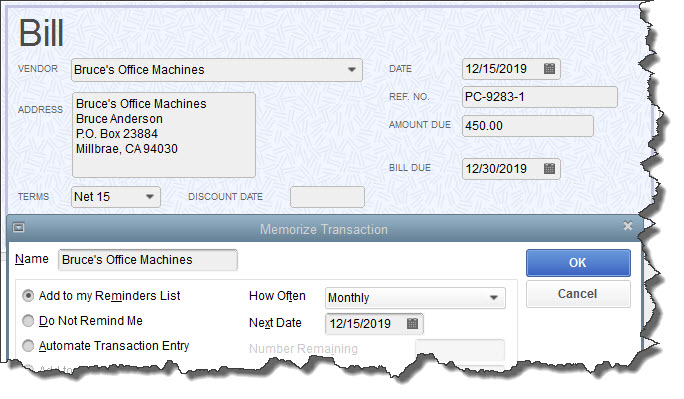
To memorize a transaction, you first need to create a model for it. Let’s say you have a monthly bill for $450 that’s paid to Bruce’s Office Machines. You’d click Enter Bills on the home page or open the Vendors menu and select Enter Bills. Fill in the blanks and select from drop-down lists to create the bill. Then click Memorize in the horizontal toolbar at the top of the form.  This window will open.
Before you can Memorize a transaction, you first have to create a model (template) for it.
The vendor’s name will already be filled in on the Memorize Transaction screen. Look directly below that. There are three ways that QuickBooks can handle these Memorized Transactions when one of their due dates is approaching:
  • Add to my Reminders List. If you click the button in front of this option, the current transaction will appear on your Reminders List every time it’s due. You might request this for transactions that will change some every time they’re processed, like a utility bill that’s always expected on the same day, but which has a different amount every month.
  • Do Not Remind Me. Obviously, QuickBooks will not post a reminder if you click this button. This is best used for transactions that don’t recur on a regular basis. Maybe you have a snow-shoveling service that you pay only when there’s a storm. So the date is always different, but everything else is the same.
  • Automate Transaction Entry. Be very careful with this one. It’s reserved for transactions that are identical except for the issue date. They don’t need your approval – they’re just created and dispatched.
Click the down arrow in the field to the right of How Often and select the correct interval. Then click the calendar icon to pick a date for the next occurrence. If you have selected Automate Transaction Entry, the grayed-out lines below Next Date contain fields for Number Remaining and
Days in Advance to Enter.
How Does QuickBooks Know?
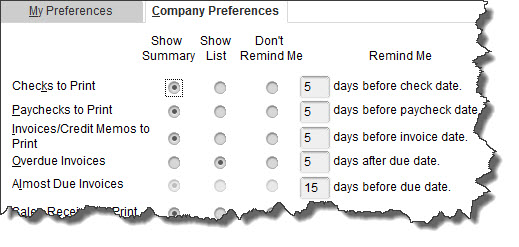
Obviously, you’ll want advance warning of transactions that will require processing. QuickBooks lets you specify how many days’ notice you want for each type. Open the Edit menu and select Preferences. Click Reminders in the left vertical pane, then the Company Preferences tab. You can tell QuickBooks whether you want to see a summary in each category or a list or no Reminder. Then you can enter the number of days’ warning you want.
 
QuickBooks lets you specify the content and timing 
of your Reminders.
Working with Memorized Transactions
Once you’ve created some Memorized Transactions, you will undoubtedly need to review them at some point. Open the Lists menu and select Memorized Transaction List to see all the templates for recurring bills, invoices, etc., that you’ve defined. Right-click on one you want to work with, and this menu appears:
The Memorized Transaction List with the right-click 
window open
 
You have several options here. If your list is so long that it fills multiple screens, you can Find the transaction you’re looking for. If you’ve created multiple related transactions, you can save them as a New Group. You can also Edit, Delete, and Enter Memorized Transactions.
Anytime you’re letting QuickBooks do something on its own, it’s critical that you thoroughly understand the mechanics of setting the process up. We’d be happy to go over the whole topic of Memorized Transactions with you, or any other aspect of QuickBooks operations.