You know that QuickBooks saves a lot of time. But have you explored how it does so by memorizing transactions?
 
Your accounting work involves a lot of repetition. You send invoices. Pay bills. Create purchase orders. Generate payroll checks and submit payroll taxes.
Some of the time, you only fill out those transaction forms once. You might be doing a one-time purchase, like paying for some new office furniture. Other times, though, you’re paying or charging the same companies or individuals on a regular basis.
QuickBooks Desktop contains a shortcut to those recurring tasks, called Memorized Transactions. You can save the details that remain the same every time, and use that template every time the bill or invoice is due, which can save a lot of time and improve accuracy. Here’s how it works.
 
Making Copies
To memorize a transaction, you first need to create a model for it. Let’s say you have a monthly bill for $450 that’s paid to Bruce’s Office Machines. You’d click Enter Bills on the home page or open the Vendors menu and select Enter Bills. Fill in the blanks and select from drop-down lists to create the bill. Then click Memorize in the horizontal toolbar at the top of the form.  This window will open.
Before you can Memorize a transaction, you first have to create a model (template) for it.
The vendor’s name will already be filled in on the Memorize Transaction screen. Look directly below that. There are three ways that QuickBooks can handle these Memorized Transactions when one of their due dates is approaching:
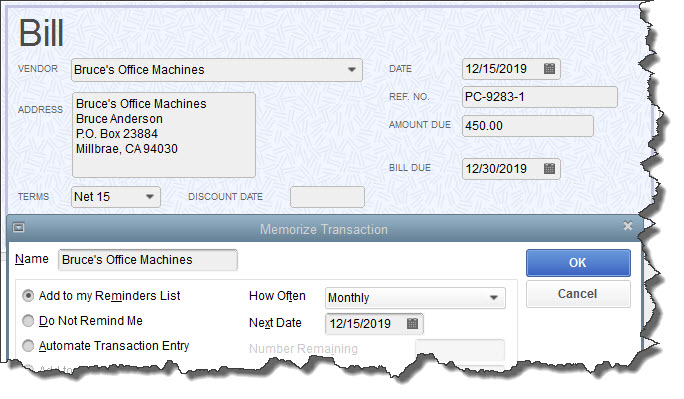
  • Add to my Reminders List. If you click the button in front of this option, the current transaction will appear on your Reminders List every time it’s due. You might request this for transactions that will change some every time they’re processed, like a utility bill that’s always expected on the same day, but which has a different amount every month.
  • Do Not Remind Me. Obviously, QuickBooks will not post a reminder if you click this button. This is best used for transactions that don’t recur on a regular basis. Maybe you have a snow-shoveling service that you pay only when there’s a storm. So the date is always different, but everything else is the same.
  • Automate Transaction Entry. Be very careful with this one. It’s reserved for transactions that are identical except for the issue date. They don’t need your approval – they’re just created and dispatched.
Click the down arrow in the field to the right of How Often and select the correct interval. Then click the calendar icon to pick a date for the next occurrence. If you have selected Automate Transaction Entry, the grayed-out lines below Next Date contain fields for Number Remaining and
Days in Advance to Enter.
How Does QuickBooks Know?
Obviously, you’ll want advance warning of transactions that will require processing. QuickBooks lets you specify how many days’ notice you want for each type. Open the Edit menu and select Preferences. Click Reminders in the left vertical pane, then the Company Preferences tab. You can tell QuickBooks whether you want to see a summary in each category or a list or no Reminder. Then you can enter the number of days’ warning you want.
 
QuickBooks lets you specify the content and timing 
of your Reminders.
Working with Memorized Transactions
Once you’ve created some Memorized Transactions, you will undoubtedly need to review them at some point. Open the Lists menu and select Memorized Transaction List to see all the templates for recurring bills, invoices, etc., that you’ve defined. Right-click on one you want to work with, and this menu appears:
The Memorized Transaction List with the right-click 
window open
 
You have several options here. If your list is so long that it fills multiple screens, you can Find the transaction you’re looking for. If you’ve created multiple related transactions, you can save them as a New Group. You can also Edit, Delete, and Enter Memorized Transactions.
Anytime you’re letting QuickBooks do something on its own, it’s critical that you thoroughly understand the mechanics of setting the process up. We’d be happy to go over the whole topic of Memorized Transactions with you, or any other aspect of QuickBooks operations.

Social media is an awesome marketing tool, but it can also be a huge time drain. If you post regularly, or want to post regularly, and use multiple social media platforms, such as Twitter, LinkedIn, Facebook, and Google+, then an app like Hootsuite can save you a tremendous amount of time.

Hootsuite allows you to schedule social media updates or posts across multiple platforms. If you are posting in real time, logging on several times a day, then Hootsuite can save you a lot of time. You can enter tweets, posts, or updates ahead of time and tell Hootsuite when to post them. You can also enter one post to be posted on multiple platforms all at once.

All you need to do is write your posts ahead of time. Once you have a week’s worth, you can log in to Hootsuite, enter them, and let Hootsuite know when and where to post them.

One of the biggest benefits of Hootsuite is that it allows you to become far more consistent with social media, rather than posting when you feel like it. You can decide ahead of time if you want to post once a day, three times a day, or ten times a day. Then, you can write your posts all at once. If you want to post three times a day, then you’ll need to write 15 posts a week. Plan to write them on Friday morning, and schedule them for the coming week. You’ll be all set with your social media until next Friday.

Writing a post and using it on multiple platforms can also save time. There is little need to create separate posts for each platform, and with Hootsuite, you can enter your post and have it update your LinkedIn, Twitter, Facebook, and Google+ account all at the same time. In addition to those four, Hootsuite integrates with WordPress, YouTube, and Instagram.

Even if you still log into your social media platforms every day to increase your interactivity and engagement, you can still automate your posts to save time. Hootsuite is free for customers who have three or fewer social media platforms connected. Look for it at Hootsuite.com.

If you plan to have multiple employees using QuickBooks, you can limit their access to specific areas.
 
Controlling access to your QuickBooks company file is easy when you’re a one-person accounting department. You simply use one password to protect your data.
But when you add new employees to the mix, do you want them to have access to absolutely everything in QuickBooks? Probably not. You have confidence in your employees or you wouldn’t have hired them. But this isn’t solely a matter of trust. It’s just good business practice to restrict individuals to specific areas and responsibilities, no matter what the application.
That’s why QuickBooks has built-in tools to help you limit activity. Here’s how it works.
Identifying Users
 
Only the Amin user can add users.  To get started, open the
Company menu and scroll down the list to highlight
Set Up User Names and Passwords. On the slide-out menu, select  Set Up Users. You will need to enter your Admin password here.  The  User List window will open, and you should see your own entry as  Admin. Click  Add User.
To give an employee access to QuickBooks, enter a User Name for him or her here, then a password.
The Setup user password and access window will open.
Fill in those fields.
 
Click Next. In the window that opens, you’ll define the access level for your new user. Your options here are:
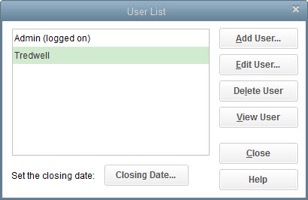
  • All areas of QuickBooks,
  • Selected areas of QuickBooks, or,
  • External accountant (you can grant us access to all areas of the software except for those that contain sensitive customer data, like credit card numbers).
Click the button in front of the second option, then Next.
You can specify the access rights for individual employees in numerous areas.
The image above shows the first screen of 10 that display the levels of access available in many individual areas of QuickBooks. Be sure to read the whole page carefully before assigning rights. Here, for example, you’re not just allowing the employee to enter sales and A/R transactions. You’re also deciding whether to grant him or her permission to view the Customer Center and A/R reports. As you can see, your options are No AccessFull Access, and Selective Access (three levels there). Check the box below this list if you want the employee to be able to View complete customer credit card numbers.
When you’re finished there, click Next to specify your similar preferences for Purchases and Accounts ReceivableChecking and Credit CardsInventoryTime Tracking, and Payroll and Employees. The next two screens contain more complex concepts, but you’ll follow the same process to express your wishes. They are:
  • Sensitive Accounting Activities, like funds transfers, general journal entries, and online banking tasks
  • Sensitive Financial Reporting, which allows access to all QuickBooks reports. The option you choose here overrides all other reporting restrictions that you’ve specified for the employee.
Finally, you’ll tell QuickBooks whether this person can change or delete transactions in designated areas and whether he or she can do so to transactions that were recorded before the closing date (if this applies). The last screen displays a summary of the access and activity rights you’ve given the employee. Check them carefully, and if they’re correct, click Finish.
Housekeeping Options
 

The User List window
QuickBooks then takes you back to the User List window, where you’ll see the employee’s name displayed. If you want to Add, Edit, Delete, or View a user, make sure the correct name is highlighted and click the button for the desired action.
Caution: Do not delete users.  There is an audit trail to teach which user performed certain tasks in the QuickBooks file and you will want to keep the name to preserve the integrity of 
the audit trail.
If you’re just now looking to add your first employee to QuickBooks or if you’re starting to outgrow the user limit, give us a call. There are more issues to consider when you take on multi-user access. We’d be happy to discuss them with you.

Before we get too far into 2017, let’s take a look back at 2016 results and five meaningful numbers you may want to discover about your business’s performance.  To start, grab your 2016 income statement, or better yet, give us a call to help you compute and interpret your results.

Revenue per Employee

This number measures a company’s productivity with regard to its employees and is relevant and meaningful for all industries.  If you have part-time employees, compute a full time equivalent total and use that as your denominator.

Compare this number to prior years to see if your company is getting more or less productive.  Also compare this number to businesses in your same industry to see how your company compares to peer companies.

You may also want to compute other revenue calculations, such as revenue by geography, revenue by product line, or average sale: revenue by customer, if you feel these may be meaningful to your business.

Customer Acquisition Cost (CAC)

How much does it cost your business to acquire a new customer?  That is the customer acquisition cost and is made up of marketing and selling costs, including marketing and selling labor.  You’ll need the number of new customers acquired during 2016 in order to calculate this number.

Compare this number to prior years as well as industry peers.  You can potentially do a lot to lower this number by boosting your marketing skills and implementing lower cost marketing channels.

Overhead Costs

Overhead costs are costs that are not directly attributable to producing or selling your products and services.  They include items such as rent, telephone, insurance, legal expenses, and executive salaries.  Although it’s not standard practice to break out overhead expenses from other expenses on an income statement, it’s valuable to know the numbers for performance purposes.

Compare your overhead costs to prior years and industry averages.  You can actively manage your overhead cost by re-negotiating with vendors on a regular basis and trimming where it makes sense.

Profit Margins

Your profit margin can help you determine which division of your business is most profitable.  If you sell more than one product or service, you can compute a gross or net margin by product or service.  You can also compute margins by geography, sales rep, employee, customer, or any other meaningful segment of your business.

Your accounting system may be able to generate an income statement by division if everything has been coded correctly and overhead has been allocated appropriately.  Reach out if you’d like us to help you with this.

Seeing which service or product is most profitable can help you decide if you want to try to refocus marketing efforts, change prices, discontinue items, fire employees, attract a different type of customer, or any number of other important decisions for your business.

Breakeven Point

Do you know how many units you need to sell in order to start generating a profit?  If not, the breakeven calculation can help you learn this information.  The formula is Fixed Costs / (Sales Price per Unit – Variable Costs per Unit) which results in the number of units you need to sell in order to “break even” or cover your overhead costs.

The breakeven point helps you plan the amount of volume you need in order to ensure that you have healthy profits and plenty of cash flow in your business.

These five numbers can help you interpret your business performance on a deeper level so you can make better decisions that will lead to increased success in your business.  If we can help with any of them, please give us a call any time.

Preferences in QuickBooks
 
Before you start entering data, make sure QuickBooks is set up appropriately for your company.
 
QuickBooks was designed to serve the needs of millions of small businesses. To do that, it had to include the tools and processes suitable for a wide variety of companies. Intuit recognized that every organization is unique, so your copy of QuickBooks can be customized in ways that make it work best for  you
and  your company.
You could just dive in and start adding records and transactions, but we recommend you do some setup first. If you don’t, you may run into some issues later, such as finding that some features you need haven’t been turned on or that QuickBooks is simply not doing some things the way you do. The good news is that you can change many of these.
 
Getting There
QuickBooks refers to these options as Preferences. You’ll find them by opening the Edit menu
and selecting Preferences.
  
To start customizing QuickBooks so it works best for you, open the
Edit menu and choose Preferences.
 
As you can see, the left vertical pane contains a list of Preferencetypes. Click on any of these to change the option screens to the right. Click both the tabs labeled My Preferences and Company Preferences to make sure you see everything that’s displayed for each type (sometimes one will have no choices).
Critical Areas
We recommend that you look through all of QuickBooks’ Preferences and change any that don’t fit your company. Some simply have to do with the way QuickBooks displays information and how it functions, but others have direct impact on your accounting work. As always, we’re available if you have questions here and when in doubt, check wth your tax preparer to be sure.
There are many that you will probably want to visit. They may have numerous options, but here’s some of what you can establish in each:
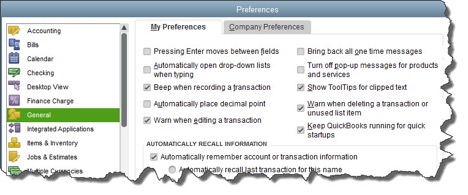
  • Accounting. Do you want to use account numbers & classes?
  • Checking. Which accounts should QuickBooks automatically use for tasks like Open the Pay Bills, Open the Make Deposits, and Open the Create Paychecks?
  • Finance Charge. Will you be assessing finance charges on late payments from customers? What’s the interest rate, minimum finance charge, and grace period?
  • Items & Inventory. Do you want inventory and purchase orders to be active?
  • Multiple Currencies. Does your company do business using other currencies?  This preference is NOT reversible, it cannot be turned off once it is turn on – be sure that you  know this!
  • Payments. Can customers pay you online? What methods can they use?
  • Payroll & Employees. Will you be processing payroll   using QuickBooks?
  • Sales & Customers. Do you want to use sales orders? How should QuickBooks handle invoices when there are time and costs that need to be added?
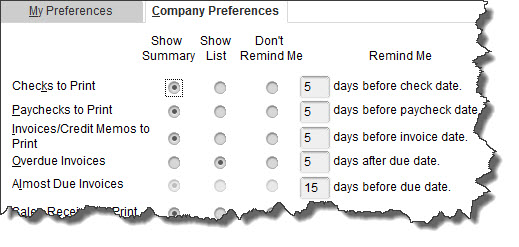
  • Reminders.  Ask QuickBooks to track critical dates and tasks and remind you of them.
You can see why it’s important to study QuickBooks’ Preferencesearly on. It’ll help you avoid unnecessary roadblocks and ensure that your company’s needs are reflected well in the software.