You work hard to make sure your QuickBooks data is accurate. Make sure it’s safe, too.
Your QuickBooks company file contains some of the most sensitive information on your computer. You may have customers’ credit card numbers and employees’ Social Security numbers. An intruder who captured all that data could create tremendous problems for you and a lot of other people.
That’s probably the worst-case scenario. But other situations could also spell disaster for your business, which  involve losing your company data through fraud, hacking, or simple technical failures.
We can’t overstate the vital importance of protecting your QuickBooks company file, especially your customer and payroll information. Whether someone steals it or it’s inaccessible for another reason, it’s gone. Keeping your business going after such a loss would be very difficult – maybe even impossible.
Here’s what we suggest to prevent that.
Internal Safeguards
 
No business owner wants to believe that his or her employees could use their QuickBooks access to commit fraud. But it happens. Your company file contains credit card and checking account data that could be used for nefarious purposes. As we discussed just last spring, you can restrict user access to specific areas
and actions of QuickBooks.
You can limit your employees who have QuickBooks access to certain areas and activities.
To get started, open the Company menu and select Set Up Users and Passwords | Set Up Users. The User List window opens. It should have at least one entry there, for you (Admin). Click Add User and enter the employee’s name and password in the next window that opens, then click Next.
Tip: Your QuickBooks license limits you to a specified number of users. If you’re not sure how many you’re allowed, click F2 to open the Product Information page. The number of user licenses you’ve paid for appears in the upper left.
 
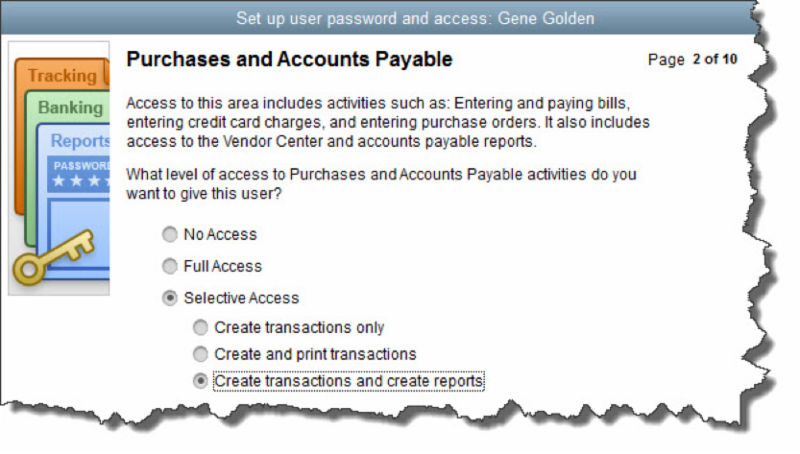
On the next page of this wizard, click the button in front of Selected Areas of QuickBooks. The following screens will let you define that employee’s access permissions in areas like Sales and Accounts Receivable, Inventory, and Payroll and Employees. When you’ve clicked through every screen and reviewed the summary displayed, click Finish. Your user will now be able to sign in and access the areas you specified.
You can-and should-take numerous other steps to keep your QuickBooks data safe. If your company is big enough to have a dedicated IT expert, he or she will handle most of this. But there’s a lot you can do on your own to prevent data loss and theft.
Keep Your Operating System and Applications Updated
 

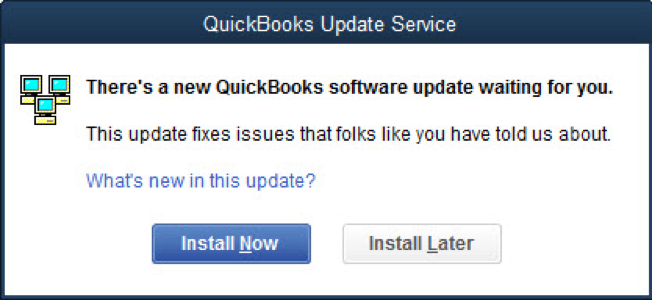
Don’t ignore this dialog box.
Software companies’ occasional updates offer more than just adding new features and fixing bugs. They sometimes refresh your software to ensure greater security based on new threats. Don’t forget about those all-important antivirus and anti-malware applications, as well as QuickBooks itself.
Keep Your Networks Safe
 
Just as a cold virus spreads around your office, so, too, can unwanted intrusions like computer viruses. Don’t allow an electronic epidemic to get started; take steps ahead of time to prevent it:
  • Discourage employees from excessive web browsing. This can be a hard rule to enforce, as some employees probably need internet access for research, timecard entry, and other work-related tasks. Create a firm policy legislating what workers can and can’t do on company-issued equipment (including tablets and smartphones) or any personal devices that use your wireless network.
  • Ask employees to refrain from using public networks on work equipment. Enforce the rules vigorously, and make compliance an element of performance evaluations.
  • Minimize app installations on business smartphones. Employees should ask for approval. Viruses and malware get in that way, as well as through some websites and email attachments.
  • Use monitoring software. If you can’t afford to pay for “managed IT” (a la carte, third-party IT services), install an application that alerts you to problems.
Use Common Sense
 
You can fight data loss and theft by being cautious. Be diligent about backups, and if you create them on a local, portable device, don’t leave them in the office. Cloud-based solutions are better. Shred papers that have sensitive information on them. Log out of QuickBooks when you’re not using it or when you leave your office. Be aware of who may be around you, looking over your shoulder.
We take data security very seriously in our own office, and we strongly encourage you to do the same. Contact us if you’re at all concerned with your own data safety, and we’ll come up with a plan together.
-Thank you
New Business Directions, LLC
It’s one of your more pleasant tasks as a QuickBooks user: receiving payments from customers. 
Here’s how it works. 
QuickBooks was designed to make your daily accounting tasks easier, faster, and more accurate. If you’ve been using the software for a while, you’ve probably found that to be true. Some chores, of course, aren’t so enjoyable. Like paying bills. Reconciling your bank account. Or anything else that has the potential to reduce the balance in your checking accounts.
The process of receiving customer payments is one of your more enjoyable responsibilities. You supplied a product or service that someone liked and purchased, and you’re getting the
money due you.
Depending on the situation, you’ll use one of multiple methods to record customer payments. Here’s a look at some of your options.
A Familiar Screen
 
If you’re like many businesses, you send invoices to customers to let them know what they owe and when their payment is due. So one of the most commonly used ways to record payments is by using the Receive Payments window. To open it, click the Receive Payments icon on the home page or click
Customers | Receive Payments.
 

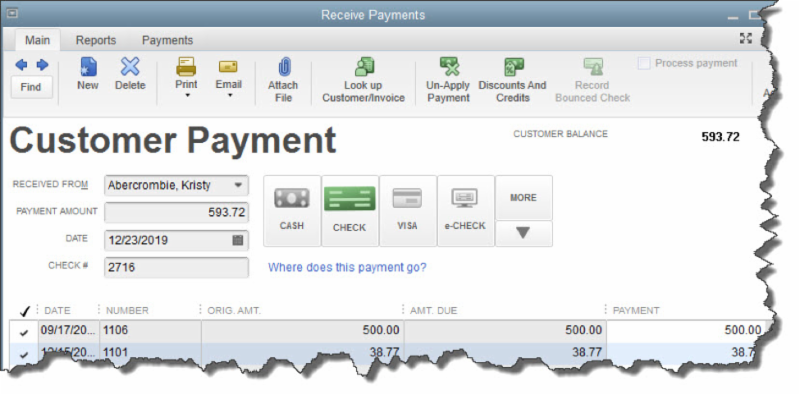
You’ll use QuickBooks’ Receive Payments screen when you record a payment made in response to an invoice.
 
The first thing you’ll do, of course, is choose the correct customer by clicking the down arrow in the field to the right of RECEIVED FROM. The outstanding balance from that customer will appear in the upper right corner, and invoice information will be displayed in the table below. Enter the PAYMENT AMOUNT and make sure the DATE is correct. (The next field, REFERENCE #, changes to CHECK # only if the CHECK option is selected.)
Next, you’ll need to ensure that the payment is applied to the right invoices. If it covers the whole amount due, there will be a checkmark in every row in the first column of the table. If not, QuickBooks will use the money received to pay off the oldest invoices first. To change this, click Un-Apply Payment in the icon bar and click in front of the correct rows to create checkmarks.
Several Options
 
You’ll then want to tell QuickBooks what payment method the customer is using. Four options are displayed. The possibilities that are visible here are:
  • CASH
  • CHECK
  • CREDIT DEBIT (A specific card type may be shown here if you’ve indicated the customer’s preferred payment method in his or her record.)
  • e-CHECK
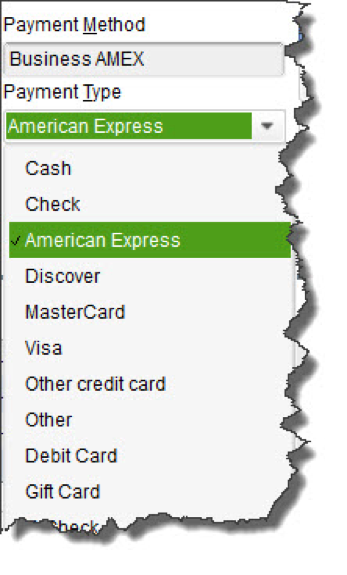
If the desired payment method isn’t included in those four, click the down arrow under MORE. If it’s still not there, click Add New Payment Method. This window will open:
The New Payment Method window
 
Click OK. When you choose your new payment method from the list, a window opens containing fields for the card number and expiration date. Click Done after you’ve entered it, and you’ll be returned to the Receive Payments screen. If you’re satisfied with your work there, click Save & Close or Save & New.
Haven’t gotten set up to accept credit and debit cards yet? We can get you going with a merchant account to make this possible. You’re likely to find that some customers pay faster with this option. Your customers will be able to click a link in an emailed invoice and make their payments.
Instant Sales
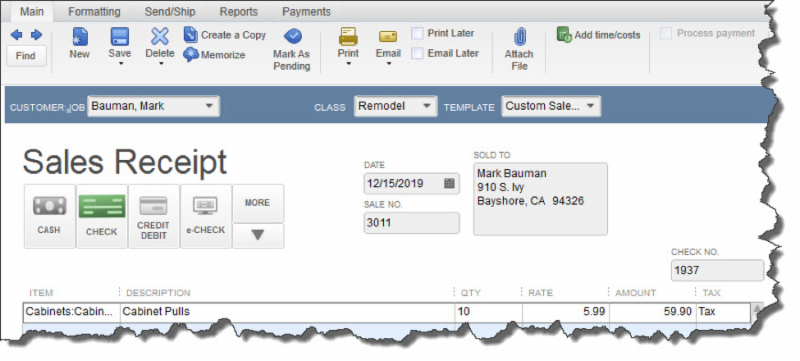
Depending on the type of business you have and its physical location, there may be times when customers will come in and buy something on the spot. You’ll need to give them a Sales Receipt. Click Create Sales Receipts on the home page or open the Customers menu and select Enter Sales Receipts to
open this window:
The Enter Sales Receipts window
 
You’ll complete this form much like you entered data in the fields of the Receive Payments window. As you can see, you can print the mail for the customer and/or email it.
After all the hard work you’ve done to make your sales, the last thing you want to do is record a payment incorrectly so it isn’t processed and you don’t get paid. Though QuickBooks makes the mechanics of receiving payments simple enough, you still should understand the entire process involved in getting income into the correct accounts.  We’re available to help with this and any other areas of QuickBooks
You know that QuickBooks saves a lot of time. But have you explored how it does so by memorizing transactions?
 
Your accounting work involves a lot of repetition. You send invoices. Pay bills. Create purchase orders. Generate payroll checks and submit payroll taxes.
Some of the time, you only fill out those transaction forms once. You might be doing a one-time purchase, like paying for some new office furniture. Other times, though, you’re paying or charging the same companies or individuals on a regular basis.
QuickBooks Desktop contains a shortcut to those recurring tasks, called Memorized Transactions. You can save the details that remain the same every time, and use that template every time the bill or invoice is due, which can save a lot of time and improve accuracy. Here’s how it works.
 
Making Copies
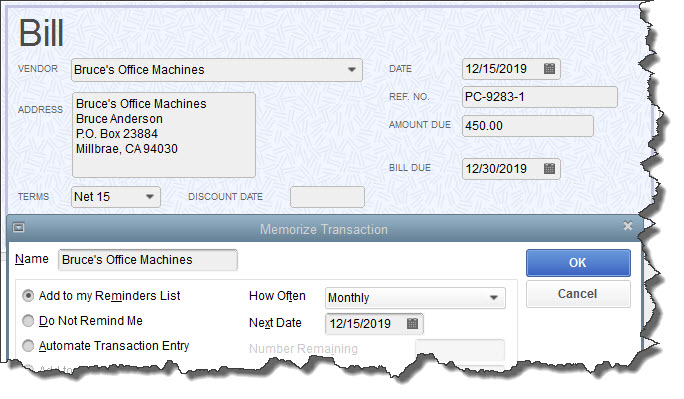
To memorize a transaction, you first need to create a model for it. Let’s say you have a monthly bill for $450 that’s paid to Bruce’s Office Machines. You’d click Enter Bills on the home page or open the Vendors menu and select Enter Bills. Fill in the blanks and select from drop-down lists to create the bill. Then click Memorize in the horizontal toolbar at the top of the form.  This window will open.
Before you can Memorize a transaction, you first have to create a model (template) for it.
The vendor’s name will already be filled in on the Memorize Transaction screen. Look directly below that. There are three ways that QuickBooks can handle these Memorized Transactions when one of their due dates is approaching:
  • Add to my Reminders List. If you click the button in front of this option, the current transaction will appear on your Reminders List every time it’s due. You might request this for transactions that will change some every time they’re processed, like a utility bill that’s always expected on the same day, but which has a different amount every month.
  • Do Not Remind Me. Obviously, QuickBooks will not post a reminder if you click this button. This is best used for transactions that don’t recur on a regular basis. Maybe you have a snow-shoveling service that you pay only when there’s a storm. So the date is always different, but everything else is the same.
  • Automate Transaction Entry. Be very careful with this one. It’s reserved for transactions that are identical except for the issue date. They don’t need your approval – they’re just created and dispatched.
Click the down arrow in the field to the right of How Often and select the correct interval. Then click the calendar icon to pick a date for the next occurrence. If you have selected Automate Transaction Entry, the grayed-out lines below Next Date contain fields for Number Remaining and
Days in Advance to Enter.
How Does QuickBooks Know?
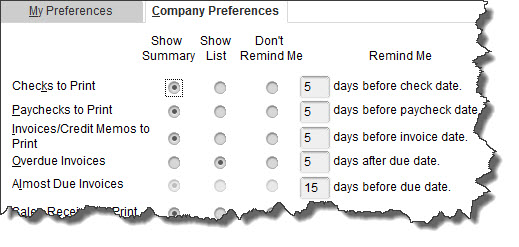
Obviously, you’ll want advance warning of transactions that will require processing. QuickBooks lets you specify how many days’ notice you want for each type. Open the Edit menu and select Preferences. Click Reminders in the left vertical pane, then the Company Preferences tab. You can tell QuickBooks whether you want to see a summary in each category or a list or no Reminder. Then you can enter the number of days’ warning you want.
 
QuickBooks lets you specify the content and timing 
of your Reminders.
Working with Memorized Transactions
Once you’ve created some Memorized Transactions, you will undoubtedly need to review them at some point. Open the Lists menu and select Memorized Transaction List to see all the templates for recurring bills, invoices, etc., that you’ve defined. Right-click on one you want to work with, and this menu appears:
The Memorized Transaction List with the right-click 
window open
 
You have several options here. If your list is so long that it fills multiple screens, you can Find the transaction you’re looking for. If you’ve created multiple related transactions, you can save them as a New Group. You can also Edit, Delete, and Enter Memorized Transactions.
Anytime you’re letting QuickBooks do something on its own, it’s critical that you thoroughly understand the mechanics of setting the process up. We’d be happy to go over the whole topic of Memorized Transactions with you, or any other aspect of QuickBooks operations.
If you plan to have multiple employees using QuickBooks, you can limit their access to specific areas.
 
Controlling access to your QuickBooks company file is easy when you’re a one-person accounting department. You simply use one password to protect your data.
But when you add new employees to the mix, do you want them to have access to absolutely everything in QuickBooks? Probably not. You have confidence in your employees or you wouldn’t have hired them. But this isn’t solely a matter of trust. It’s just good business practice to restrict individuals to specific areas and responsibilities, no matter what the application.
That’s why QuickBooks has built-in tools to help you limit activity. Here’s how it works.
Identifying Users
 
Only the Amin user can add users.  To get started, open the
Company menu and scroll down the list to highlight
Set Up User Names and Passwords. On the slide-out menu, select  Set Up Users. You will need to enter your Admin password here.  The  User List window will open, and you should see your own entry as  Admin. Click  Add User.
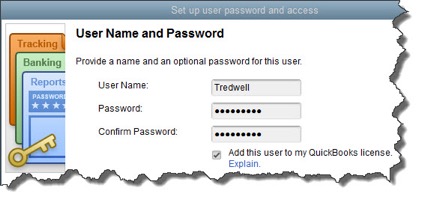
To give an employee access to QuickBooks, enter a User Name for him or her here, then a password.
The Setup user password and access window will open.
Fill in those fields.
 
Click Next. In the window that opens, you’ll define the access level for your new user. Your options here are:
  • All areas of QuickBooks,
  • Selected areas of QuickBooks, or,
  • External accountant (you can grant us access to all areas of the software except for those that contain sensitive customer data, like credit card numbers).
Click the button in front of the second option, then Next.
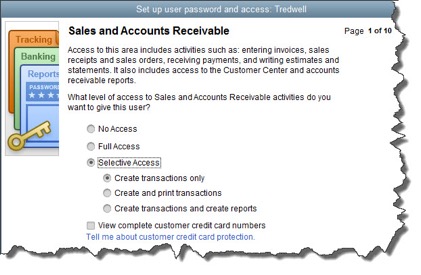
You can specify the access rights for individual employees in numerous areas.
The image above shows the first screen of 10 that display the levels of access available in many individual areas of QuickBooks. Be sure to read the whole page carefully before assigning rights. Here, for example, you’re not just allowing the employee to enter sales and A/R transactions. You’re also deciding whether to grant him or her permission to view the Customer Center and A/R reports. As you can see, your options are No AccessFull Access, and Selective Access (three levels there). Check the box below this list if you want the employee to be able to View complete customer credit card numbers.
When you’re finished there, click Next to specify your similar preferences for Purchases and Accounts ReceivableChecking and Credit CardsInventoryTime Tracking, and Payroll and Employees. The next two screens contain more complex concepts, but you’ll follow the same process to express your wishes. They are:
  • Sensitive Accounting Activities, like funds transfers, general journal entries, and online banking tasks
  • Sensitive Financial Reporting, which allows access to all QuickBooks reports. The option you choose here overrides all other reporting restrictions that you’ve specified for the employee.
Finally, you’ll tell QuickBooks whether this person can change or delete transactions in designated areas and whether he or she can do so to transactions that were recorded before the closing date (if this applies). The last screen displays a summary of the access and activity rights you’ve given the employee. Check them carefully, and if they’re correct, click Finish.
Housekeeping Options
 

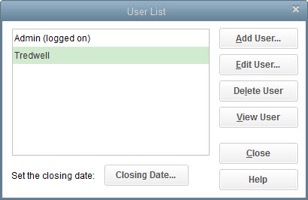
The User List window
QuickBooks then takes you back to the User List window, where you’ll see the employee’s name displayed. If you want to Add, Edit, Delete, or View a user, make sure the correct name is highlighted and click the button for the desired action.
Caution: Do not delete users.  There is an audit trail to teach which user performed certain tasks in the QuickBooks file and you will want to keep the name to preserve the integrity of 
the audit trail.
If you’re just now looking to add your first employee to QuickBooks or if you’re starting to outgrow the user limit, give us a call. There are more issues to consider when you take on multi-user access. We’d be happy to discuss them with you.
Preferences in QuickBooks
 
Before you start entering data, make sure QuickBooks is set up appropriately for your company.
 
QuickBooks was designed to serve the needs of millions of small businesses. To do that, it had to include the tools and processes suitable for a wide variety of companies. Intuit recognized that every organization is unique, so your copy of QuickBooks can be customized in ways that make it work best for  you
and  your company.
You could just dive in and start adding records and transactions, but we recommend you do some setup first. If you don’t, you may run into some issues later, such as finding that some features you need haven’t been turned on or that QuickBooks is simply not doing some things the way you do. The good news is that you can change many of these.
 
Getting There
QuickBooks refers to these options as Preferences. You’ll find them by opening the Edit menu
and selecting Preferences.
  
To start customizing QuickBooks so it works best for you, open the
Edit menu and choose Preferences.
 
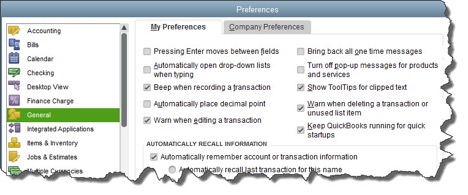
As you can see, the left vertical pane contains a list of Preferencetypes. Click on any of these to change the option screens to the right. Click both the tabs labeled My Preferences and Company Preferences to make sure you see everything that’s displayed for each type (sometimes one will have no choices).
Critical Areas
We recommend that you look through all of QuickBooks’ Preferences and change any that don’t fit your company. Some simply have to do with the way QuickBooks displays information and how it functions, but others have direct impact on your accounting work. As always, we’re available if you have questions here and when in doubt, check wth your tax preparer to be sure.
There are many that you will probably want to visit. They may have numerous options, but here’s some of what you can establish in each:
  • Accounting. Do you want to use account numbers & classes?
  • Checking. Which accounts should QuickBooks automatically use for tasks like Open the Pay Bills, Open the Make Deposits, and Open the Create Paychecks?
  • Finance Charge. Will you be assessing finance charges on late payments from customers? What’s the interest rate, minimum finance charge, and grace period?
  • Items & Inventory. Do you want inventory and purchase orders to be active?
  • Multiple Currencies. Does your company do business using other currencies?  This preference is NOT reversible, it cannot be turned off once it is turn on – be sure that you  know this!
  • Payments. Can customers pay you online? What methods can they use?
  • Payroll & Employees. Will you be processing payroll   using QuickBooks?
  • Sales & Customers. Do you want to use sales orders? How should QuickBooks handle invoices when there are time and costs that need to be added?
  • Reminders.  Ask QuickBooks to track critical dates and tasks and remind you of them.
You can see why it’s important to study QuickBooks’ Preferencesearly on. It’ll help you avoid unnecessary roadblocks and ensure that your company’s needs are reflected well in the software.
What you need to know about Windows 10 and QuickBooks® 

I know that many of you are wondering if you should upgrade to the new Windows 10 operating system. It has been hard to ignore the constant reminders of this FREE upgrade. Every time we turn on our computers, there it is, asking us to Upgrade Now. Some of us have even had a surprise automatic installation of the newest operating system while we were sleeping!

Microsoft is offering this software for free until the end of July 2016, after which they are going to charge a fee – currently starting at $149 per system for the Home Edition – they have not yet released any pricing for the Professional versions of the software. If you are currently running Windows 8/8.1, then you may wish to consider the update to Windows 10, but please read further.

At New Business Directions, LLC, we have decided to stay with the Windows 7 platform and not to upgrade to Windows 10. Microsoft will still be issuing updates for Windows 7 until 2021 but will not offer any phone or online support for the product.

There have been many issues with the installation of Windows 10 especially in a networked environment and the software needs a lot of tweaking to network correctly and play with other devices – such as printers. We see no real advantage to updating to Windows 10 and we have found it to actually hinder some programs from running properly, specifically QuickBooks and Point of Sale.
If you do decide to upgrade to Windows 10, we will gladly assist in the installation to smooth the transition. Ultimately, the decision is yours.
TSheets Pros
The New Business Directions Team is bringing the #1 employee-rated and requested Time Tracking Software to you. Sondra Love, Wayne Kukuruza, and Rhonda Rosand, CPA have recently joined the 6000+ TSheets PRO community by participating in an exclusive TSheets PRO certification course accredited by CPAacademy.org.So what exactly is TSheets? TSheets is a time tracking and scheduling software designed for businesses that track, manage, and report time. TSheets provides the alternative to paper timesheets and/or punch cards to simplify human resource and data processing roles for companies of all sizes.

But here’s the best part, TSheets fully integrates with QuickBooks by syncing accurate timesheets to your QuickBooks file and eliminating manual, duplicate time entries. Tracked and approved time can now be easily exported to either QuickBooks® Online or Desktop with just one click. Management can then use their favorite tools within QuickBooks to process payroll, calculate job costing, and create invoices in a more simplified work flow.

TSheets is also a scheduling software making it faster and easier to build and share schedules with employees, assign jobs, and alert shifts while increasing profitability and improving communication. In other words, we want to keep your workforce running like a well-oiled machine.

Oh, and have I mentioned their amazing customer service department? The TSheets team who’s behind the product is just as amazing as the software itself. Customer service team is passionate about their customers and provides exceptional support in times of need. They make your entire TSheets experience FUN and might even give you a smile or two.

Are you ready to sign up? To find out more about TSheets, email sondra@newbusinessdirections.com or give us a call at (603) 356-2914.
Note: As of February 2021, TSheets is now QuickBooks Time. To learn more about this update, visit https://quickbooks.intuit.com/time-tracking/
Sondra Love and Rhonda Rosand, CPA of New Business Directions, LLC took to the sky last week to attend the 8th annual Scaling New Heights 2016 conference at Atlantis Paradise Island Resort located on Paradise Island, Bahamas.

This year’s theme was “epic” designed as the epic conference to empower small business advisors to develop and sustain the epic practice that distinguishes itself and embraces the key differences that separate ProAdvisors around the good, the great and the “epic.”

Sessions
The four-day conference kicked off each morning with Power Breakfast Sessions followed by main stage presentations with keynote speakers such as Daymond John of Shark Tank, Joe Buissink of Canon Explorer of Light, and author Mike Michalowicz of Profit First. In between general session, attendees dispersed around the conference center into rooms where cutting edge training sessions were being held. Training sessions were broken down into 5-tracks for Practice and Professional Development, Practice Growth, In-Depth QuickBooks Training, ProAdvisor Certification Training and QB Integrated Apps.

If you were fortunate enough to attend, Rhonda Rosand, CPA taught a 100-minute informative training session titled Successful Implementations from Initial Contact through Ongoing Support on Sunday, May 22nd. As the evenings came around, networking sessions were held consisting of ICB Bookkeeper’s Symposium, the Woodard Network Social hosted within Atlantis’ stunning marine life exhibit, The Dig and of course, the infamous TSheets dance Party on TSheets Tuesday.


Sondra’s Take on Vendors
 In between training, I was able to visit the exhibit ballroom which held over 90 vendors, some of which were very familiar. I came across software I use everyday to make my work flow run smoothly and now I am able to put a face to the product. For example, SmartVault allows me to access files anywhere, anytime and from any device. I also have the capability to securely share files with clients and our team.

While at Scaling New Heights, I learned the importance of technology and how it relates to strengthening our firm and supporting our clients.

The advanced level training will allow us to continue to assist our clients in streamlining the process of making money and creating order out of chaos. We would like to thank all of the members of the Woodard Group for another successful event at Scaling New Heights and look forward to next years’ conference in Orlando, FL.
Note: As of February 2021, TSheets is now QuickBooks Time. To learn more about this update, visit https://quickbooks.intuit.com/time-tracking/

Rhonda

New Business Directions, LLC is pleased to announce the recognition of Rhonda Rosand, CPA as an Insightful Accountant Top 100 ProAdvisor for 2016. This will be Rosand’s third consecutive year receiving the award out of tens of thousands of ProAdvisors in the country.

Leading Top 100 ProAdvisors leverage the ProAdvisor Program to better serve their clients, grow their own business, deliver great client service, and increase their knowledge and understanding of the Intuit ecosystem.2016_top100-2016This years award ceremony will take place at the Scaling New Heights 2016 conference at Atlantis Paradise Island Resort in the Bahamas.

Congratulations Rhonda!

  Say goodbye to Winter and hello Spring! The seasons are changing before our eyes and you’ve probably heard a few remarks about tax/mud season, upcoming Summer plans and of course everyone’s favorite thing to do; Spring cleaning. Okay, maybe it’s not everyone’s favorite thing to do but here is some helpful advice for Spring cleaning your QuickBooks file.

It’s not hard to see when your home needs a good cleaning but QuickBooks company file errors are harder to recognize so here are a few errors to watch for:

  • Performance problems
  • Inability to execute specific processes
  • Occasional program crashes
  • Missing data (accounts, names, dates)
  • Refusal to complete transactions
  • Mistakes in reports
Figure 1: If some transactions won’t go through or QuickBooks shuts down when you click on the save button, you may have a corrupted company file.
Be Proactive

One thing you can do on your own is to start practicing good preventive medicine to keep your QuickBooks company file healthy. Once a month or so, perhaps at the same time you reconcile your bank accounts, do a manual check of your major Lists.

Run the Account Listing report (Lists, Chart of Accounts, and Reports). Ask yourself: Are all of your bank accounts still active? Do you see accounts that you no longer use or which duplicate each other? You may be able to make them inactive or merge duplicates. Be very careful here. If there’s any doubt, leave them there. Do not try to fix the Chart of Accounts on your own. Let us help or speak with your tax preparer. Do not make accounts with balances inactive.
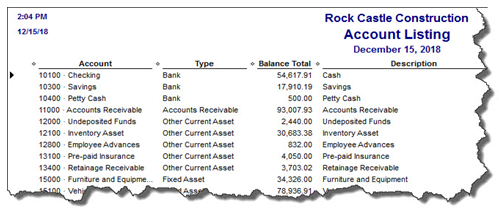
Figure 2: You might run this report periodically to see if it can be abbreviated.

If there are Customers and Vendors that have been off your radar for a long time, consider removing or making them inactive – once you’re sure your interaction with them is history. Same goes for Items and Jobs. Do not remove customer jobs with balances. Go through the other lists in this menu with a critical but conservative eye.
 

A Risky Utility

One of the reasons QuickBooks files get corrupt is simply because they grow too big. That’s either a sign of your company’s success or of a lack of periodic maintenance. QuickBooks does contain some built-in tools to be run occasionally to minimize your file size. QuickBooks contains a Condense Data utility that can do this automatically. But just because QuickBooks offers this tool doesn’t mean that you should use it on your own.

The program’s documentation for this utility contains a list of warnings and preparation steps a mile long. We recommend that you do not use this tool. Same goes for Verify Data and Rebuild Data in the Utilities menu. If you lose a significant amount of company data, you can also lose your company file. It’s happened to numerous businesses.
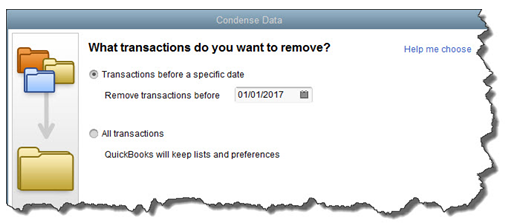
Figure 3:  Yes, QuickBooks allows you to use this tool on your own. But if you really want to preserve the integrity of  your data, let us help.

The best thing you can do if you notice problems like this cropping up in QuickBooks – especially if you’re experiencing multiple ones – is to contact us. We understand the file structure of QuickBooks company data, and we have access to tools that you don’t. We can analyze your file and take steps to correct the problem(s).

The Alternatives

Your copy of QuickBooks may be misbehaving because it’s unable to handle the depth and complexity of your company. It may be time to upgrade. If you’re using QuickBooks Pro, consider a move up to Premier. And if Premier isn’t cutting it anymore, consider QuickBooks Enterprise Solutions.

There’s cost involved, of course, but you may already be losing money by losing time because of your version’s limitations. All editions of QuickBooks look and work similarly, so your learning curve will be minimal.

Also, try to minimize the number of open windows that are active in QuickBooks. That will improve your performance. And what about your hardware? Is it getting a little long in the tooth? At least consider adding memory, but PCs are cheap these days. If you’re having problems with many of your applications, it may be time for a hardware upgrade.

We Are Here for You

We’ve suggested many times that you should contact us for help with your spring cleanup. While that may seem self-serving, remember that it takes us a lot less time and money to take preventive steps with your QuickBooks company file than to troubleshoot a broken one.

Now open those windows and doors, go outside and enjoy the upcoming Spring weather!