 New Business Direction LLC
Your “Chart of Accounts” is the list of accounts in your accounting software and forms the basis for all reports. It is the foundation of your accounting system. The accounts are listed in your reports, and the totals allow you to determine how much you’ve spent, made, own, or owe depending on the type of account.
It’s essential to create a list of accounts that you need in order to make better business decisions. Your chart of accounts needs to be designed intentionally. It needs to be short, sweet, and to the point. You don’t need a million accounts. If it hasn’t been, it’s never too late.
Two Types of Accounts
There are two major types of accounts:
- Balance sheet accounts that tell what you own and owe. These are determined by your checking accounts, inventory, and credit cards.
- Income statement accounts that tell you about current period operating results. These, in turn, have two major categories, income and expenses. For companies with inventory, expenses are further broken out into cost of goods sold and other expenses.
Three Purposes
A chart of accounts should meet three needs:
- Make it really fast for you to do your taxes
- Give you all sorts of “Aha’s”
- Allow you to spend far more time on revenue analysis than expense analysis because that’s where success lies for small businesses
Taxes
Your accounts should be the same as (or be able to be grouped into) the lines on your tax return. You can find a copy of the tax form you fill out. For example, a sole proprietor will use a Schedule C of the 1040, and a corporation will complete an 1120.
There are a few special needs, such as meals and entertainment which are only partially deductible, that you need to pay special attention to. We can help you with that.
Aha
As small business owners, we work with a gut feel, but when you see what you’ve made or spent in black and white, it takes on a whole new level of meaning. Your income statement and other reports should do that for you. If they don’t you may not have your accounts set up right.
Revenue
Think about how you want to see your revenue:
- By product line
- By major supplier
- By category of solution to the customer
- By customer type
- By service type
- By location (you can also use Class for this)
- By job
- By distribution method
We can help you brainstorm based on your industry and type of business.
Actionable Intelligence
If you’ve been putting all your revenue into one revenue account, it will be exciting the first time you see your new Profit and Loss statement.
If you’ve been breaking out your revenue but it hasn’t led to any actionable change in your business, then there may be a better way to break it out.
If you’re happy with the way your revenue is broken out, then think about how you can take it to the next level.
Once you see your new chart of accounts, you will likely have even more questions. The chart of accounts can be an evolving entity, designed to serve your business needs.
The security breach at Equifax a few months ago left many people thinking once again about identity theft. The best thing is to do everything you can to prevent it from happening to you. Here are a few tips to help you reduce your risk of being a victim of identity theft as well as how to reduce the damage from security breaches of your personal data from sources you can’t control.
Discontinue paper statements that are mailed.
Paper bank, brokerage, and credit card statements that are mailed can be misboxed, intercepted, lost, or stolen, and the information can fall into dishonest hands. Instead, discontinue paper statements, and access them via your online account where you can review, print, or save them each month for your records.
Rent a private mailbox.
If you have trouble with mail theft in your area and can’t check your mailbox as soon as the mail is delivered, consider renting a post office box or a private mailbox. These are especially handy if you travel a lot or have many packages delivered and no one is home to sign for them. They cost up to $300 per year, and you can find them at places like The UPS Store, Mailboxes Etc., Postal Annex, or your local post office.
Shred your trash.
If you throw out junk mail offers for new credit cards or bank accounts, be sure to shred that paper and anything else that might contain private information.
Don’t email secure data.
Credit card numbers, social security numbers, and passwords should not be sent via email unless the email is encrypted or secure. The odds of something happening are low but could happen.
Use different passwords for different account groups.
Even the most secure-minded person uses the same password for many different accounts. You can too, but be smart about it. Use a unique password for your bank that you don’t use anywhere else. You might use the same password for all of your social media accounts because it’s just easier. Or another one for all of your free accounts; just don’t use those for any banking or credit card activity. Be smart about your password use, and make your password difficult based on the level of information that is at risk.
Choose hard passwords.
It’s painful, but choosing long, hard passwords can help throw off thieves. Include at least one capital letter, one special character, and one number in your password. Make it nice and long. And don’t use common words, your birthday, parts of your social security, or your phone number in your password. When it’s provided, use a random password generator. And don’t let your browser automatically save your banking passwords for you.
Close inactive accounts.
If you no longer use an account you signed up for, close it rather than let it linger. It will reduce your risk. Be mindful, though; if you close some credit card accounts, your credit score could be adversely affected even if there has been no activity for a while.
Consider freezing your credit.
If you don’t need a new credit card or loan or are not planning a large purchase soon, consider freezing your credit. When your credit is frozen or secure, no one can run checks against it. Any identity thieves would not be able to take a loan out in your name.
Avoid unsecured wifi.
Although the ambiance is nice at a Starbucks, the wifi is not secure, and connecting and doing your work all day long there is a big security risk.
Monitor all account activity.
Check your bank and credit card accounts frequently, and turn on all alerts and fraud notifications. You can turn on alerts for when transactions exceed a dollar amount and when your bank balance goes below a certain amount. Getting emails or text messages on your activity can help you stay on top of things.
Consider identity theft insurance.
Identity theft insurance is now common, and you can get it and fraud protection for your business as well as for individuals. If you are a victim, it reimburses you for the cost of restoring your credit. Check with your local insurance agent for more information.
We hope it never happens to you. Try these tips to reduce your risk of identity theft.
Working with Checks in QuickBooks
Online banking may get all the headlines, but many small businesses still insist on paper checks. QuickBooks can accommodate them.
“I don’t write checks anymore,” you hear a lot of people say these days. Debit cards, smartphone payment apps, and online banking have replaced the old paper checkbook for a lot of consumers.
That’s fine if you’re at Starbucks or the grocery store, but many small businesses still prefer to issue paper checks to pay bills, cover expenses, and make product and service purchases. QuickBooks provides tools that help you create, print, and track checks.
But you don’t just head to the Write Checks window every time something needs to be paid. There are numerous times when you would record a payment in a different area of the program. For example, if you’ve already created a bill in Enter Bills, you’d go to the Pay Bills screen to dispatch a check.
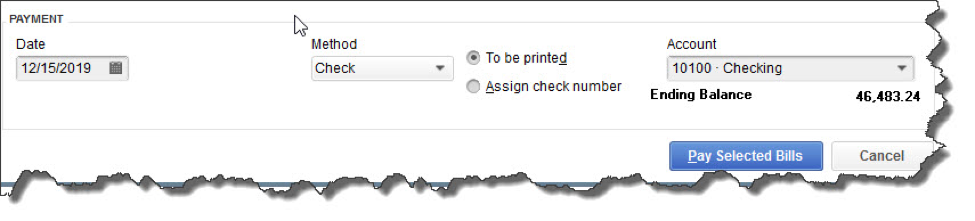
Once you’ve recorded a bill in Enter Bills, you need to visit the Pay Bills screen to dispatch a check. The image above shows the bottom of that screen.
Other examples here include:
- Issuing paychecks (click the Pay Employees icon),
- Submitting payroll taxes and liabilities (Pay Liabilities icon), and
- Paying sales taxes (Manage sales tax icon).
Simple Steps
Let’s say you asked an employee to go to an office supply store to pick up some copy paper because you ran short before your normal shipment came in. If you knew the exact amount it would cost, you could write a check directly to the shop. But the employee agrees to pay for it and be reimbursed.
Click the Write Checks icon on the home page. If the BANK ACCOUNT that’s showing isn’t the correct one, click the arrow to the right of that field and select the right one. Unless you’ve written a check to that employee before, he won’t be in the Vendor list that opens when you click the arrow to the right of PAY TO THE ORDER OF. Enter his name in that field.
The Name Not Found window opens. If this was a new vendor that you would be working with again, you’d click Set Up and follow the instructions in the step-by-step wizard that opened. Since this isn’t the case, click Quick Add. In the window that opens, click the button next to Vendor.
Note: If you’re using a payroll application, you already have an employee record for that individual, which would have filled in automatically when you started typing the name. Since this is a Non-Payroll Transaction, it won’t get mixed up with his payroll records as long as you assign the correct account.
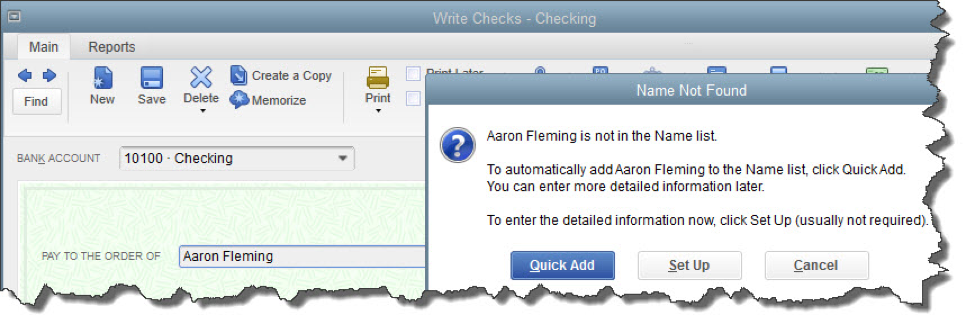
If you don’t want to create an entire record for the payee of a check, you can just click Quick Add.
QuickBooks will then return you to the check-writing screen, where you can verify the check number and date, and enter the amount. Fill in the MEMO field so you’ll remember the reason for the payment.
At the bottom of the screen, you’ll see a tabbed register. The Expenses tab should be highlighted and the amount of your check entered. Click the down arrow in the field under ACCOUNT to open the list, and select Office Supplies. The AMOUNT should fill in automatically. Not sure which account to select, and what the remaining three columns mean? Ask us.
Note: You would only enter the expense under the Items tab if you were buying inventory items or paying job-related costs.
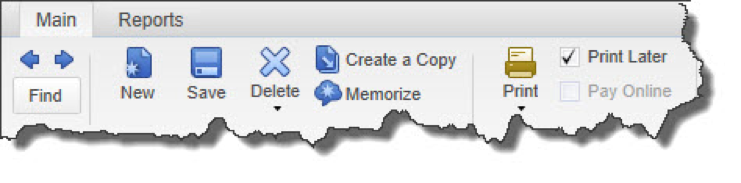
Warning: If you’re planning to print the check, be sure to check the Print Later box in the horizontal toolbar at the top of the screen.
When you’re finished, save the transaction. Since you want to pay the employee right away, click the Print Checks icon and click in the field in front of the correct check to select it, then click OK.
Easy, But Tricky
QuickBooks makes the mechanics of writing checks easy. Simple as it is, though, a lot can go wrong if you, for example:
- Issue a check from the wrong screen,
- Classify a check incorrectly, or,
- Skip a step.
We encourage you to set up a learning session with us if you’re new to check-writing in QuickBooks or are confused about any of its attributes. We’ll be happy to help ensure that your accounts payable activities will result in accurate record keeping.

If you spend a lot of time online using a web browser to view web sites or to work in online applications, then you may benefit from knowing these wonderful features about your browser software.
Bookmarks
All browsers support bookmarks, and hopefully you are already using this powerful feature. Which web pages do you need to visit on a daily basis? Those should be ones that have a place on your browser’s bookmark bar. Look for your browser menu to find the bookmark commands you can use to set them up.
Avoid bookmarking your bank, brokerage, and credit card web pages for security reasons, but most everything else is fair game and will save you a lot of time.
Browse Incognito
Need to browse privately? Many browsers offer incognito browsing which disables browsing history and the web cache. Find this command in your browser menu.
People
Roughly two-thirds of the population use Google Chrome as their browser, and the People feature is unique to Chrome. If you have a situation where you have multiple accounts with one software provider, Chrome allows you to have an entirely separate browser session going on for each person.
Let’s say you’re a social media consultant and manage the Facebook accounts for ten clients. You can set up a “person” in Chrome, one for each client. You then can have ten browser sessions going for each of your clients without having to log out and log back in to each Facebook account.
Do you volunteer at a nonprofit where you manage accounts for them? Set them up as a new person, and you can log in to all of their accounts without impacting yours.
Pretend that different departments of your business are separate people. Set up Accounting as a person in Chrome and log in to all of your accounting apps. Or set up Marketing as a person and log in to all your marketing and social media apps using this person.
Set up a different bookmark bar for each person, pouring rocket fuel on your time savings and decluttering you bookmark bars at the same time.
Set up a new person using the Manage People section in Settings. Toggle between People by using the button on the tab bar at the top right of your screen just to the left of the Minimize command.
Extensions
Many browsers have extensions or plug-ins which expand the functionality of the browser. Here are couple of favorites.
- Gmail Offline – allows Gmail users to view their email when they don’t have an Internet connection.
- AdBlock Plus – tired of ads popping up? Get this extension to thwart them.
- Momentum – provides a customized, motivational dashboard with weather, time, and daily to-do items.
- Pocket – allows you to save articles and other content to read later or on your other devices.
Many of the software apps you use every day also have Chrome extensions you can use. Pinterest, Evernote, your anti-virus software, Hootsuite, and others have extensions you can check out and install.
Try these tips to learn your browser software better and become more productive while navigating the web.
Abandoned Property – What Is It? How Do We Account For It?

How many times have you written a check to someone, who either loses it or forgets to cash the check? After a certain amount of time, that check is considered stale and can no longer be presented to be cashed. It sits in your QuickBooks file uncleared on the bank statement reconciliation, now what?
You call the person, ask them to cash it. You may even re-issue the check so they have another chance to get paid, but then you find out they moved away and you don’t have their address, now what?
Uncashed checks to vendors, payroll checks to employees, contractors, dividends, and distributions to stockholders all are potential unclaimed or abandoned property. Every state has their own escheatment laws that require businesses and organizations to hand over to the state, the abandoned property that has been in their possession for a certain period of time. If a check goes uncashed, that does not mean the property no longer belongs to that individual and the obligation that the employer has to compensate the employee does not go away.
In the state of New Hampshire, you are required to notify the owner of the abandoned property. No more than 120 days prior to filing, all holders must send a written notice to the owner of the property having a value of $50.00 or more. In this notice you must verify the nature of the property and how to retrieve it and avoid abandonment to the state. If this attempt at notifying the owner is unsuccessful, you will then move forward to reporting the abandoned property to the state.
How to Report Abandoned Property in New Hampshire

To begin the process of reporting abandoned property, you must fill out the State of New Hampshire form for abandoned property which is Form T-1. Below is a link for your convenience to click on and review this form and/or print it.
https://www.nh.gov/treasury/documents/abandonded-propert-t1-form.pdf
For detailed instructions on how to fill out this form, we have also provided you the necessary link that will walk you through, step-by-step for filling out NH Form T-1.
https://www.nh.gov/treasury/documents/abandonded-property-t1-instructions.pdf
The first column on the form asks for the correct code for the property type. Here is a link that will show you which code is appropriate for your abandoned property.
https://www.nh.gov/treasury/documents/property-type-codes-t1-a.pdf
How to handle Abandoned Property in QuickBooks
It is important to remember that abandoned property does not belong to the company. That property is either owed to the state or owner. Uncashed checks should never be voided. Making sure your bank accounts are reconciled on a monthly basis will help you monitor uncashed checks. Once that property amount is sent to the state or given to the property owner, it can then be cleared from your bank reconciliation.
Sign up for our FREE newsletter
Tips & Tricks in QuickBooks®

